如果你在构建 检索增强生成(RAG)应用,你需要与你主题相关的最新数据——而不是教程里那份静态 PDF。但抓取真实文章意味着会遇到反爬虫墙与请求被拦截。即使拿到了数据,你仍需要完成切分、向量化、索引,以及把检索链路串起来。
本教程将把这些全部做完。Bright Data 负责发现并抓取任意主题的文章,Weaviate 负责存储与检索,你将用一个 Python 脚本获得带引用的答案。
TL;DR
将任意主题变成可搜索、可问答的知识库——由实时网页数据驱动,而不是依赖过时的训练数据。
- Bright Data SERP API 为你的主题找到真实文章 URL;Web Unlocker 负责抓取(即使是受反爬虫保护的网站也能抓取)。
- Weaviate 通过 Cohere 自动将文本块向量化,用混合搜索进行索引,并在一次 API 调用中生成带引用的答案。
- 运行
python3 pipeline.py,输入一个主题,几分钟内就能得到带引用的 RAG 答案。 - GitHub 上的完整源码——直接 clone 并运行。
获取你的 API keys,然后用你自己的主题试一试。
最终输出长这样:
3–5 分钟跑起来
如果你已经有 API keys,现在就可以运行流水线:
# 1. Clone the repo (requires Python 3.10+)
git clone https://github.com/triposat/weaviate-bright-data-rag.git
cd weaviate-bright-data-rag

# 2. Install dependencies
pip3 install -r requirements.txt

# 3. Create your .env file
cp .env.example .env
# Edit .env and fill in your API keys (see "Get your API keys" below)

# 4. Run it
python3 pipeline.py
流水线会询问主题,并自动发现你的 Bright Data zones。它会查找并抓取真实文章,将其切分并存入 Weaviate(通过 Cohere 自动向量化),运行 demo 查询,然后进入交互模式供你提出自己的问题。
获取 API keys(可免费开始)
你需要 3 个 API key——每个服务各 1 个。Cohere 与 Weaviate 无需信用卡;Bright Data 注册会提供免费试用额度。
1. Bright Data API key
创建一个 API key,并创建 2 个 zones:
- 在 brightdata.com 注册。
- 进入 Account Settings → Users and API keys。
- 创建一个新的 API key → 复制 → 在你的
.env文件中粘贴到BRIGHT_DATA_API_TOKEN字段。
该流水线还需要 2 个 zones:SERP API 与 Web Unlocker。你可以在 Proxies & Scraping → My Zones 查看是否已有。如果没有,创建它们:
- 进入 Proxies & Scraping → 选择 My Zones。
- 选择 Add → zone type 选择 SERP API → 随便命名(例如
serp)→ 保存。 - 再次选择 Add → zone type 选择 Unlocker API → 随便命名(例如
unlocker)→ 保存。
你不需要复制 zone 名称或密码。流水线会使用你的 API key 自动检测它们。
2. Cohere API key(免费)
Cohere 在此流水线中同时负责向量化(embedding)与生成(generation):
- 打开 dashboard.cohere.com。
- 使用 Google、GitHub 或邮箱注册——无需信用卡。
- 控制台会显示你的 Trial API key——复制它。
- Trial 套餐有速率限制但额度很友好(自动运行少于 20 次调用;每次交互提问会再增加 2 次)。
3. Weaviate Cloud 凭证(免费)
创建一个免费的 sandbox 集群来存储与查询向量:
- 打开 console.weaviate.cloud。
- 使用 Google 或 GitHub 注册。
- 选择 Create Cluster → 选择 Sandbox (Free) → 选择地区 → 创建。
- 等待约 30 秒,然后选择你的集群 → Details 标签页。
- 复制 REST Endpoint(你的集群 URL)以及 API Key。
注意:Sandbox 集群 14 天后会过期。如果过期,创建一个新的集群,并在你的 .env 文件中更新 URL 与 key。重新运行 pipeline.py 以重新导入数据。
拿到 3 个 key 后,回到 “3–5 分钟跑起来” 小节,按 clone/install 步骤操作即可。
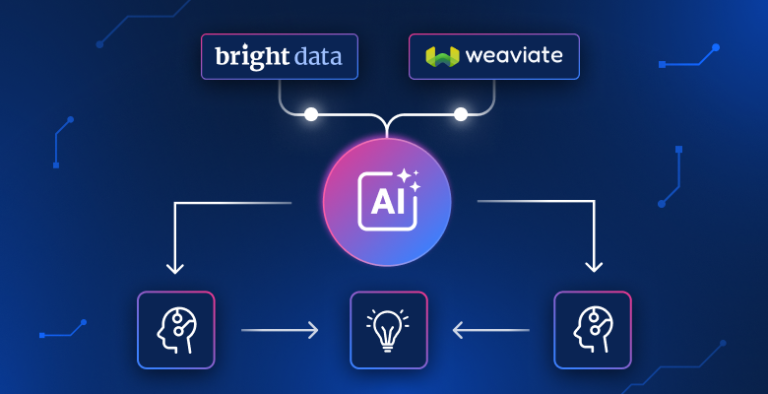
RAG 流水线端到端如何工作
该流水线包含 4 个步骤——数据采集、处理、向量存储与生成:
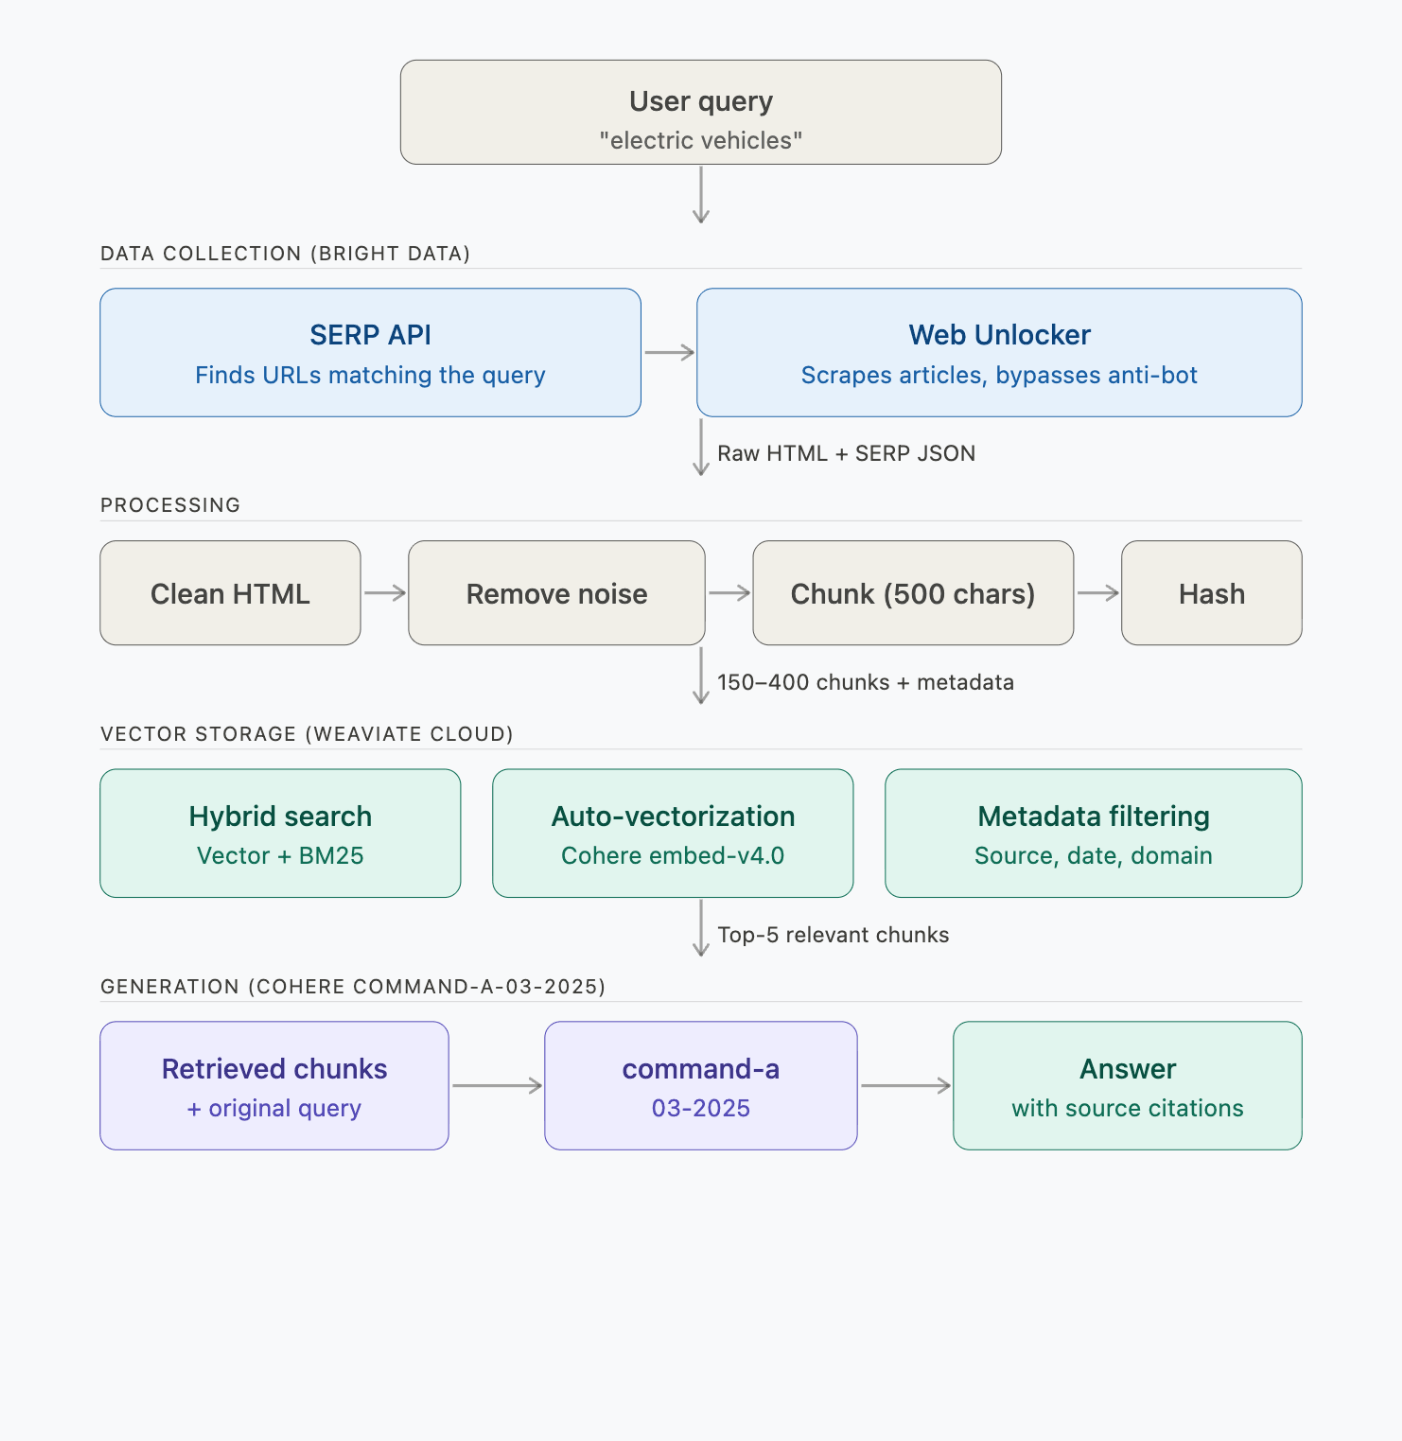
每个步骤会发起如下 API 调用:
| 步骤 | 运行内容 | 耗时 | API 调用 |
|---|---|---|---|
| 1. 查找 + 抓取 | Bright Data SERP + Web Unlocker | 约 2–3 分钟 | 2 次 SERP + 6 次抓取请求 |
| 2. 处理 + 切分 | 本地(BeautifulSoup + chunker) | <1 秒 | 0 |
| 3. 向量化 + 存储 | Weaviate → Cohere embed-v4.0 | 约 30–60 秒 | 约 150–400 次向量化(批量) |
| 4. 查询(3 个 demo) | Weaviate → Cohere command-a-03-2025 | 约 5 秒/查询 | 每次查询 1 次检索 + 1 次生成 |
Bright Data 在流水线中做什么
Bright Data 是网页数据平台。在这条流水线里,它承担两项角色:
| 产品 | 在本流水线中的作用 |
|---|---|
| SERP API | 你输入主题后,SERP API 搜索 Google 并返回真实文章 URL——无需硬编码 URL |
| Web Unlocker | 每个主题抓取 6 篇文章(包含带反爬虫保护的网站)——每篇约 20 万到 180 万字符 |
该流水线使用 SERP API 与 Web Unlocker。其他数据采集方式请参考 Bright Data 完整产品列表。
为什么 RAG 要用 Bright Data
以下是在为 RAG 抓取数据时真正重要的点:
- 可靠抓取。Web Unlocker 会自动处理重试、IP 轮换与浏览器指纹,避免流水线运行中途卡在反爬虫页面。
- LLM 友好输出。Crawl API 可返回干净的 Markdown(而非原始 HTML),减少向量化流水线的预处理成本(本教程使用 Web Unlocker + BeautifulSoup,但若你不需要原始 HTML,Crawl API 会更快)。
- 规模化。本教程抓取 6 篇文章;生产中你可能需要 6,000 篇。Bright Data 的AI 基础设施支持该规模下的并发抓取,而你无需修改代码。
- 合规。Bright Data 符合 GDPR 与 CCPA,并在授予完整网络访问前要求身份验证。
Weaviate 在流水线中做什么
Weaviate 是一个开源的向量数据库。它可在一次 API 调用中同时完成检索与生成,因此你无需单独调用 LLM。
在这里,Weaviate 存储抓取后的 chunks,并通过 Cohere 将其向量化。你发起查询时,它会执行混合搜索,并通过其生成式搜索 API 生成答案。
| 特性 | 在本流水线中的工作方式 |
|---|---|
| 混合搜索 | 通过可调的 alpha 参数,将语义向量(70%)与 BM25 关键词匹配(30%)结合 |
| 集成式生成搜索 | 检索 Top-5 chunks,并在一次 generate.hybrid() 调用中生成带引用的答案 |
| 自动向量化 | 导入时由 Weaviate 自动调用 Cohere embedding API——你无需编写任何 embedding 代码 |
| 元数据过滤 | 在每个 chunk 旁存储 source URL、域名、抓取时间戳与内容类型 |
Weaviate 的规模化能力
Weaviate 还有一些本流水线未用到但在规模化时很重要的特性:
- BSD 3-Clause 许可证——需要时可自建部署或 fork
- 多种部署方式——Weaviate Cloud(免费 sandbox)、Dedicated Cloud、自建 Kubernetes
- 多租户(Multi-tenancy)——每个节点支持 50,000+ 租户,适用于 SaaS
- 旋转量化(Rotational quantization)——在 98–99% 召回率下实现 4 倍向量压缩
逐步构建 RAG 流水线
下面每一步展示 pipeline.py 中的核心逻辑。完整源码在 GitHub。
项目初始化与导入
首先导入依赖,并从你的 .env 文件加载凭证:
import os
import sys
import time
import hashlib
import requests
import urllib3
from urllib.parse import quote
from datetime import datetime, timezone
from dotenv import load_dotenv
from bs4 import BeautifulSoup
import weaviate
from weaviate.classes.init import Auth
from weaviate.classes.config import Configure, Property, DataType

urllib3.disable_warnings()
load_dotenv()

# Load credentials from .env
COHERE_API_KEY = os.getenv("COHERE_API_KEY")
WEAVIATE_URL = os.getenv("WEAVIATE_URL")
WEAVIATE_API_KEY = os.getenv("WEAVIATE_API_KEY")
BD_API_TOKEN = os.getenv("BRIGHT_DATA_API_TOKEN")

COLLECTION_NAME = "WebResearch"


def clean_url(url):
    """Fix nbsp artifacts in URLs (from   encoding issues in some sites)."""
    cleaned = url.replace("nbsp", "-")
    while "--" in cleaned:
        cleaned = cleaned.replace("--", "-")
    return cleaned


def clean_generated_text(text):
    """Clean LLM-generated text for terminal display."""
    text = text.replace("**", "")
    text = text.replace("nbsp", "-")
    while "--" in text:
        text = text.replace("--", "-")
    return text
在开始之前,流水线会检查你的 .env 文件中是否已设置所有必需凭证:
def validate_env():
    """Check all required environment variables are set."""
    missing = []
    if not BD_API_TOKEN:
        missing.append("BRIGHT_DATA_API_TOKEN")
    if not COHERE_API_KEY:
        missing.append("COHERE_API_KEY")
    if not WEAVIATE_URL:
        missing.append("WEAVIATE_URL")
    if not WEAVIATE_API_KEY:
        missing.append("WEAVIATE_API_KEY")

    if missing:
        print("ERROR: Missing environment variables in .env file:")
        for var in missing:
            print(f"  - {var}")
        # ... prints example .env format ...
        print("\nSee the blog post for how to get each key (all free to start).")
        sys.exit(1)
你不需要配置 zone 名称或密码——流水线会基于你的 API key 自动发现它们:
def discover_bright_data_credentials():
    """
    Auto-discover Bright Data proxy credentials from the API key.
    Works for any Bright Data account. No hardcoded values needed.
    """
    headers = {"Authorization": f"Bearer {BD_API_TOKEN}"}

    # 1. Get active zones
    zones = requests.get(
        "https://api.brightdata.com/zone/get_active_zones", headers=headers
    ).json()

    # Pick the first zone of each type (if you have multiple, set the name explicitly)
    zone_names = {}
    for z in zones:
        if z["type"] not in zone_names:
            zone_names[z["type"]] = z["name"]

    # "unblocker" is the API name for the Web Unlocker product
    unlocker_zone = zone_names.get("unblocker")
    serp_zone = zone_names.get("serp")

    # 2. Get zone passwords
    unlocker_pwd = requests.get(
        f"https://api.brightdata.com/zone/passwords?zone={unlocker_zone}",
        headers=headers,
    ).json()["passwords"][0]

    serp_pwd = requests.get(
        f"https://api.brightdata.com/zone/passwords?zone={serp_zone}",
        headers=headers,
    ).json()["passwords"][0]

    # 3. Get customer ID (the cost endpoint returns {customer_id: cost_data})
    cost = requests.get(
        f"https://api.brightdata.com/zone/cost?zone={unlocker_zone}",
        headers=headers,
    ).json()
    customer_id = list(cost.keys())[0]

    return customer_id, unlocker_zone, unlocker_pwd, serp_zone, serp_pwd
克隆仓库、填上你的 API key,剩下的流水线会自动搞定。
步骤 1:用 Bright Data 查找并抓取文章
流水线使用 SERP API 来查找文章 URL,然后通过 Web Unlocker 抓取每篇文章:
def get_bd_proxy(customer_id, zone, password):
    """Build Bright Data proxy URL."""
    proxy = f"http://brd-customer-{customer_id}-zone-{zone}:{password}@brd.superproxy.io:33335"
    return {"http": proxy, "https": proxy}


def search_serp(query, customer_id, zone, password, num=10):
    """Search Google via Bright Data SERP API and return organic results."""
    proxies = get_bd_proxy(customer_id, zone, password)
    # brd_json=1 tells Bright Data to return structured JSON instead of raw HTML
    search_url = f"https://www.google.com/search?q={quote(query)}&brd_json=1&num={num}"

    try:
        # verify=False bypasses SSL verification for the BD proxy.
        # For production, install the Bright Data CA certificate instead:
        # https://docs.brightdata.com/general/account/ssl-certificate
        response = requests.get(search_url, proxies=proxies, timeout=30, verify=False)
        if response.status_code == 200:
            data = response.json()
            return [
                {
                    "title": item.get("title", ""),
                    "url": item.get("link", ""),
                    "description": item.get("description", ""),
                }
                for item in data.get("organic", [])
            ]
    except Exception as e:
        print(f"SERP error: {str(e)[:60]}", end=" ", flush=True)
    return []
search_serp() 会通过 Bright Data 的 SERP 代理发送查询,并返回结构化 JSON(标题、URL、描述)。brd_json=1 参数会让 Bright Data 帮你把 Google 的 HTML 解析成干净的 JSON。
接下来,find_articles_for_topic() 会对每个主题运行 2 次 SERP 查询并过滤结果;同时 scrape_url() 通过 Web Unlocker 抓取每个文章页面:
def find_articles_for_topic(topic, customer_id, serp_zone, serp_pwd):
    """Use Bright Data SERP API to find real article URLs about a topic."""
    search_queries = [
        f"{topic} latest news and trends",
        f"{topic} in-depth analysis guide",
    ]

    # Skip domains that return non-article content (videos, feeds, social media)
    skip_domains = {
        "youtube.com", "twitter.com", "x.com", "facebook.com", "instagram.com",
        "reddit.com", "linkedin.com", "wikipedia.org", "amazon.com", "tiktok.com",
    }
    skip_extensions = (".pdf", ".doc", ".ppt", ".xls", ".zip", ".mp4", ".mp3")

    all_urls = []
    seen_domains = set()
    serp_docs = []

    for query in search_queries:
        results = search_serp(query, customer_id, serp_zone, serp_pwd, num=10)

        if results:
            # Save SERP titles + descriptions as a document so the LLM can
            # reference article summaries even if the full scrape fails
            serp_text = f"Google search results for: {query}\n\n"
            for r in results:
                serp_text += f"Title: {r['title']}\nURL: {r['url']}\n"
                serp_text += f"Summary: {r['description']}\n\n"
            serp_docs.append({
                "url": f"https://google.com/search?q={quote(query)}",
                "html": serp_text,
                "scraped_at": datetime.now(timezone.utc).isoformat(),
                "is_serp": True,
            })

            # Extract article URLs (1 per domain for diversity)
            for r in results:
                url = r.get("url", "")
                if not url:
                    continue

                domain = url.split("/")[2] if "://" in url else ""
                base_domain = ".".join(domain.split(".")[-2:])

                if base_domain in skip_domains:
                    continue
                if any(url.lower().endswith(ext) for ext in skip_extensions):
                    continue
                if base_domain in seen_domains:
                    continue  # One article per domain for diversity

                seen_domains.add(base_domain)
                all_urls.append(url)

    return all_urls[:6], serp_docs  # Top 6 URLs


def scrape_url(url, customer_id, zone, password, retries=2):
    """Scrape a URL using Bright Data Web Unlocker with automatic retry."""
    proxies = get_bd_proxy(customer_id, zone, password)
    # No custom headers needed: Web Unlocker manages User-Agent,
    # cookies, and fingerprints automatically.

    for attempt in range(retries + 1):
        try:
            # verify=False bypasses SSL verification for the BD proxy.
            # For production, install the Bright Data CA certificate instead:
            # https://docs.brightdata.com/general/account/ssl-certificate
            response = requests.get(
                url, proxies=proxies, timeout=60, verify=False
            )
            if response.status_code == 200:
                return {
                    "url": url,
                    "html": response.text,
                    "scraped_at": datetime.now(timezone.utc).isoformat(),
                }
            else:
                print(f"HTTP {response.status_code}", end=" → ", flush=True)
        except Exception as e:
            print(f"Error: {str(e)[:60]}", end=" → ", flush=True)

        if attempt < retries:
            time.sleep(2)

    return None
collect_data() 将两步合并起来——SERP 找 URL,Web Unlocker 负责抓取:
def collect_data(topic, customer_id, unlocker_zone, unlocker_pwd, serp_zone, serp_pwd):
"""Find articles about the topic via SERP, then scrape them with Web Unlocker."""
documents = []
# 1. Use SERP API to find article URLs
urls_to_scrape, serp_docs = find_articles_for_topic(
topic, customer_id, serp_zone, serp_pwd
)
if not urls_to_scrape:
return []
# 2. Scrape the found articles with Web Unlocker
for i, url in enumerate(urls_to_scrape):
domain = url.split("/")[2] if "://" in url else url
print(f" ({i+1}/{len(urls_to_scrape)}) {domain}... ", end="", flush=True)
result = scrape_url(url, customer_id, unlocker_zone, unlocker_pwd)
if result:
documents.append(result)
print(f"OK ({len(result['html']):,} chars)")
else:
print("FAILED (skipping)")
# 3. Add SERP results as additional documents
documents.extend(serp_docs)
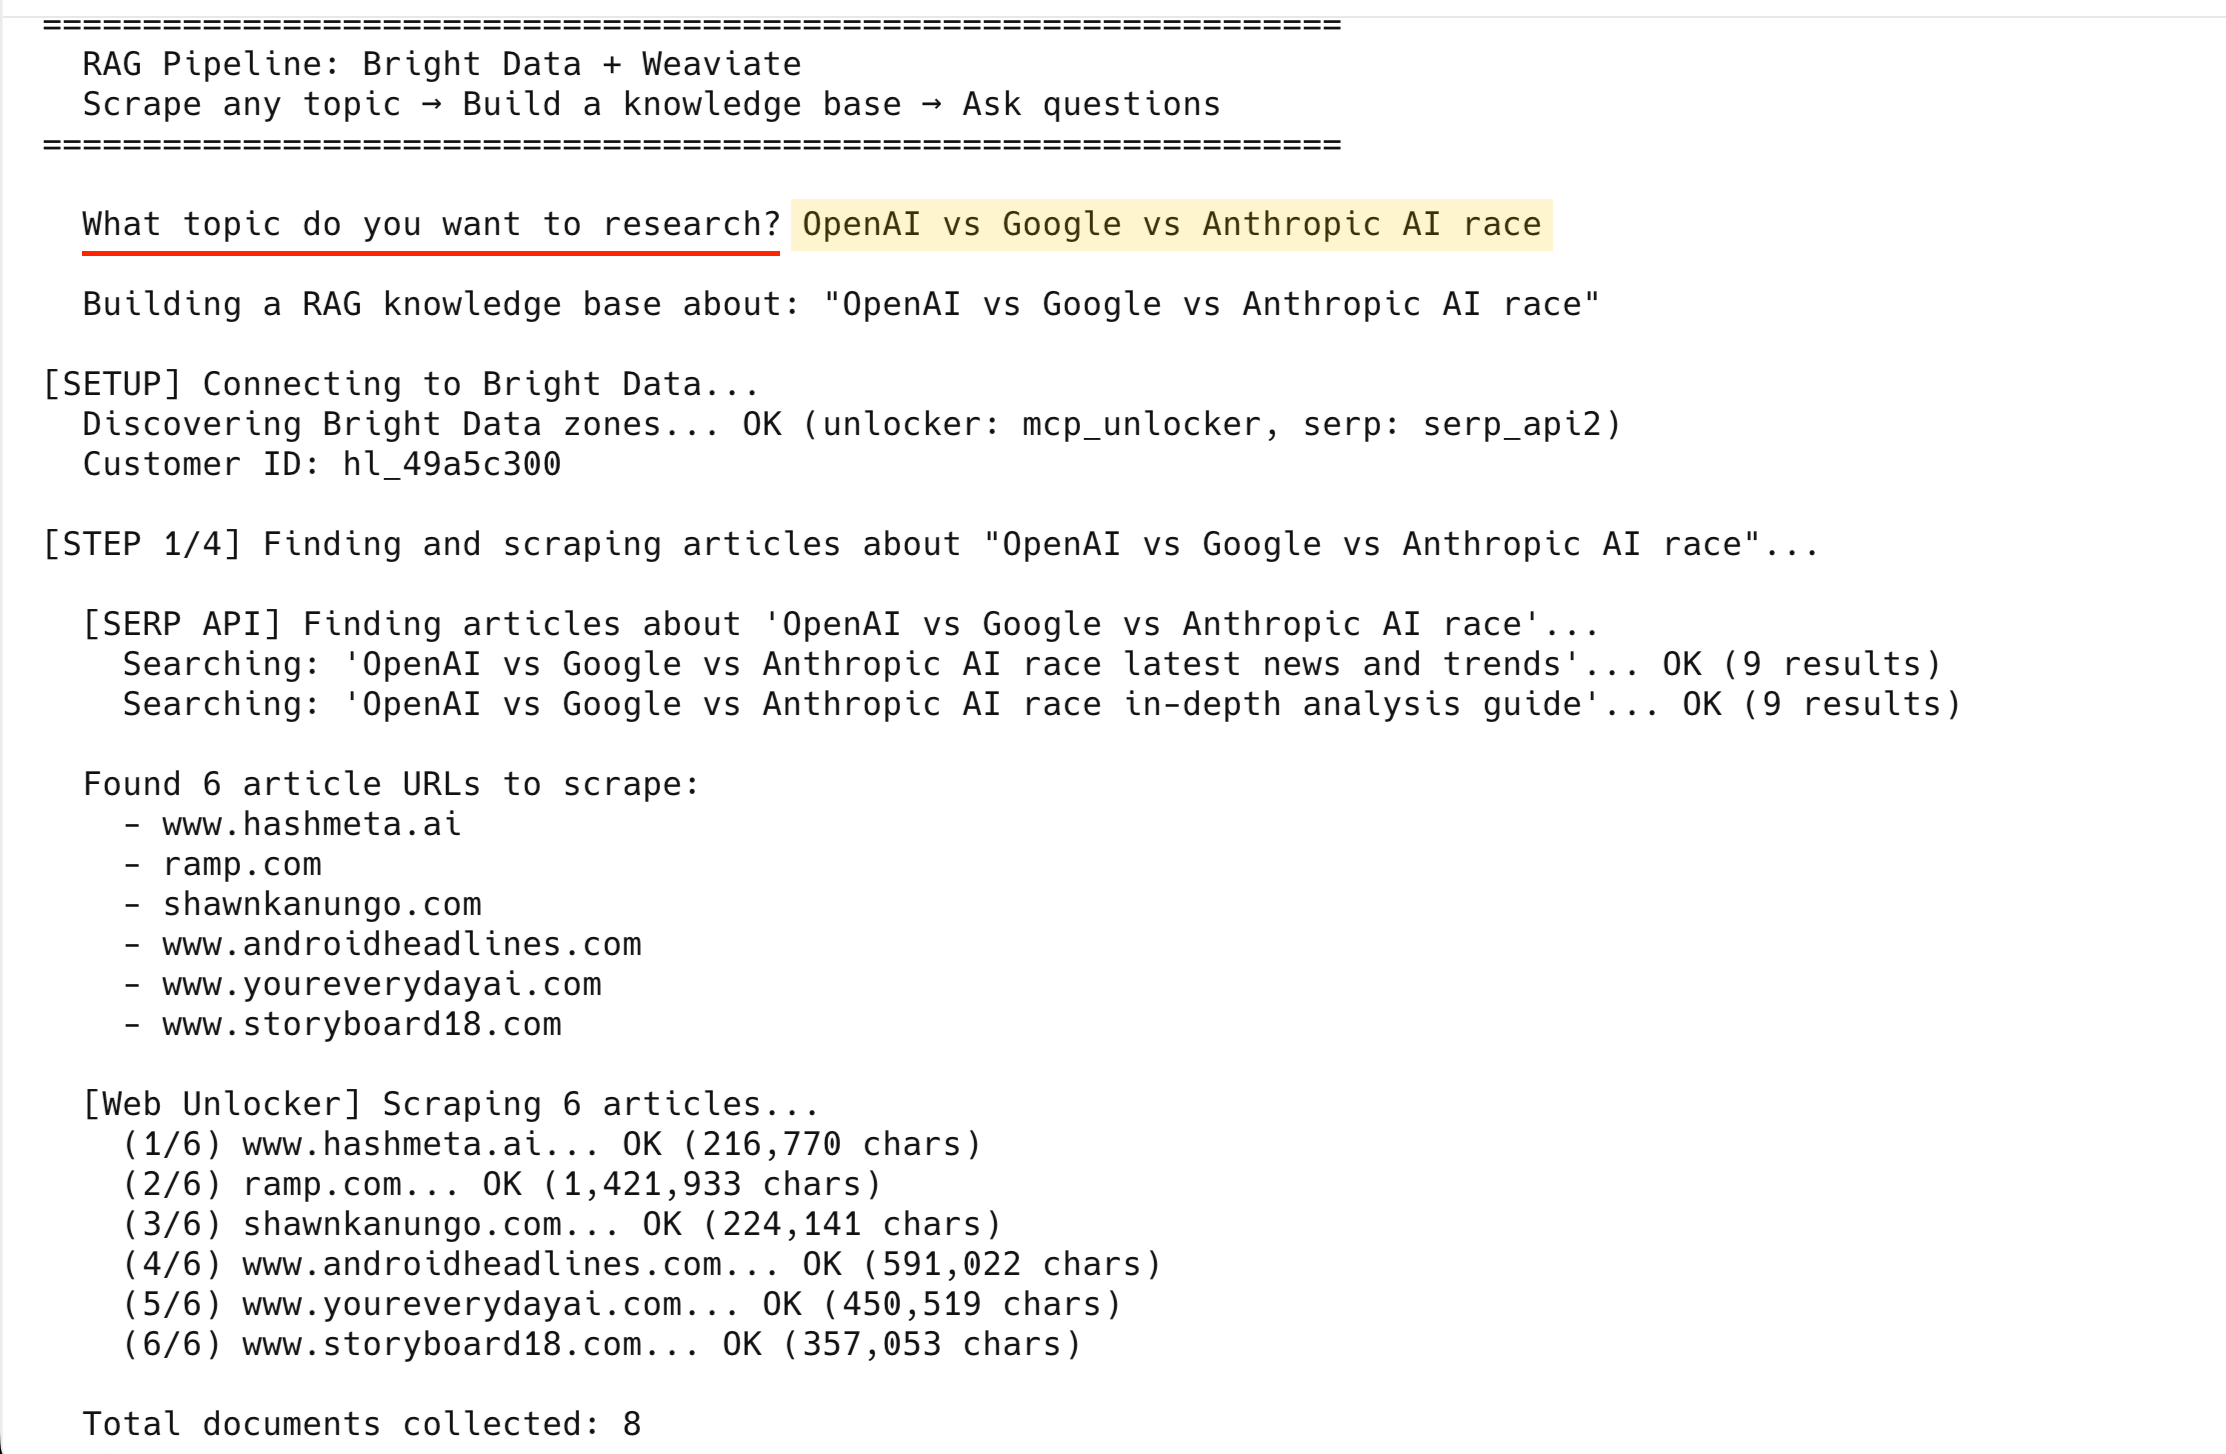
return documents以 “OpenAI vs Google vs Anthropic AI race” 为主题运行,会输出如下内容:
[SERP API] Finding articles about 'OpenAI vs Google vs Anthropic AI race'...
  Searching: 'OpenAI vs Google vs Anthropic AI race latest news and trends'... OK (9 results)
  Searching: 'OpenAI vs Google vs Anthropic AI race in-depth analysis guide'... OK (9 results)

Found 6 article URLs to scrape:
  - www.hashmeta.ai
  - ramp.com
  - shawnkanungo.com
  - www.androidheadlines.com
  - www.youreverydayai.com
  - www.storyboard18.com

[Web Unlocker] Scraping 6 articles...
  (1/6) www.hashmeta.ai... OK (216,770 chars)
  (2/6) ramp.com... OK (1,421,933 chars)
  (3/6) shawnkanungo.com... OK (224,141 chars)
  (4/6) www.androidheadlines.com... OK (591,022 chars)
  (5/6) www.youreverydayai.com... OK (450,519 chars)
  (6/6) www.storyboard18.com... OK (357,053 chars)

Total documents collected: 8
6 篇文章全部抓取成功——再加上 2 个 SERP 结果页,总计 8 份文档。
如果 Web Unlocker 在某个 URL 上尝试 3 次仍失败,流水线会跳过该 URL,并继续处理剩余文章。
此时你就有了 8 份原始文档(6 篇文章 + 2 个 SERP 结果页)。下一步是清洗并切分它们,以便做向量化。
步骤 2:清洗并切分数据
原始 HTML 大约 90% 是噪声。处理步骤会将其剥离为干净文本,并切分为 500 字符的 chunks(约 125 tokens),尽可能在句子边界处断开。
chunk 大小决定 RAG 的核心权衡:更小的 chunks(200–500 字符)能按事实更精确检索;更大的 chunks(1000–2000 字符)能给 LLM 更多上下文,但会带来更“嘈杂”的检索结果。默认 500 字符很适合事实型问题(例如“Anthropic 在企业市场对 OpenAI 的胜率是多少?”)。对需要更广上下文的查询(如总结或对比),可将 chunk_size 增加到 1500–2000。
50 字符的 overlap 可以防止边界信息丢失——否则一条跨越两个 chunks 的句子会被截断,两个 chunk 都无法包含完整含义。
def clean_html(html, is_serp=False):
    """Strip HTML to clean text, removing navigation, ads, and boilerplate."""
    if is_serp:
        return html  # SERP results are already clean text

    soup = BeautifulSoup(html, "html.parser")

    # Remove noise elements
    for tag in soup(["nav", "footer", "header", "script", "style",
                     "aside", "iframe", "noscript", "svg", "form", "button"]):
        tag.decompose()

    # Remove common ad/cookie/popup containers
    for selector in [".ad", ".ads", ".cookie", ".popup", ".modal", ".sidebar",
                     "#cookie-banner", "#ad-container", "[role='banner']",
                     "[role='navigation']", "[role='complementary']"]:
        for el in soup.select(selector):
            el.decompose()

    text = soup.get_text(separator="\n", strip=True)
    lines = [line.strip() for line in text.splitlines() if line.strip()]
    return "\n".join(lines)


def chunk_text(text, chunk_size=500, chunk_overlap=50):
    """Split text into overlapping chunks, breaking at sentence boundaries.
    Overlap ensures sentences at chunk boundaries aren't lost between chunks."""
    if len(text) <= chunk_size:
        return [text]

    chunks = []
    start = 0
    while start < len(text):
        end = start + chunk_size

        # Try to break at a sentence boundary
        if end < len(text):
            for sep in [". ", ".\n", "\n\n", "\n", " "]:
                last_sep = text[max(start, end - 100):end].rfind(sep)
                if last_sep != -1:
                    end = max(start, end - 100) + last_sep + len(sep)
                    break

        chunk = text[start:end].strip()
        if chunk and len(chunk) > 50:
            chunks.append(chunk)
        start = end - chunk_overlap

    return chunks


def process_documents(documents):
    """Clean, chunk, and add metadata to all documents."""
    all_chunks = []
    for doc in documents:
        is_serp = doc.get("is_serp", False)
        clean_text = clean_html(doc["html"], is_serp=is_serp)

        if len(clean_text) < 100:
            continue

        chunks = chunk_text(clean_text)
        domain = doc["url"].split("/")[2] if "://" in doc["url"] else "unknown"

        for i, chunk in enumerate(chunks):
            all_chunks.append({
                "text": chunk,
                "source_url": doc["url"],
                "source_domain": domain,
                "scraped_at": doc["scraped_at"],
                "chunk_index": i,
                "total_chunks": len(chunks),
                "content_hash": hashlib.md5(chunk.encode()).hexdigest(),
                "content_type": "serp_result" if is_serp else "article",
            })
    return all_chunks
处理后,8 份文档会变成约 150–400 个干净文本 chunks(取决于文章长度),每个 chunk 都带有元数据(来源 URL、域名、时间戳、内容 hash)。
步骤 3:向量化并存入 Weaviate
连接 Weaviate Cloud,创建一个启用 Cohere 向量化的 collection,然后批量导入所有 chunks。
def connect_weaviate():
    """Connect to Weaviate Cloud with extended timeouts."""
    client = weaviate.connect_to_weaviate_cloud(
        cluster_url=WEAVIATE_URL,
        auth_credentials=Auth.api_key(WEAVIATE_API_KEY),
        headers={"X-Cohere-Api-Key": COHERE_API_KEY},
        additional_config=weaviate.classes.init.AdditionalConfig(
            timeout=weaviate.classes.init.Timeout(init=30, query=60, insert=120),
        ),
        skip_init_checks=True,  # Prevents gRPC timeout on idle sandboxes
    )
    if not client.is_ready():
        print("  ERROR: Weaviate cluster is not ready.")
        print("  Check your WEAVIATE_URL and WEAVIATE_API_KEY in .env")
        print("  Make sure your sandbox cluster is running at console.weaviate.cloud")
        sys.exit(1)

    return client


def setup_collection(client):
    """Create the collection with hybrid search + generative config."""
    # Deletes any existing collection with this name – re-running with a
    # new topic replaces the previous knowledge base, not adds to it.
    if client.collections.exists(COLLECTION_NAME):
        client.collections.delete(COLLECTION_NAME)
        print(f"    Deleted existing '{COLLECTION_NAME}' collection")

    client.collections.create(
        name=COLLECTION_NAME,
        description="Web articles scraped via Bright Data for RAG",

        # Cohere embed-v4.0: auto-vectorizes text at import time
        vector_config=Configure.Vectors.text2vec_cohere(
            model="embed-v4.0",
        ),

        # Cohere command-a-03-2025: generates RAG answers at query time
        generative_config=Configure.Generative.cohere(
            model="command-a-03-2025",
        ),

        properties=[
            Property(name="text", data_type=DataType.TEXT,
                     description="The chunk text content"),
            Property(name="source_url", data_type=DataType.TEXT,
                     skip_vectorization=True),
            Property(name="source_domain", data_type=DataType.TEXT,
                     skip_vectorization=True),
            Property(name="scraped_at", data_type=DataType.TEXT,
                     skip_vectorization=True),
            Property(name="chunk_index", data_type=DataType.INT,
                     skip_vectorization=True),
            Property(name="total_chunks", data_type=DataType.INT,
                     skip_vectorization=True),
            Property(name="content_hash", data_type=DataType.TEXT,
                     skip_vectorization=True),
            Property(name="content_type", data_type=DataType.TEXT,
                     skip_vectorization=True),
        ],
    )
    print(f"    Created '{COLLECTION_NAME}' collection")
有几点值得注意:
skip_vectorization=True用于元数据字段——只对text字段做向量化,既节省 API 调用也能让向量更干净。- 每个 chunk 都存了
content_hash——当你之后增加增量重抓取逻辑时,可以用它跳过对未变化内容的重复向量化(当前流水线每次运行都会重新导入)。
重复运行行为:流水线每次运行都会删除并重建 collection。先运行 “AI race”,再运行 “quantum computing”,会用量子计算数据替换 AI 竞赛数据。若要保留多个主题,请把
COLLECTION_NAME改为每个主题独一无二的名称(例如WebResearch_ai_race、WebResearch_quantum)。
关于准备AI-ready 向量数据集,可参考 Bright Data 指南。
store_chunks() 会将所有 chunks 批量写入 collection:
def store_chunks(client, chunks):
    """Batch import chunks into Weaviate (auto-vectorized via Cohere)."""
    collection = client.collections.use(COLLECTION_NAME)

    with collection.batch.fixed_size(batch_size=50) as batch:
        for chunk in chunks:
            batch.add_object(properties=chunk)

    failed = len(collection.batch.failed_objects) if collection.batch.failed_objects else 0

    if failed > 0:
        print(f"    First error: {collection.batch.failed_objects[0].message[:120]}")

    return failed
batch.fixed_size(50) 以批处理方式导入以提高吞吐,而不是逐条插入。在测试运行中,所有 chunks 都以 0 失败导入。Weaviate 会在导入时调用 Cohere 对每个 chunk 做向量化。
步骤 4:使用混合检索 + 生成进行查询
当所有 chunks 都完成向量化并建立索引后,就可以使用 rag_query() 进行查询。它会调用 generate.hybrid() 在一次请求中完成检索与生成:
def rag_query(client, question, alpha=0.7, limit=5):
    """Run a RAG query using Weaviate hybrid search + generative AI."""
    collection = client.collections.use(COLLECTION_NAME)

    response = collection.generate.hybrid(
        query=question,
        alpha=alpha,  # 0.7 = 70% semantic, 30% keyword
        limit=limit,
        grouped_task=f"""Based on the retrieved documents below, answer this question:
"{question}"

Instructions:
- Provide a clear, comprehensive answer
- Cite the source URL for each key claim
- If information seems outdated or conflicting, note it
- Keep the answer concise but informative (2-4 paragraphs)""",
    )

    print(f"\n  Q: {question}")
    print(f"  {'─' * 60}")

    if response.generated:
        print(f"  A: {clean_generated_text(response.generated)}")
    else:
        print("  A: (No response generated — check your Cohere API key)")

    # Separate article sources from SERP summary chunks
    article_sources = []
    serp_sources = []
    seen_urls = set()
    for obj in response.objects:
        url = obj.properties.get("source_url", "unknown")
        if url in seen_urls:
            continue
        seen_urls.add(url)
        content_type = obj.properties.get("content_type", "")
        domain = obj.properties.get("source_domain", "")
        if content_type == "serp_result":
            serp_sources.append((domain, url))
        else:
            article_sources.append((domain, clean_url(url)))

    print(f"\n  Sources ({len(response.objects)} chunks retrieved):")
    for domain, url in article_sources:
        print(f"    - [{domain}] {url}")
    if not article_sources and serp_sources:
        print("    (Based on SERP summaries — no article chunks matched)")

    return response
纯向量检索可能会漏掉诸如 “GPT-5” 或 “Claude Code” 这样的精确术语;纯关键词检索又会漏掉语义相关内容。alpha=0.7 的混合能兼顾两者。Weaviate 的 BlockMax WAND 算法也能让 BM25 关键词部分在规模化下保持高性能。
当 limit=5 时,查询会取 Top-5 chunks:上下文足够详细,但又不会让噪声淹没 LLM。更宽泛的问题可以提高到 10;精确事实查询可降低到 3。grouped_task 会把所有检索到的 chunks 一起发送给 Cohere,让它生成单个统一答案。另一种方式是 single_prompt:对每个 chunk 生成一个回答——适合做逐文档摘要,但不适合跨来源整合的答案。
更多选项可参考 Bright Data 对语义搜索 API的盘点。
把 4 个步骤串起来
main() 会运行完整流水线:你选择主题,其余都由它处理:
def main():
print("=" * 65)
print(" RAG Pipeline: Bright Data + Weaviate")
print(" Scrape any topic → Build a knowledge base → Ask questions")
print("=" * 65)
# ── Validate environment ──
validate_env()
# ── Ask the user for a topic ──
print()
try:
topic = input(" What topic do you want to research? ").strip()
except (EOFError, KeyboardInterrupt):
print("\n Goodbye!")
return
if not topic:
print(" No topic entered. Exiting.")
return
print(f'\n Building a RAG knowledge base about: "{topic}"')
# ── Discover Bright Data credentials automatically ──
print("\n[SETUP] Connecting to Bright Data...")
cust_id, unlocker_zone, unlocker_pwd, serp_zone, serp_pwd = (
discover_bright_data_credentials()
)
# ── Step 1: Find and scrape articles about the topic ──
print(f'\n[STEP 1/4] Finding and scraping articles about "{topic}"...')
documents = collect_data(
topic, cust_id, unlocker_zone, unlocker_pwd, serp_zone, serp_pwd
)
print(f"\n Total documents collected: {len(documents)}")
if not documents:
print(" ERROR: No documents collected. Try a different topic.")
return
# ── Step 2: Process and chunk ──
print("\n[STEP 2/4] Processing and chunking documents...")
chunks = process_documents(documents)
print(f" Created {len(chunks)} chunks from {len(documents)} documents")
if not chunks:
print(" ERROR: No chunks created. Documents may be too short.")
return
# ── Step 3: Store in Weaviate ──
print("\n[STEP 3/4] Storing in Weaviate (embedding + indexing)...")
print(" Connecting to Weaviate Cloud...", end=" ", flush=True)
client = connect_weaviate()
print("OK")
print(" Setting up collection...")
setup_collection(client)
print(f" Importing {len(chunks)} chunks (auto-vectorizing via Cohere)...")
failed = store_chunks(client, chunks)
print(f" Imported: {len(chunks) - failed} success, {failed} failed")
# Verify count
collection = client.collections.use(COLLECTION_NAME)
count = collection.aggregate.over_all(total_count=True).total_count
print(f" Total objects in Weaviate: {count}")
# ── Step 4: Demo queries + Interactive mode ──
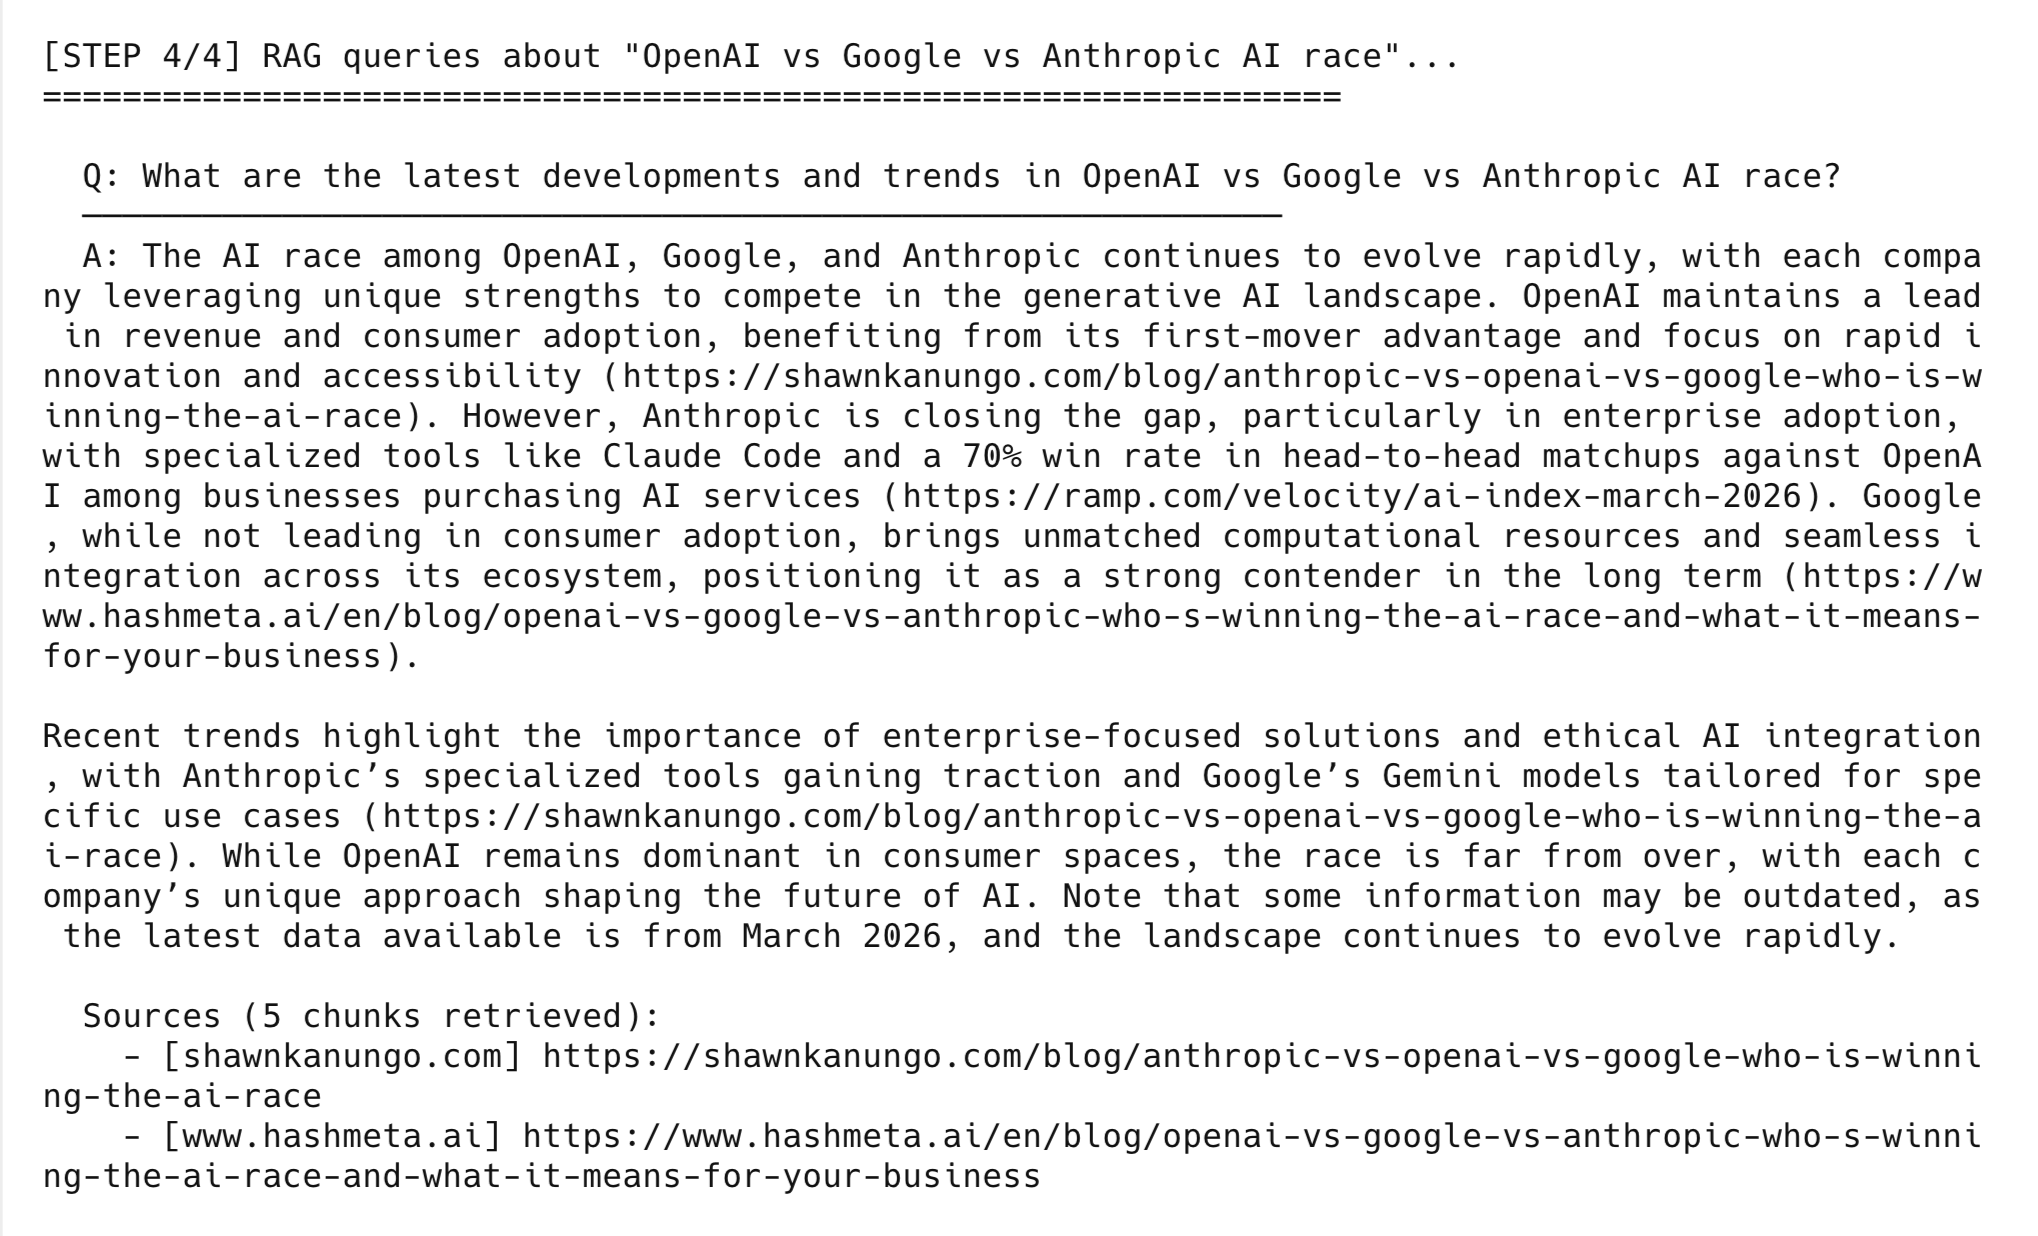
print(f'\n[STEP 4/4] RAG queries about "{topic}"...')
print("=" * 65)
demo_queries = [
f"What are the latest developments and trends in {topic}?",
f"What are the biggest challenges and risks in {topic}?",
f"What is the future outlook for {topic}?",
]
for question in demo_queries:
rag_query(client, question)
print()
# ── Summary ──
print("=" * 65)
print(" Pipeline complete!")
print(f' Topic: "{topic}"')
print(f" - Scraped {len(documents)} sources via Bright Data")
print(f" - Stored {count} chunks in Weaviate")
print(f" - Ran {len(demo_queries)} demo RAG queries")
print("=" * 65)
# ── Interactive Mode ──
print(f'\n Your knowledge base about "{topic}" is ready!')
print(" Ask anything. Type 'quit' to exit.\n")
while True:
try:
user_question = input(" Your question: ").strip()
except (EOFError, KeyboardInterrupt):
print("\n Goodbye!")
break
if not user_question:
continue
if user_question.lower() in ("quit", "exit", "q"):
print(" Goodbye!")
break
rag_query(client, user_question)
print()
client.close()
if __name__ == "__main__":
main()运行:
python3 pipeline.pyAI 竞赛测试运行的 RAG 答案示例
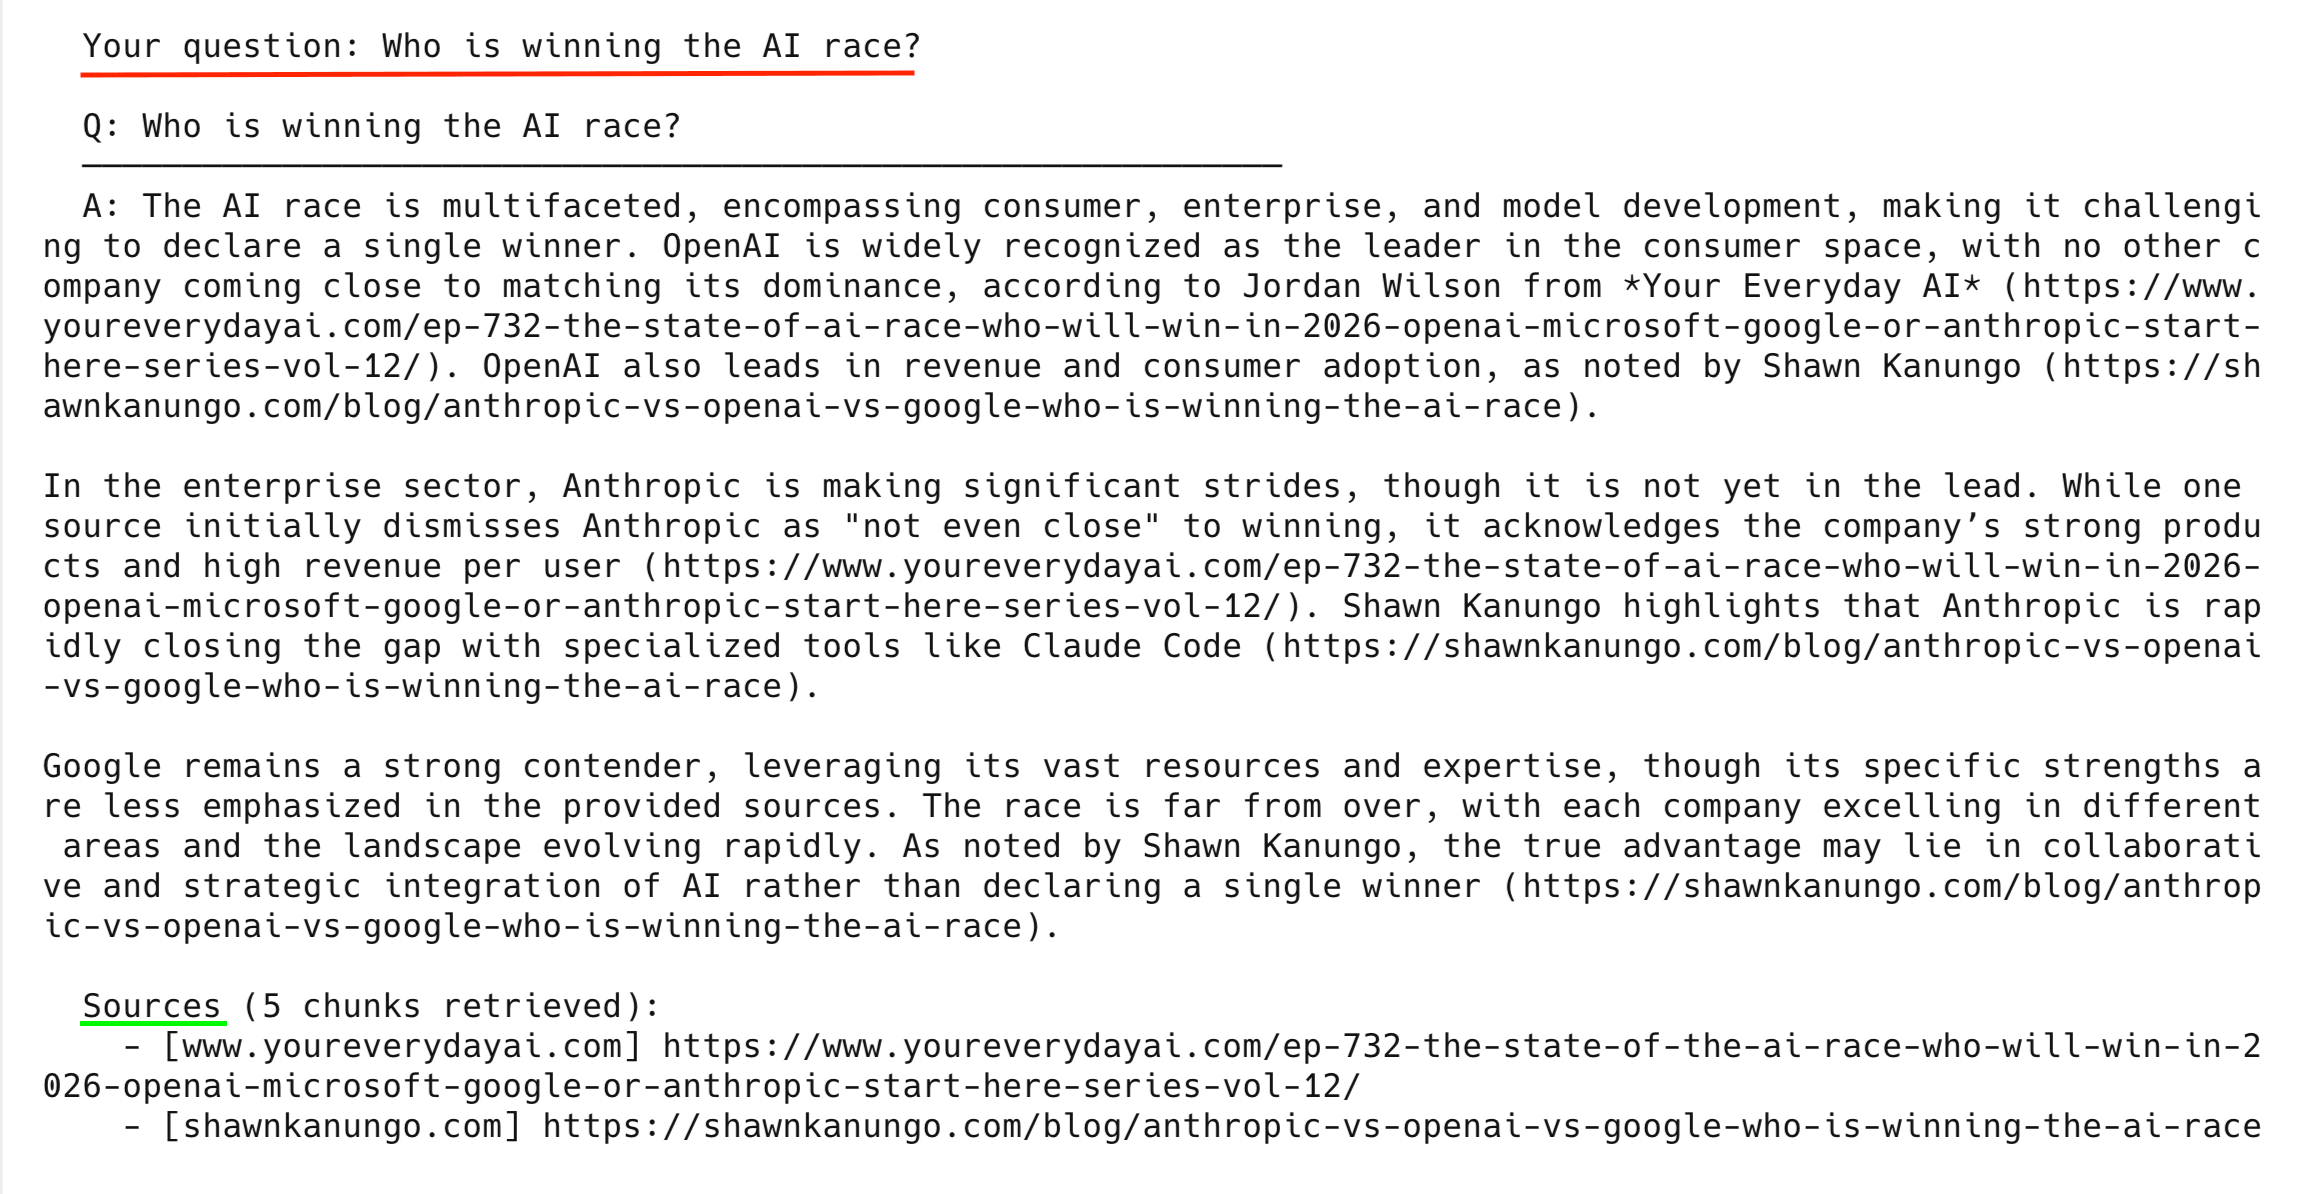
流水线以 “OpenAI vs Google vs Anthropic AI race” 为主题运行。以下为一次测试运行的示例 RAG 答案——你的结果会随运行时实时抓取到的文章而变化。
查询 1:“OpenAI vs Google vs Anthropic AI race 的最新进展与趋势是什么?”
OpenAI、Google 与 Anthropic 之间的 AI 竞赛仍在快速演进,各家公司都在发挥各自的独特优势。OpenAI 在收入与消费者采用方面保持领先,受益于先发优势。Anthropic 在企业采用方面正在缩小差距,推出了诸如 Claude Code 等专用工具,并在企业客户购买 AI 服务的正面比较中实现了 70% 的胜率。Google 则拥有无可匹敌的计算资源,并能在其生态系统内实现无缝集成。
来源: shawnkanungo[.]com、hashmeta[.]ai、ramp[.]com
查询 2:“OpenAI vs Google vs Anthropic AI race 的最大挑战与风险是什么?”
OpenAI 面临的挑战是在保持独立性的同时维持创新节奏,尤其是其算力资源依赖合作伙伴。Google 则受到 官僚惯性 的影响,并且面临被对话式 AI 降低广告点击量、从而蚕食其核心搜索广告业务的风险。Anthropic 以“安全优先”定位,需要把对可解释性的关注转化为在“能力驱动”的市场中可量化的份额增长。
来源: hashmeta[.]ai、shawnkanungo[.]com
查询 3:“OpenAI vs Google vs Anthropic AI race 的未来展望如何?”
OpenAI 在收入与消费者采用方面领先,其路线图包括 GPT-5,并投资降低推理成本。Anthropic 的未来成功取决于是否会出现对可解释性的监管要求——其在安全性与可解释性方面的早期投入可能带来显著优势。Google 仍是强劲竞争者,尤其是在将 Gemini 针对特定用例进行优化、并把 AI 融入日常工作流方面。
来源: hashmeta[.]ai、shawnkanungo[.]com
每个答案都基于同一次流水线运行中抓取到的文章。每条引用都指向步骤 1 中抓取的来源——你可以打开 URL 验证任何论断。如果你问到抓取文章未覆盖的内容,模型会说明信息不足,或给出更不详细的回答。
完成 demo 查询后,流水线会进入交互模式,你可以提出自己的问题:
走向生产
如果你要在生产环境使用,你会需要多租户、合规与成本控制。(更宏观的背景可参考:RAG 在生产AI 智能体技术栈中的位置。)
用于数据隔离的多租户
如果你要为多个客户构建 RAG,Weaviate 的多租户能力会为每个租户提供一个独立 shard,并隔离向量索引:
from weaviate.classes.config import Configure
from weaviate.classes.tenants import Tenant

# Enable multi-tenancy on the collection
collection = client.collections.create(
    name="WebContent",
    multi_tenancy_config=Configure.multi_tenancy(enabled=True),
    # ... vectorizer + generative config
)

# Each customer gets their own isolated tenant
collection.tenants.create([
    Tenant(name="customer_a"),
    Tenant(name="customer_b"),
    Tenant(name="customer_c"),
])

# Scrape and store data per tenant
tenant_collection = collection.with_tenant("customer_a")
with tenant_collection.batch.dynamic() as batch:
    for chunk in customer_a_chunks:
        batch.add_object(properties=chunk)
单个节点可支持 50,000+ 活跃租户——20 节点集群可支持 100 万租户。
成本优化
随着数据规模增长,有 4 种技术可降低成本:
- Weaviate 旋转量化——在 98–99% 召回率下实现 4 倍向量压缩。
- 内容 hashing——
content_hash字段可支持增量更新:跳过对未变化 chunks 的重复向量化(见上文步骤 3)。 skip_vectorization=True用于元数据字段——只向量化真正重要的内容。- Bright Data Dataset Marketplace——对常见领域使用预采集数据集,而不是每次都抓取。
当你从单用户原型走向规模化时,这些会变得很关键。
常见错误与修复方式
遇到问题时,先看这张表:
| 问题 | 原因 | 修复方式 |
|---|---|---|
Weaviate gRPC DEADLINE_EXCEEDED |
Sandbox 集群在抓取期间进入空闲状态 | 重新运行 pipeline.py——脚本会自动重连。如果仍持续出现,去 Weaviate 控制台检查集群状态 |
Cohere API rate limit (429) |
Trial 套餐有速率限制 | 等待一分钟后重试,或在 Cohere 控制台查看用量。自动运行少于 20 次调用;每次交互提问会再增加 2 次 |
No Web Unlocker zone found |
你的 Bright Data 账号没有 Web Unlocker zone | 进入 Bright Data → Proxies & Scraping → My Zones → 创建 Web Unlocker zone |
No SERP API zone found |
你的 Bright Data 账号没有 SERP zone | 进入 Bright Data → Proxies & Scraping → My Zones → 创建 SERP API zone |
所有 URL 都是 HTTP 403 |
Web Unlocker 重试耗尽 | 换个主题——某些小众网站反爬虫非常严格。高级选项参考如何绕过 CAPTCHA |
Weaviate cluster not ready |
Sandbox 过期(14 天限制) | 在 Weaviate 控制台创建新 sandbox,并更新 .env |
| Cohere model not available | command-a-03-2025 或 embed-v4.0 已下线 |
到 docs.cohere.com/docs/models 查看可用模型,并更新 setup_collection() 中的 model= 参数 |
ModuleNotFoundError: No module named 'weaviate' |
未安装依赖 | 在项目目录运行 pip3 install -r requirements.txt |
如果你的错误不在表中,请查看完整输出——流水线会记录每一步的细节日志。
用例
同一套架构适用于任意主题。以下是一些想法:
- 竞品情报——主题:“competitor X pricing strategy”。流水线会抓取竞品网站、定价页面与分析报告。然后你可以问:“Competitor X 的企业定价与我们相比如何?”
- 市场研究——主题:“fintech trends Southeast Asia”。抓取区域新闻与行业出版物,支持你提问:“东南亚新兴金融科技趋势有哪些?”
- 电商——主题:“sustainable fashion market”。抓取市场报告与消费者研究。然后问:“哪些可持续时尚品牌在提升市场份额?”
- 技术研究——主题:“Kubernetes security best practices”。抓取技术博客与安全公告,以便你询问特定 CVE 或配置错误。
下一步可以构建什么
这是一个可运行原型,但有一些已知限制:
- 每次运行会替换整个 collection(无增量更新)——可用
content_hash增加差异比较(diff) - 只处理文本;抓取页面中的表格、图片与 PDF 会被丢弃
- 通过 Google 搜索发现内容——若你已有特定 URL,可直接传给
scrape_url() - 以单用户 CLI 方式运行
从这里你可以继续扩展:
- 调度——用 cron 定时运行流水线,保持知识库始终最新
- 多租户——给每个客户独立 shard(见上文“走向生产”)
- 不同数据源——用 Bright Data Web Scraper API 获取结构化的 Amazon 或 LinkedIn 数据,或用 Crawl API 获取整站 Markdown
- 前端——用 Flask/FastAPI 包一层
rag_query()endpoint,并连接聊天 UI - 智能体 RAG——构建智能体 RAG 系统,让系统自行决定何时抓取、抓取什么
- LangChain——将流水线迁移到 LangChain + Bright Data,获得内置编排与记忆能力
常见问题
哪些主题适用于这个流水线?
任何在开放网页上有文章可抓取的主题都适用。流水线使用 Bright Data SERP API 在 Google 上搜索你的主题,然后抓取 Top 结果。更小众的主题因为被索引的页面更少,可能返回更少文章,但流水线仍能运行——只是用它能找到的内容来构建知识库。
运行成本是多少?
三个服务都提供免费起步方式:Cohere Trial 免费且无需信用卡;Weaviate Cloud 提供免费 sandbox;Bright Data 为 SERP API 与 Web Unlocker 提供免费试用。
我可以使用不同的 embedding 模型或 LLM 吗?
可以。在 setup_collection() 中同时修改 embeddings 与 generation 的 model 参数即可。Weaviate 原生支持 Cohere、OpenAI、Google 与 Hugging Face 的向量化器。切换时,把 text2vec_cohere 换成 text2vec_openai,在 connect_weaviate() 里更新 API key header,然后重新运行流水线。
如何保持知识库最新?
使用同一主题再次运行 pipeline.py。流水线会删除旧 collection,并用新抓取的数据创建新 collection。生产场景建议增加 content_hash 检查来跳过未变化 chunks 的重复向量化,并用 cron 定时刷新。
如果我已经有要抓取的 URL 怎么办?
跳过 SERP 发现步骤。在 collect_data() 中,用你自己的 URL 列表替换 find_articles_for_topic() 的调用,然后把每个 URL 传给 scrape_url()。后续步骤(切分、向量化、查询)保持不变。
如何抓取超过 6 篇文章?
把 find_articles_for_topic() 末尾的 [:6] 切片改大(例如 [:12])。你也可以在 search_queries 列表中增加更多搜索查询,以获得更广覆盖。文章越多,抓取时间与 chunks 数就越多,但流水线其他部分会自动处理。


技术写作者
 5 years experience
Satyam Tripathi 帮助 SaaS 和数据初创公司将复杂技术转化为可执行的内容,提升开发者采用度并增强用户理解。