在这篇关于使用网页数据微调 GPT-OSS 的指南中,你将学习:
- 什么是 Unsloth,以及它为何能加速微调
- 如何使用 Bright Data 的抓取 API 采集高质量训练数据
- 如何搭建高效微调的环境
- 如何按照完整步骤微调 GPT-OSS
让我们开始吧!
什么是 Unsloth,以及为什么用于微调?
Unsloth 是一个轻量级库,它在保持对 Hugging Face 生态(Hub、transformers、PEFT、TRL)完全兼容的同时,显著加快了大语言模型的微调。该库支持多数 NVIDIA GPU,从 GTX 1070 到 H100,且能与 TRL 库的完整 trainer 套件无缝配合。
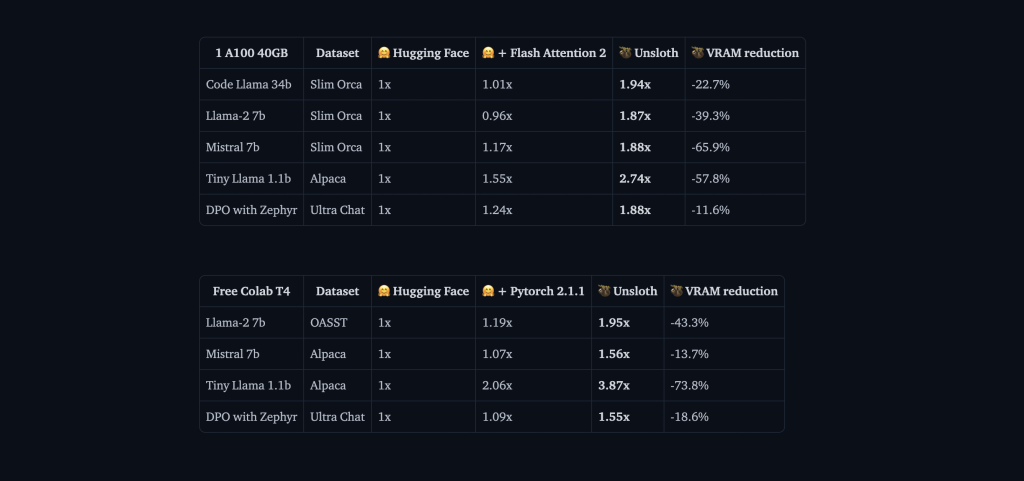
Unsloth 带来的性能提升非常亮眼。在基准测试中,相比标准 transformers 实现,它能实现 2 倍训练速度,同时降低 40% 的内存占用。这意味着你可以在相同硬件上训练更大的模型或使用更大的 batch size。更重要的是,它几乎不带来精度损失(0% 准确率下降),因此你可以在不牺牲模型质量的情况下获得这些收益。
理解 GPT-OSS 模型
OpenAI 发布的 GPT-OSS 标志着其在 AI 开发生态上的重大转变。我们首次能够访问真正的 GPT 模型,而无需 API 限制、按量计费或速率限制。
GPT-OSS 主要有两个变体:
- GPT-OSS-120B:更大的模型,质量可匹配 GPT-4,但至少需要 80GB 显存
- GPT-OSS-20B:性能可比 GPT-3.5,可在 16GB 显存上高效运行(非常适合本教程)
GPT-OSS 相较其他开源模型的一大特色是“推理努力”控制。你可以将模型的思考深度设置为 “low”、“medium” 或 “high”,以便根据特定用例在速度与准确性之间进行平衡。
为何高质量数据对微调至关重要
微调 的效果取决于你提供的数据。即便训练流程再先进,如果数据嘈杂、不一致或格式糟糕,模型也会学到这些问题。因此我们将使用 Bright Data 的 Web Scraper API 来获取干净、格式良好且准确的数据。
Bright Data 处理了网页抓取中容易绊倒自建方案的复杂环节。它管理IP 轮换以避免限流、自动解决 CAPTCHA、处理动态的 JavaScript 渲染内容,并在数百万次请求中保持一致的数据质量。
在本教程中,我们将使用 Bright Data 的 API 收集 Python 文档,并将其转化为我们模型的训练数据。
前置条件与环境搭建
在开始之前,先确保你具备成功微调所需的一切。我们将使用 Google Colab,因为它提供免费的 GPU 访问;不过,相同流程也适用于任何至少拥有 16GB 显存的机器。
硬件要求
本教程你需要:
- 一块至少 16GB 显存的 GPU(T4、V100 或更好)
- 25GB 的可用磁盘空间(用于模型权重与检查点)
- 稳定的网络连接(用于下载模型与依赖)
在 Google Colab 中,你可以通过以下方式免费使用 T4 GPU:
- 打开一个新 notebook
- 转到 Runtime → Change runtime type
- 选择 GPU 作为硬件加速器
- 点击 Save 应用更改

安装 Unsloth 与依赖
当 GPU 运行环境就绪后,我们将安装 Unsloth 及所有必要依赖。安装过程已优化,以避免不同包版本之间的冲突:
%%capture
# Install Unsloth and core dependencies
!pip install --upgrade -qqq uv
try: import numpy; get_numpy = f"numpy=={numpy.__version__}"
except: get_numpy = "numpy"
!uv pip install -qqq
    "torch>=2.8.0" "triton>=3.4.0" {get_numpy} torchvision bitsandbytes "transformers>=4.55.3"
    "unsloth_zoo[base] @ git+https://github.com/unslothai/unsloth-zoo"
    "unsloth[base] @ git+https://github.com/unslothai/unsloth"
    git+https://github.com/triton-lang/triton.git@05b2c186c1b6c9a08375389d5efe9cb4c401c075#subdirectory=python/triton_kernels
!uv pip install --upgrade --no-deps transformers==4.56.2 tokenizers
!uv pip install --no-deps trl==0.22.2
!pip install -q brightdata-sdk
此安装脚本处理了多个关键细节:它使用 uv 加速包解析,固定特定版本以避免兼容性问题,安装 Unsloth 的定制 Triton 内核以获得最佳性能,并包含用于数据采集步骤的 Bright Data SDK。
验证 GPU 配置
安装完成后,验证你的 GPU 是否被正确检测到且拥有足够内存:
import torch

# Get GPU information
gpu_stats = torch.cuda.get_device_properties(0)
max_memory = round(gpu_stats.total_memory / 1024 / 1024 / 1024, 3)

print(f"GPU = {gpu_stats.name}")
print(f"Max memory = {max_memory} GB")
print(f"CUDA version = {torch.version.cuda}")
print(f"PyTorch version = {torch.__version__}")

# Verify minimum requirements
if max_memory < 15:
    print("⚠️ Warning: Your GPU might not have enough memory for GPT-OSS-20B")
else:
    print("✅ Your GPU has sufficient memory for fine-tuning")
你应至少看到约 15GB 可用显存。免费 Colab 的 T4 GPU 提供 16GB,配合 Unsloth 的优化非常适合我们的需求。
使用 Unsloth 加载 GPT-OSS
现在我们使用 Unsloth 的优化加载器来加载 GPT-OSS 模型。与标准 transformers 相比,这个过程非常简洁,因为 Unsloth 会自动处理所有优化细节。

加载基础模型
from unsloth import FastLanguageModel
import torch

# Configuration
max_seq_length = 1024  # Adjust based on your data
dtype = None  # Auto-detect best dtype for your GPU

# Unsloth provides pre-quantized models for faster loading
fourbit_models = [
    "unsloth/gpt-oss-20b-unsloth-bnb-4bit",  # BitsAndBytes 4bit
    "unsloth/gpt-oss-120b-unsloth-bnb-4bit",
    "unsloth/gpt-oss-20b",  # MXFP4 format
    "unsloth/gpt-oss-120b",
]

# Load the model
model, tokenizer = FastLanguageModel.from_pretrained(
    model_name = "unsloth/gpt-oss-20b",
    dtype = dtype,
    max_seq_length = max_seq_length,
    load_in_4bit = True,  # Essential for fitting in 16GB
    full_finetuning = False,  # Use LoRA for efficiency
)

print(f"✅ Model loaded successfully!")
print(f"Model size: {model.num_parameters():,} parameters")
print(f"Using device: {model.device}")
FastLanguageModel.from_pretrained() 在幕后做了很多事情:自动检测你的 GPU 能力并相应优化、应用 4-bit 量化将内存占用降低约 75%、将模型设置为 LoRA 训练而非全量微调,并配置内存高效的注意力机制。
配置 LoRA 适配器
LoRA(低秩适配)使得在消费级硬件上进行微调成为可能。我们只训练插入到关键层中的小型适配矩阵,而不是更新全部模型参数:
model = FastLanguageModel.get_peft_model(
    model,
    r = 8,  # LoRA rank - higher = more capacity but slower
    target_modules = ["q_proj", "k_proj", "v_proj", "o_proj",
                      "gate_proj", "up_proj", "down_proj"],
    lora_alpha = 16,  # LoRA scaling factor
    lora_dropout = 0,  # Dropout disabled for faster training
    bias = "none",  # Don't train bias terms
    use_gradient_checkpointing = "unsloth",  # Critical for memory savings
    random_state = 3407,
    use_rslora = False,  # Standard LoRA works best for most cases
    loftq_config = None,
)

# Display training statistics
trainable_params = sum(p.numel() for p in model.parameters() if p.requires_grad)
all_params = sum(p.numel() for p in model.parameters())
trainable_percent = 100 * trainable_params / all_params

print(f"Training {trainable_params:,} parameters out of {all_params:,}")
print(f"That's only {trainable_percent:.2f}% of all parameters!")
print(f"Memory saved: ~{(1 - trainable_percent/100) * 40:.1f}GB")
此配置在训练效率与模型容量之间取得了平衡。使用 r=8,我们训练的参数不到总量的 1%,却仍可获得良好的微调效果。仅梯度检查点就能节省约 30% 内存,这往往是能否放入显存与避免 OOM(Out of Memory)错误的关键。
测试 GPT-OSS 的推理努力控制
在开始微调之前,让我们探索一下 GPT-OSS 独特的“推理努力”功能。它允许你控制模型在响应前“思考”的程度:
from transformers import TextStreamer

# Test problem requiring mathematical reasoning
messages = [
    {"role": "user", "content": "Solve x^5 + 3x^4 - 10 = 3. Explain your approach."},
]

# Test with LOW reasoning effort
print("="*60)
print("LOW REASONING (Fast but less thorough)")
print("="*60)

inputs = tokenizer.apply_chat_template(
    messages,
    add_generation_prompt = True,
    return_tensors = "pt",
    return_dict = True,
    reasoning_effort = "low",
).to("cuda")

text_streamer = TextStreamer(tokenizer, skip_prompt=True, skip_special_tokens=True)
_ = model.generate(**inputs, max_new_tokens = 128, streamer = text_streamer)

# Test with HIGH reasoning effort
print("n" + "="*60)
print("HIGH REASONING (Slower but more accurate)")
print("="*60)

inputs = tokenizer.apply_chat_template(
    messages,
    add_generation_prompt = True,
    return_tensors = "pt",
    return_dict = True,
    reasoning_effort = "high",
).to("cuda")

_ = model.generate(**inputs, max_new_tokens = 512, streamer = text_streamer)
运行这段代码时,你会看到在 “low” 推理下,模型给出快速的近似答案,而 “high” 推理会生成更详细、带有逐步推导的解法。该特性对于在生产中平衡速度与准确性非常有价值。
使用 Bright Data 采集训练数据
现在我们使用 Bright Data 的 Web Scraper API 采集高质量训练数据。相比自己搭建爬虫,Bright Data 的方案更可靠,因为它处理了大规模网页抓取所需的复杂基础设施。
设置数据采集器
from brightdata import bdclient
from typing import List, Dict
import re
import json

class DataCollector:
    def __init__(self, api_token: str):
        """
        Initialize Bright Data client for web scraping.

        Args:
            api_token: Your Bright Data API token
        """
        self.client = bdclient(api_token=api_token)
        self.collected_data = []
        print("✅ Bright Data client initialized")

    def collect_documentation(self, urls: List[str]) -> List[Dict]:
        """
        Scrape documentation pages and convert to training data.

        This method handles both batch and individual URL scraping,
        automatically falling back to individual requests if batch fails.
        """
        print(f"Starting to scrape {len(urls)} URLs...")

        try:
            # Attempt batch scraping for efficiency
            results = self.client.scrape(urls, data_format="markdown")

            if isinstance(results, str):
                # Single result returned
                print("Processing single result...")
                training_data = self.process_single_result(results)

            elif isinstance(results, list):
                # Multiple results returned
                print(f"Processing {len(results)} results...")
                training_data = []
                for i, content in enumerate(results, 1):
                    if content:
                        print(f"  Processing result {i}/{len(results)}")
                        examples = self.process_single_result(content)
                        training_data.extend(examples)
            else:
                print(f"Unexpected result type: {type(results)}")
                training_data = []

        except Exception as e:
            print(f"Batch scraping failed: {e}")
            print("Falling back to individual URL scraping...")

            # Fallback: scrape URLs one by one
            training_data = []
            for url in urls:
                try:
                    print(f"  Scraping: {url}")
                    content = self.client.scrape(url, data_format="markdown")
                    if content:
                        examples = self.process_single_result(content)
                        training_data.extend(examples)
                        print(f"    ✓ Extracted {len(examples)} examples")
                except Exception as url_error:
                    print(f"    ✗ Failed: {url_error}")

        self.collected_data = training_data
        print(f"n✅ Collection complete: {len(self.collected_data)} training examples")
        return self.collected_data
这段代码做了什么:
- 智能回退策略:采集器优先尝试批量抓取以提高效率,若因网络或配额问题失败,会自动回退到单个抓取。
- 进度跟踪:实时日志让我们清楚了解抓取过程中发生了什么,便于调试。
- 错误韧性:每个 URL 都有独立异常处理,单个失败不会阻断整个流程。
- Markdown 格式:请求以 Markdown 返回,因为它比 HTML 更干净,更易处理为训练数据。
Bright Data 客户端帮我们处理了多个复杂任务:
- 轮换 IP 以避免限流
- 自动解决 CAPTCHA
- 渲染 JavaScript 密集的页面
- 对失败的请求进行指数退避重试
将抓取内容处理为训练数据
优质微调的关键是干净、格式良好的数据。下面是我们如何把原始抓取内容处理为问答对:
def process_single_result(self, content: str) -> List[Dict]:
"""
Process scraped content into clean Q&A training pairs.
This method performs aggressive cleaning to remove all
formatting artifacts and create natural-sounding examples.
"""
examples = []
# Step 1: Remove all HTML and Markdown formatting
content = re.sub(r'<[^>]+>', '', content) # HTML tags
content = re.sub(r'', '', content) # Images
content = re.sub(r'[([^]]+)]([^)]+)', r'1', content) # Links
content = re.sub(r'```[^`]*```', '', content) # Code blocks
content = re.sub(r'`[^`]+`', '', content) # Inline code
content = re.sub(r'[#*_~>`|-]+', ' ', content) # Markdown symbols
content = re.sub(r'\(.)', r'1', content) # Escape sequences
content = re.sub(r'https?://[^s]+', '', content) # URLs
content = re.sub(r'S+.w+', '', content) # File paths
content = re.sub(r's+', ' ', content) # Normalize whitespace
# Step 2: Split into sentences
sentences = re.split(r'(?<=[.!?])s+', content)
# Step 3: Filter out navigation and boilerplate content
clean_sentences = []
skip_patterns = ['navigation', 'copyright', 'index',
'table of contents', 'previous', 'next',
'click here', 'download', 'share']
for sent in sentences:
sent = sent.strip()
# Keep only substantial sentences
if (len(sent) > 30 and
not any(skip in sent.lower() for skip in skip_patterns)):
clean_sentences.append(sent)
# Step 4: Create Q&A pairs from consecutive sentences
for i in range(0, len(clean_sentences) - 1):
instruction = clean_sentences[i][:200].strip()
response = clean_sentences[i + 1][:300].strip()
# Ensure both parts are substantial
if len(instruction) > 20 and len(response) > 30:
examples.append({
"instruction": instruction,
"response": response
})
return examples处理流程说明:
process_single_result 会通过四个关键步骤将原始网页内容转化为干净的训练数据:
- 步骤 1 – 强力清洗:移除可能干扰模型的格式伪影:
- Markdown 转换后残留的 HTML 标签
- 无助于文本理解的图片与链接
- 代码块与行内代码(我们要的是说明性文字而非代码片段)
- 造成噪声的特殊字符与转义序列
- 步骤 2 – 句子切分:使用标点将内容拆成句子,获得逻辑单元便于处理。
- 步骤 3 – 质量过滤:移除:
- 过短(少于 30 字符)且缺乏信息量的句子
- 诸如“click here”“next page”的导航元素
- 样板内容(如版权声明)
- 包含常见网页导航模式的句子
- 步骤 4 – 构造问答对:用相邻句子构造问答。文档常用先陈述概念再解释的模式,因此效果自然。
最终得到的训练数据干净、具备上下文,能教会模型自然的行文与应答方式。
采集与校验数据
现在把所有步骤串起来,开始采集训练数据:
# Initialize the collector with your API token
# Get your token from: /cp/api_tokens
BRIGHTDATA_API_TOKEN = "your_brightdata_api_token_here"

collector = DataCollector(api_token=BRIGHTDATA_API_TOKEN)

# URLs to scrape - Python documentation makes excellent training data
urls = [
    "https://docs.python.org/3/tutorial/introduction.html",
    "https://docs.python.org/3/tutorial/controlflow.html",
    "https://docs.python.org/3/tutorial/datastructures.html",
    "https://docs.python.org/3/tutorial/modules.html",
    "https://docs.python.org/3/tutorial/classes.html",
]

print("="*60)
print("STARTING DATA COLLECTION")
print("="*60)

training_data = collector.collect_documentation(urls)

# Validate that we got data
if len(training_data) == 0:
    print("⚠️ ERROR: No training data collected!")
    print("nTroubleshooting steps:")
    print("1. Verify your Bright Data API token is correct")
    print("2. Check that your account has sufficient credits")
    print("3. Try with a single URL first to test connectivity")
    raise ValueError("No training data collected")
理解数据采集设置:
- API Token:你需要注册 Bright Data 账户 以获取 API token。我们提供带额度的免费试用,便于快速上手。
- URL 选择:我们选择 Python 文档,因为:
- 结构良好且一致
- 包含非常适合训练代码助手的技术内容
- 说明风格非常适合转化为问答格式
- 公开可得且来源合规
- 错误处理:校验可防止在数据为空的情况下继续训练导致失败。附带的排障步骤可帮助诊断常见问题。
最终数据校验与清洗
在用于训练前,再进行一次最终清洗:
# Final validation and cleaning
def final_validation(examples: List[Dict]) -> List[Dict]:
    """
    Perform final validation and deduplication of training examples.
    """
    clean_data = []
    seen_instructions = set()

    for ex in examples:
        instruction = ex.get('instruction', '').strip()
        response = ex.get('response', '').strip()

        # Final cleaning pass
        instruction = re.sub(r'[^a-zA-Z0-9s.,?!]', '', instruction)
        response = re.sub(r'[^a-zA-Z0-9s.,?!]', '', response)

        # Remove duplicates and ensure quality
        if (len(instruction) > 10 and
            len(response) > 20 and
            instruction not in seen_instructions):

            seen_instructions.add(instruction)
            clean_data.append({
                "instruction": instruction,
                "response": response
            })

    return clean_data

training_data = final_validation(training_data)

print(f"n✅ Final dataset: {len(training_data)} unique examples")
print("nSample training examples:")
print("="*60)

for i, example in enumerate(training_data[:3], 1):
    print(f"nExample {i}:")
    print(f"Q: {example['instruction']}")
    print(f"A: {example['response']}")
该校验做了什么:
- 去重:
seen_instructions确保没有重复问题,避免训练过程中出现过拟合。 - 最终字符清洗:移除除基本标点外的特殊字符,保证文本干净一致。
- 长度门槛:确保样本有足够信息量:
- 问题至少 10 个字符
- 回答至少 20 个字符
- 质量保障:打印样例便于在训练前对数据进行人工抽查。
最终输出应为干净、可读的问答对,适合作为训练数据。如果样例看起来不合理或格式糟糕,你可能需要调整处理参数或更换源 URL。
专业提示:在生产环境中,考虑使用 Bright Data 数据集市场 提供的预采集数据集。它为多个领域提供了精选数据集,能节省大量时间并保证质量一致性。
为 GPT-OSS 训练格式化数据
GPT-OSS 期望特定的聊天格式。我们将使用 Unsloth 的工具确保数据以最优方式格式化:
from unsloth.chat_templates import standardize_sharegpt
from datasets import Dataset

def prepare_dataset(raw_data: List[Dict]):
    """
    Convert raw Q&A pairs to properly formatted training dataset.

    This function handles:
    1. Converting to message format
    2. Applying GPT-OSS chat template
    3. Fixing any formatting issues
    """

    print("Preparing dataset for training...")

    # Step 1: Convert to chat message format
    formatted_data = []
    for item in raw_data:
        formatted_data.append({
            "messages": [
                {"role": "user", "content": item["instruction"]},
                {"role": "assistant", "content": item["response"]}
            ]
        })

    # Step 2: Create HuggingFace dataset
    dataset = Dataset.from_list(formatted_data)
    print(f"Created dataset with {len(dataset)} examples")

    # Step 3: Standardize to ShareGPT format
    dataset = standardize_sharegpt(dataset)
本部分在做什么:
- 消息格式转换:将简单的问答对转换为 GPT 期望的对话格式。每个样本成为两轮对话:用户问题与助手回答。
- 数据集创建:HuggingFace 的 Dataset 类提供高效数据处理,包括:
- 对大数据集的内存映射访问
- 内置批处理与打乱
- 与 HF 生态完全兼容
- ShareGPT 标准化:
standardize_sharegpt确保数据匹配事实上的标准 ShareGPT 格式,处理边界情况并保证一致性。
应用聊天模板
现在应用 GPT-OSS 的特定格式要求:
 # Step 4: Apply GPT-OSS specific chat template
def formatting_prompts_func(examples):
    """Apply the GPT-OSS chat template to each example."""
    convos = examples["messages"]
    texts = []

    for convo in convos:
        # Apply template without generation prompt (we're training)
        text = tokenizer.apply_chat_template(
            convo,
            tokenize = False,
            add_generation_prompt = False
        )
        texts.append(text)

    return {"text": texts}

dataset = dataset.map(
    formatting_prompts_func,
    batched = True,
    desc = "Applying chat template"
)
理解模板应用:
- 聊天模板的作用:每个模型家族都有自己的特殊 token 与格式。GPT-OSS 使用如
<|start|>、<|message|>、<|channel|>等标签来划分对话部分。 - 不添加生成提示:设置
add_generation_prompt = False,因为我们在训练而非生成。训练时希望模型看到完整对话。 - 批处理:
batched = True可成批处理样本,大幅加速大数据集的格式化过程。 - 文本输出:此阶段保留文本,不进行分词;trainer 会用自己的设置处理分词。
验证并修复格式问题
GPT-OSS 对 channel 标签有特定要求,我们需要验证:
 # Step 5: Verify and fix channel tag if needed
    sample_text = dataset[0]['text']
    print("nChecking format...")
    print(f"Sample (first 200 chars): {sample_text[:200]}")

    if "<|channel|>" not in sample_text:
        print("⚠️ Missing channel tag, fixing format...")

        def fix_formatting(examples):
            """Add the channel tag for GPT-OSS compatibility."""
            fixed_texts = []
            for text in examples["text"]:
                # GPT-OSS expects channel tag between role and message
                text = text.replace(
                    "<|start|>assistant<|message|>",
                    "<|start|>assistant<|channel|>final<|message|>"
                )
                fixed_texts.append(text)
            return {"text": fixed_texts}

        dataset = dataset.map(
            fix_formatting,
            batched = True,
            desc = "Adding channel tags"
        )
        print("✅ Format fixed")

    print(f"n✅ Dataset ready: {len(dataset)} formatted examples")
    return dataset

# Prepare the dataset
dataset = prepare_dataset(training_data)
为何 channel 标签重要:
- channel 标签的作用:
<|channel|>final告诉 GPT-OSS 这是最终回答,而非中间推理步骤。这是 GPT-OSS 推理努力控制体系的一部分。 - 格式验证:检查标签是否存在并在缺失时补加,防止因格式不匹配而训练失败。
- 自动修复:替换操作确保兼容性而无需人工干预,特别是在使用不同版本的 tokenizer 时尤为重要。
数据集统计与验证
最后验证准备好的数据集:
# Display statistics
print("nDataset Statistics:")
print(f"Number of examples: {len(dataset)}")
print(f"Average text length: {sum(len(x['text']) for x in dataset) / len(dataset):.0f} chars")

# Show a complete formatted example
print("nFormatted example:")
print("="*60)
print(dataset[0]['text'][:500])
print("="*60)

# Verify all examples have the correct format
format_checks = {
    "has_user_tag": all("<|start|>user" in ex['text'] for ex in dataset),
    "has_assistant_tag": all("<|start|>assistant" in ex['text'] for ex in dataset),
    "has_channel_tag": all("<|channel|>" in ex['text'] for ex in dataset),
    "has_message_tags": all("<|message|>" in ex['text'] for ex in dataset),
}

print("nFormat validation:")
for check, passed in format_checks.items():
    status = "✅" if passed else "❌"
    print(f"{status} {check}: {passed}")
在验证中需要关注:
- 长度统计:平均文本长度有助于你设置合适的序列长度。如果过长,可能需要截断或增大
max_seq_length。 - 格式完整性:四项检查都应通过:
- user 标签标记用户输入起点
- assistant 标签标记模型回答
- channel 标签标记回答类型
- message 标签包含实际内容
- 人工检查:打印的示例应类似下面这样:
<|start|>user<|message|>Your question here<|end|>
<|start|>assistant<|channel|>final<|message|>The response here<|end|>
若任何验证失败,训练可能无法正常进行,或模型会学习到错误模式。自动修复通常可处理大部分问题,但人工检查可捕捉边缘情况。
使用 Unsloth 与 TRL 配置训练
现在我们来设置训练配置。Unsloth 与 Hugging Face 的 TRL 库无缝集成,既具备 Unsloth 的速度优化,也能使用 TRL 的成熟训练算法。
from trl import SFTConfig, SFTTrainer
from unsloth.chat_templates import train_on_responses_only

# Create the training configuration
training_config = SFTConfig(
    # Basic settings
    per_device_train_batch_size = 2,  # Adjust based on your GPU memory
    gradient_accumulation_steps = 4,   # Effective batch size = 2 * 4 = 8
    warmup_steps = 5,
    max_steps = 60,  # For quick testing; increase for production

    # Learning rate settings
    learning_rate = 2e-4,
    lr_scheduler_type = "linear",

    # Optimization settings
    optim = "adamw_8bit",  # 8-bit optimizer saves memory
    weight_decay = 0.01,

    # Logging and saving
    logging_steps = 1,
    save_steps = 20,
    output_dir = "outputs",

    # Advanced settings
    seed = 3407,  # For reproducibility
    fp16 = True,  # Mixed precision training
    report_to = "none",  # Set to "wandb" for experiment tracking
)

print("Training configuration:")
print(f"  Effective batch size: {training_config.per_device_train_batch_size * training_config.gradient_accumulation_steps}")
print(f"  Total training steps: {training_config.max_steps}")
print(f"  Learning rate: {training_config.learning_rate}")
初始化 Trainer
SFTTrainer(监督微调 Trainer)会处理训练的复杂细节:
# Initialize the trainer
trainer = SFTTrainer(
    model = model,
    tokenizer = tokenizer,
    train_dataset = dataset,
    args = training_config,
)

print("✅ Trainer initialized")

# Configure to only train on assistant responses
# This is crucial - we don't want the model learning to generate user questions
gpt_oss_kwargs = dict(
    instruction_part = "<|start|>user<|message|>",
    response_part = "<|start|>assistant<|channel|>final<|message|>"
)

trainer = train_on_responses_only(
    trainer,
    **gpt_oss_kwargs,
)

print("✅ Configured for response-only training")
理解 Trainer 设置:
- SFTTrainer 集成:它将以下组件组合在一起:
- 你的 LoRA 配置模型
- 用于文本处理的 tokenizer
- 准备好的数据集
- 训练配置参数
- 仅在回答上训练:对聊天模型尤为关键。通过
train_on_responses_only我们确保:- 仅在助手回答的 token 上计算损失
- 不学习去生成用户问题
- 训练更高效(更少不必要 token)
- 模型保持理解多样用户输入的能力
- GPT-OSS 专用标签:
instruction_part与response_part必须与数据格式完全匹配。这些标签告诉 trainer 在何处忽略(用户输入)与何处训练(助手回答)。
验证训练 mask
重要的是验证我们只在助手回答上训练,而非用户问题:
# Verify the training mask is correct
print("nVerifying training mask...")
sample = trainer.train_dataset[0]

# Decode the labels to see what we're training on
# -100 indicates tokens we're not training on (masked)
visible_tokens = []
for token_id, label_id in zip(sample["input_ids"], sample["labels"]):
    if label_id != -100:
        visible_tokens.append(token_id)

if visible_tokens:
    decoded = tokenizer.decode(visible_tokens)
    print(f"Training on: {decoded[:200]}...")
    print("✅ Mask verified - only training on responses")
else:
    print("⚠️ Warning: No visible training tokens detected")
mask 验证意味着什么:
- -100 标签:在 PyTorch 中,-100 告诉损失函数忽略这些 token。我们据此实现“仅回答训练”:
- 用户输入 token 的 label 设为 -100(忽略)
- 助手回答 token 维持真实标签(参与训练)
- 可见 token 检查:仅提取未被 mask 的 token,便能看到模型实际学习的内容。你应只看到助手回答,而非用户问题。
- 为何重要:若没有正确 masking:
- 模型可能学会生成用户问题而非答案
- 训练会低效(优化不必要的 token)
- 模型可能出现复读用户输入等不良行为
- 调试提示:若解码文本中包含用户输入,请检查:
instruction_part与response_part字符串是否完全匹配- 数据集格式是否包含所有必需标签
- tokenizer 是否正确应用聊天模板
开始训练
一切就绪后,开始训练。我们将监控 GPU 内存使用并追踪训练进度:
import time
import torch

# Clear GPU cache before training
torch.cuda.empty_cache()

# Record initial GPU state
start_gpu_memory = torch.cuda.max_memory_reserved() / 1024**3
start_time = time.time()

print("="*60)
print("STARTING TRAINING")
print("="*60)
print(f"Initial GPU memory reserved: {start_gpu_memory:.2f} GB")
print(f"Training for {training_config.max_steps} steps...")
print("nTraining progress:")

# Start training
trainer_stats = trainer.train()

# Calculate training statistics
training_time = time.time() - start_time
final_gpu_memory = torch.cuda.max_memory_reserved() / 1024**3
memory_used = final_gpu_memory - start_gpu_memory

print("n" + "="*60)
print("TRAINING COMPLETE")
print("="*60)
print(f"Time taken: {training_time/60:.1f} minutes")
print(f"Final loss: {trainer_stats.metrics['train_loss']:.4f}")
print(f"GPU memory used for training: {memory_used:.2f} GB")
print(f"Peak GPU memory: {final_gpu_memory:.2f} GB")
print(f"Training speed: {trainer_stats.metrics.get('train_steps_per_second', 0):.2f} steps/second")
理解训练指标:
- GPU 内存管理:
- 训练前清缓存可释放未使用内存
- 监控内存有助于后续优化 batch size
- 起始与结束的差值显示训练的实际开销
- 峰值内存告诉你距离 OOM 的余量
- 训练进度指标:
- Loss:应随时间下降,若早早平台期,可能学习率过低
- 步/秒:有助于估算更大数据集的训练时间
- 耗时:在 T4 上,60 步约需 10-15 分钟
- 训练中需观察:
- 损失稳定下降(良好)
- 损失剧烈波动(学习率过高)
- 损失不变(学习率过低或数据问题)
- 内存错误(减少 batch size 或序列长度)
- 性能预期:
- T4:0.5-1.0 步/秒
- V100:1.5-2.5 步/秒
- A100:3-5 步/秒
训练应能顺利完成,并看到损失从约 2-3 降至 1.0 以下。
测试你的微调模型
现在到了激动人心的部分:验证微调是否奏效!我们将创建一个全面的测试函数,并在多个与 Python 相关的问题上进行评估:
from transformers import TextStreamer

def test_model(prompt: str, reasoning_effort: str = "medium", max_length: int = 256):
    """
    Test the fine-tuned model with a given prompt.

    Args:
        prompt: The question or instruction
        reasoning_effort: "low", "medium", or "high"
        max_length: Maximum tokens to generate

    Returns:
        The generated response
    """

    # Create the message format
    messages = [
        {"role": "system", "content": "You are a Python expert assistant."},
        {"role": "user", "content": prompt}
    ]

    # Apply chat template
    inputs = tokenizer.apply_chat_template(
        messages,
        add_generation_prompt = True,
        return_tensors = "pt",
        return_dict = True,
        reasoning_effort = reasoning_effort,
    ).to("cuda")

    # Set up streaming for real-time output
    streamer = TextStreamer(
        tokenizer,
        skip_prompt=True,
        skip_special_tokens=True
    )

    # Generate response
    outputs = model.generate(
        **inputs,
        max_new_tokens = max_length,
        streamer = streamer,
        temperature = 0.7,
        top_p = 0.9,
        do_sample = True,
    )

    # Decode and return the response
    response = tokenizer.decode(outputs[0], skip_special_tokens=True)
    return response

# Test on various Python topics
test_questions = [
    "What is a Python generator and when should I use one?",
    "How do I read a CSV file in Python?",
    "Explain async/await in Python with a simple example",
    "What's the difference between a list and a tuple in Python?",
    "How do I handle exceptions properly in Python?",
]

print("="*60)
print("TESTING FINE-TUNED MODEL")
print("="*60)

for i, question in enumerate(test_questions, 1):
    print(f"n{'='*60}")
    print(f"Question {i}: {question}")
    print(f"{'='*60}")
    print("Response:")
    _ = test_model(question, reasoning_effort="medium")
    print()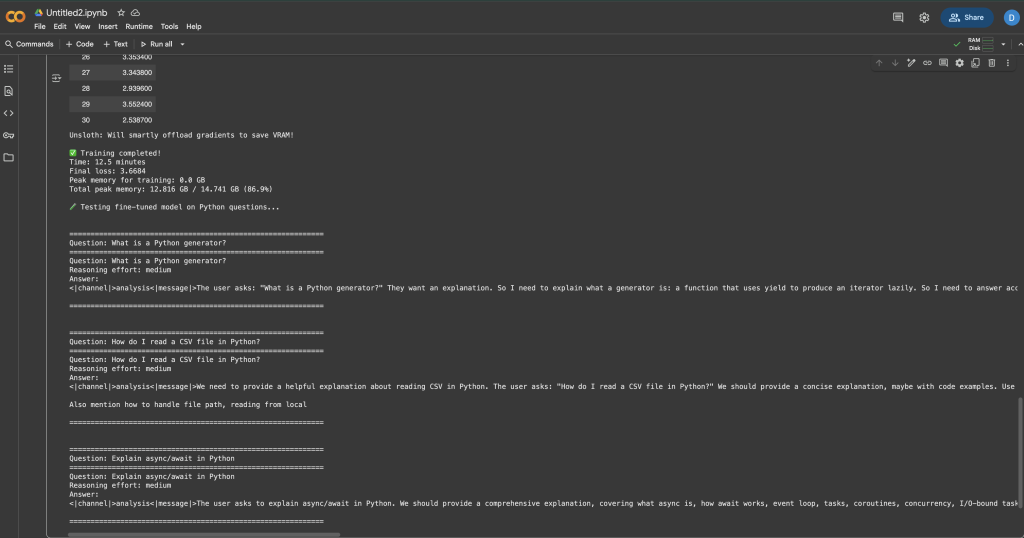
你应会注意到,与微调前相比,模型现在能给出更详细、与 Python 更相关的答案。回答会体现出你的训练数据中文档式的风格与技术深度。
测试不同推理级别
再来测试不同推理努力对回答的影响:
complex_question = "Write a Python function that finds all prime numbers up to n using the Sieve of Eratosthenes"

print("="*60)
print("TESTING REASONING EFFORT LEVELS")
print("="*60)

for effort in ["low", "medium", "high"]:
    print(f"n{'='*40}")
    print(f"Reasoning Effort: {effort.upper()}")
    print(f"{'='*40}")
    _ = test_model(complex_question, reasoning_effort=effort, max_length=300)
    print()
运行后你会看到,“low” 给出基础实现,“medium” 在解释与代码间取得平衡,而 “high” 则包含更详细的解释与优化。
保存与部署你的模型
微调成功后,你可能需要保存模型以便后续使用。可根据部署需求选择不同方式:
本地保存
import os

# Create directory for saving
save_dir = "gpt-oss-python-expert"
os.makedirs(save_dir, exist_ok=True)

print("Saving model locally...")

# Option 1: Save LoRA adapters only (small, ~200MB)
lora_save_dir = f"{save_dir}-lora"
model.save_pretrained(lora_save_dir)
tokenizer.save_pretrained(lora_save_dir)
print(f"✅ LoRA adapters saved to {lora_save_dir}")

# Check the size
lora_size = sum(
    os.path.getsize(os.path.join(lora_save_dir, f))
    for f in os.listdir(lora_save_dir)
) / (1024**2)
print(f"   Size: {lora_size:.1f} MB")

# Option 2: Save merged model (full size, ~20GB)
merged_save_dir = f"{save_dir}-merged"
model.save_pretrained_merged(
    merged_save_dir,
    tokenizer,
    save_method = "merged_16bit"  # Options: "merged_16bit", "mxfp4"
)
print(f"✅ Merged model saved to {merged_save_dir}")
推送至 Hugging Face Hub
为了便于分享与部署,将模型推送到 Hugging Face:
from huggingface_hub import login

# Login to Hugging Face (you'll need your token)
# Get token from: https://huggingface.co/settings/tokens
login(token="hf_...")  # Replace with your token

# Push LoRA adapters (recommended for sharing)
model_name = "your-username/gpt-oss-python-expert-lora"
print(f"Pushing LoRA adapters to {model_name}...")

model.push_to_hub(
    model_name,
    use_auth_token=True,
    commit_message="Fine-tuned GPT-OSS on Python documentation"
)

tokenizer.push_to_hub(
    model_name,
    use_auth_token=True
)

print(f"✅ Model available at: https://huggingface.co/{model_name}")

# Optionally push the merged model (takes longer)
if False:  # Set to True if you want to push the full model
    merged_model_name = "your-username/gpt-oss-python-expert"
    model.push_to_hub_merged(
        merged_model_name,
        tokenizer,
        save_method = "mxfp4",  # 4-bit for smaller size
        use_auth_token=True
    )
加载你的微调模型
之后可按如下方式加载模型用于推理:
from unsloth import FastLanguageModel

# Load from local directory
model, tokenizer = FastLanguageModel.from_pretrained(
    model_name = "gpt-oss-python-expert-lora",
    max_seq_length = 1024,
    dtype = None,
    load_in_4bit = True,
)

# Or load from Hugging Face Hub
model, tokenizer = FastLanguageModel.from_pretrained(
    model_name = "your-username/gpt-oss-python-expert-lora",
    max_seq_length = 1024,
    dtype = None,
    load_in_4bit = True,
)

print("✅ Model loaded and ready for inference!")
优化策略以获得更佳效果
以下是一些实用的微调优化策略:
内存优化技巧
在显存有限时,这些技巧往往决定成败:
# 1. Gradient checkpointing - trades compute for memory
model.gradient_checkpointing_enable()

# 2. Reduce sequence length if your data allows
max_seq_length = 512  # Instead of 1024

# 3. Use smaller batch sizes with more accumulation
per_device_train_batch_size = 1
gradient_accumulation_steps = 16  # Still effective batch size of 16

# 4. Enable memory efficient attention (if supported)
model.config.use_flash_attention_2 = True

# 5. Clear cache regularly during training
import gc
gc.collect()
torch.cuda.empty_cache()
训练最佳实践
经验表明,这些做法可带来更好的微调效果:
- 小步起步:先用 100 个样本测试,成功后逐步扩大。
- 监控指标:警惕过拟合——训练损失下降而验证损失上升时应早停。
- 数据混合:将领域数据与通用指令数据混合,防止灾难性遗忘。
- 学习率调度:默认 2e-4 是个好起点,但可尝试 5e-5 等更低值以适配小数据集。
- 检查点策略:每 N 步保存,便于从最佳检查点恢复:
training_config = SFTConfig(
    save_steps = 50,
    save_total_limit = 3,  # Keep only 3 best checkpoints
    load_best_model_at_end = True,
    metric_for_best_model = "loss",
)
加速优化
最大化训练速度:
# Use PyTorch 2.0 compile for faster training
if hasattr(torch, 'compile'):
    model = torch.compile(model)
    print("✅ Model compiled for faster training")

# Enable TF32 on Ampere GPUs (A100, RTX 30xx)
torch.backends.cuda.matmul.allow_tf32 = True
torch.backends.cudnn.allow_tf32 = True

# Use larger batch sizes if memory allows
# Larger batches generally train faster
optimal_batch_size = find_optimal_batch_size(model, max_memory=0.9)
生产部署选项
模型微调后,你有多种部署选择:
使用 FastAPI 快速搭建本地 API
用于快速原型搭建,创建一个简单 API:
# save as: api.py
from fastapi import FastAPI, HTTPException
from pydantic import BaseModel
import uvicorn
from unsloth import FastLanguageModel

app = FastAPI()

# Load model once at startup
model, tokenizer = None, None

@app.on_event("startup")
async def load_model():
    global model, tokenizer
    model, tokenizer = FastLanguageModel.from_pretrained(
        "gpt-oss-python-expert-lora",
        max_seq_length = 1024,
        load_in_4bit = True,
    )

class GenerateRequest(BaseModel):
    prompt: str
    reasoning_effort: str = "medium"
    max_tokens: int = 256

@app.post("/generate")
async def generate(request: GenerateRequest):
    if not model:
        raise HTTPException(status_code=503, detail="Model not loaded")

    messages = [{"role": "user", "content": request.prompt}]
    inputs = tokenizer.apply_chat_template(
        messages,
        add_generation_prompt = True,
        return_tensors = "pt",
        reasoning_effort = request.reasoning_effort,
    ).to("cuda")

    outputs = model.generate(
        **inputs,
        max_new_tokens = request.max_tokens,
        temperature = 0.7,
    )

    response = tokenizer.decode(outputs[0], skip_special_tokens=True)
    return {"response": response}

# Run with: uvicorn api:app --host 0.0.0.0 --port 8000
使用 vLLM 进行生产级部署
对于高吞吐量的生产服务,vLLM 提供了卓越性能:
# Install vLLM
pip install vllm

# Serve your model
python -m vllm.entrypoints.openai.api_server
    --model gpt-oss-python-expert-merged
    --tensor-parallel-size 1
    --max-model-len 1024
    --dtype float16
云端部署选项
各云平台各有优势:
Hugging Face Inference Endpoints
- 最易上手——推送即部署
- 适用于测试与小规模生产
- 支持自动扩缩容
- 非常适合无服务器部署
- 按使用付费
- 适合突发负载
- 7×24 小时服务的高性价比选择
- 完全掌控运行环境
- 适合高吞吐应用
- 企业级,完整 AWS 集成
- 高级监控与日志
- 适合大规模生产部署
常见问题排障
即使有 Unsloth 的优化,你仍可能遇到一些问题。以下是最常见问题的解决方法:
CUDA 显存不足(OOM)
这是一类最常见的问题:
# Solution 1: Reduce batch size
training_config = SFTConfig(
    per_device_train_batch_size = 1,  # Minimum batch size
    gradient_accumulation_steps = 8,   # Compensate with accumulation
)

# Solution 2: Reduce sequence length
max_seq_length = 512  # Instead of 1024

# Solution 3: Use more aggressive quantization
model = FastLanguageModel.from_pretrained(
    model_name = "unsloth/gpt-oss-20b",
    load_in_4bit = True,
    use_double_quant = True,  # Even more memory savings
)

# Solution 4: Enable all memory optimizations
use_gradient_checkpointing = "unsloth"
use_flash_attention = True
训练速度慢
如果训练耗时过长:
# Use Unsloth's full optimization suite
model = FastLanguageModel.get_peft_model(
    model,
    use_gradient_checkpointing = "unsloth",  # Critical
    lora_dropout = 0,  # 0 is faster than dropout
    bias = "none",  # "none" is faster than training biases
    use_rslora = False,  # Standard LoRA is faster
)

# Check you're using the right dtype
torch.set_float32_matmul_precision('medium')  # Or 'high'
模型不收敛
如果损失不下降:
- 检查数据格式:确保数据严格符合 GPT-OSS 格式
- 验证回答 mask:确认只在回答部分训练
- 调整学习率:尝试 5e-4 或 1e-4 替代 2e-4
- 提高数据质量:移除低质量样本
- 增加数据量:500+ 样本通常比 100 更稳定
输出不稳定
若生成结果不一致或质量较差:
# Use lower temperature for more consistent outputs
outputs = model.generate(
    temperature = 0.3,  # Lower = more consistent
    top_p = 0.9,
    repetition_penalty = 1.1,  # Reduce repetition
)

# Fine-tune for more steps
max_steps = 200  # Instead of 60

# Use higher quality data filtering
min_response_length = 50  # Instead of 30
结论
当你将 Unsloth 的速度与高质量、结构化的训练数据相结合时,微调 GPT-OSS 会更快、更简单。使用 顶级 AI 训练数据提供商之一提供的数据,加上 Bright Data 的 AI 方案,即可确保你拥有可靠的数据来进行高效微调,从而为任意用例构建定制化 AI 模型。
若想进一步探索 AI 驱动的数据提取策略,推荐阅读以下资源:


技术写作者
Amitesh Anand 是一位开发者倡导者和技术写作者,分享有关 AI、软件和开发工具的内容,拥有 1 万粉丝和超过 40 万次观看。