谷歌于 2026 年 3 月发布了最新的开放重量级人工智能模型 Gemma 3,其性能令人印象深刻,可与许多专有 LLM 相媲美,同时还能在资源有限的硬件上高效运行。开源人工智能的这一进步可在各种平台上运行,以易于使用的形式为全球开发人员提供强大的功能。
在本指南中,我们将指导您在一个来自 Trustpilot 评论的自定义问题解答数据集上对 Gemma 3 进行微调。我们将使用Bright Data抓取客户评论,将其处理成结构化的 QA 对,并利用Unsloth以最少的计算量进行高效的微调。最后,您将创建一个能理解特定领域问题的专业人工智能助手,并准备好托管到 Hugging Face Hub 上。
让我们深入了解一下!
Gemma 3
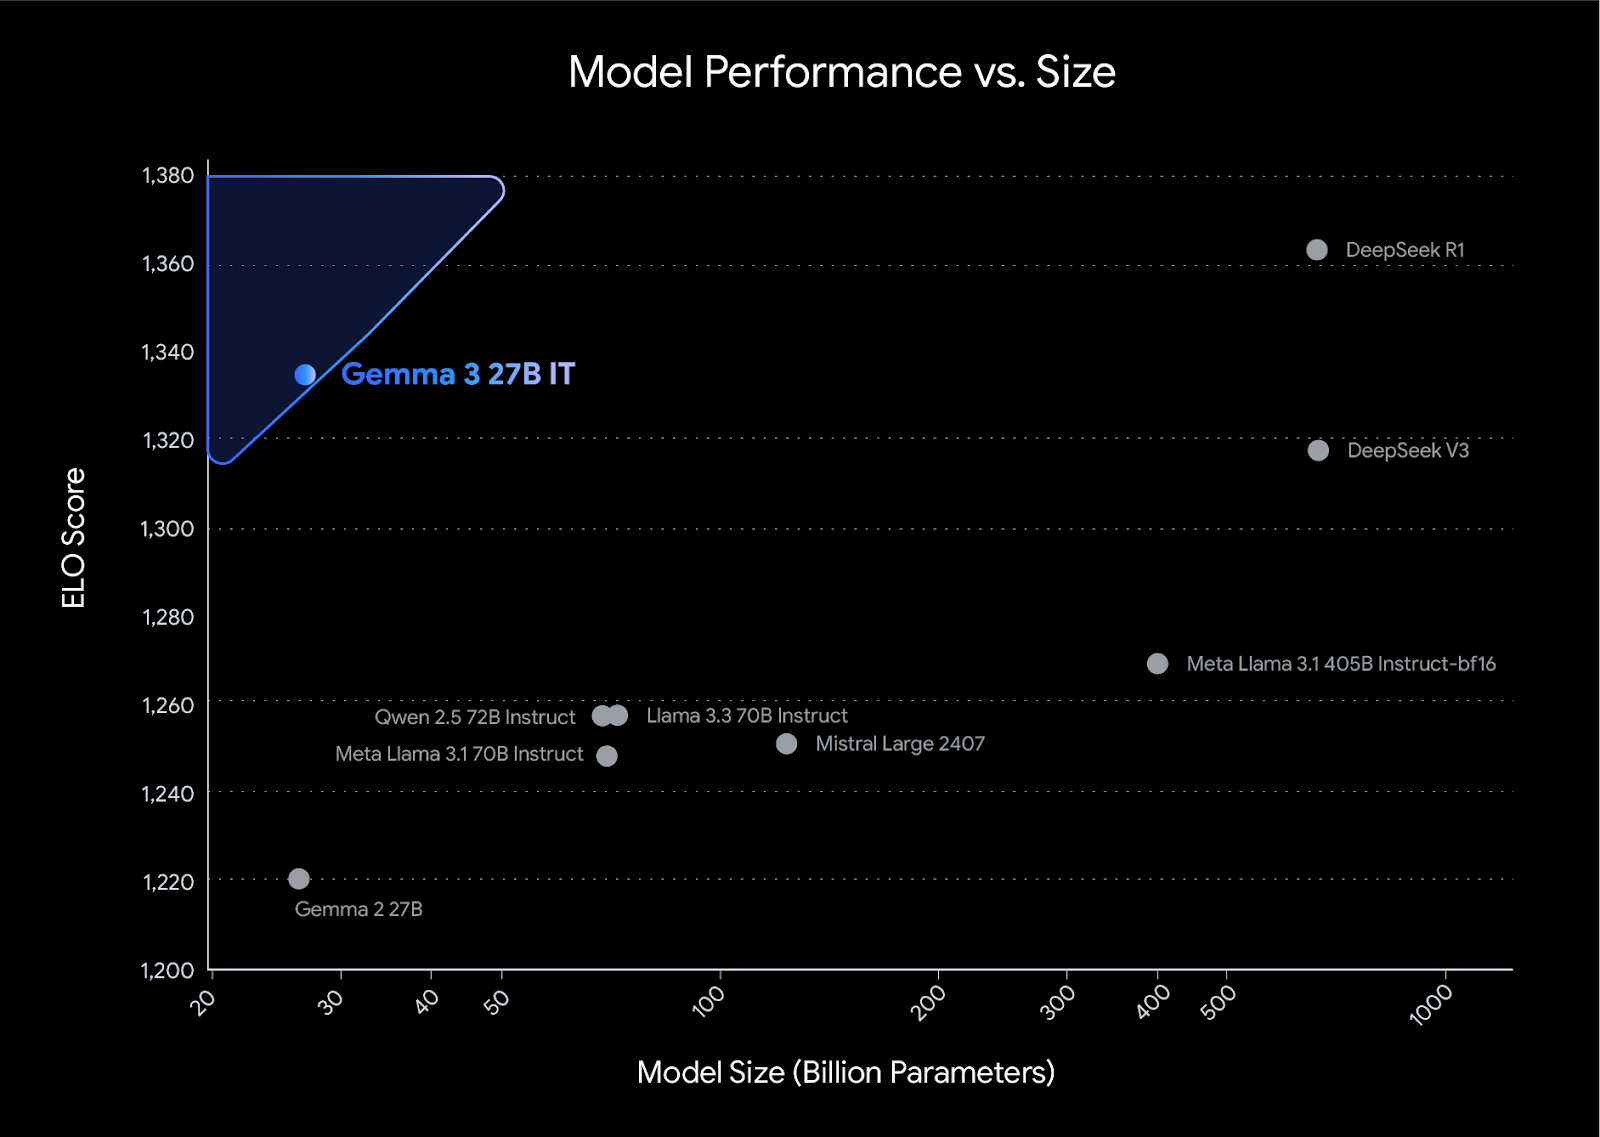
谷歌的 Gemma 3 系列于 2026 年 3 月推出,有四种开放重量大小–1B、4B、12B 和 27B 参数,所有参数都设计为在单个 GPU 上运行。
- 1B 模式是纯文本模式,有一个 32K 标记的上下文窗口。
- 4B、12B 和 27B 型号增加了多模态(文本+图像)输入,并支持 128K 令牌窗口。
在 LMArena 人类偏好排行榜上,Gemma 3-27B-IT 的得分超过了 Llama 3 405B 和 DeepSeek-V3 等更大型的型号,无需多 GPU 就能提供最先进的质量。
图片来源介绍 Gemma 3
Gemma 3 型号的主要特点
以下是 Gemma 3 型号的一些显著特点:
- 4B、12B 和 27B 型号可提供多模态输入(文本 + 图像)。
- 长上下文最多128K 标记(1B 机型为 32K)。
- 多语言功能– 开箱即支持 35 种以上语言;预培训 140 种以上语言。
- 量化感知训练–官方 QAT 版本可在保持高质量的同时大幅减少内存使用量(约 3 倍)。
- 函数调用和结构化输出– 包括对自动调用和接收结构化响应的内置支持。
- 效率– 可在单个 GPU/TPU 上运行,甚至可在消费类设备(从手机、笔记本电脑到工作站)上运行。
- 安全(ShieldGemma)– 具有集成的内容过滤框架。
为什么要微调 Gemma 3?
微调可以利用像 Gemma 3 这样的预训练模型,针对特定领域或任务教它新的行为,而无需花费时间和成本从头开始训练。Gemma 3 设计紧凑,在 4B+ 变体上还支持多模态,因此即使在资源有限的硬件上进行微调也是轻便、经济和可行的。
微调的好处包括
- 领域专业化– 帮助模型理解特定行业的语言,更好地执行领域内的专业任务。
- 知识增强– 添加模型原始训练数据中没有的重要事实和背景。
- 行为细化–调整模型的响应方式,使其符合您的品牌调性或首选输出格式。
- 资源优化– 与从头开始训练一个新模型相比,使用更少的计算资源就能获得高质量的结果。
先决条件
在开始本教程之前,请确保您具备以下条件:
- 系统已安装Python 3.9 或更高版本。
- Python 编程基础知识。
- 访问支持 GPU 的计算环境(如 Google Colab、Jupyter Notebook 或 Kaggle Notebooks)。
- 了解机器学习和大型语言模型 (LLM) 的基本原理。
- 有使用集成开发环境(如 VS Code 或类似软件)的经验。
您还需要外部服务的访问凭证:
- 一个Hugging Face帐户和一个具有写入权限的令牌。
在此创建令牌 - Bright Data帐户和 API 令牌。
👉注册并按照说明生成令牌。 - OpenAI账户和 API 密钥。
在此获取 API 密钥
💡 确保您的 OpenAI 账户有足够的余额。在此处管理账单,在此处跟踪使用情况。
建立自定义数据集进行微调
当您的数据集能紧密反映您希望模型学习的行为时,微调效果最佳。通过创建为特定用例量身定制的数据集,可以显著提高模型的性能。请记住一条经典规则:“垃圾进,垃圾出”。这就是为什么投入时间准备数据集如此重要的原因。
高质量的数据集应该:
- 与您的特定用例相匹配–您的数据集越接近您的目标应用,您的模型输出就越相关。
- 保持格式一致– 统一的结构(如问题-答案对)有助于模型更有效地学习模式。
- 包含各种示例–各种方案有助于模型在不同输入情况下的泛化。
- 干净无误– 消除不一致和噪音,防止模型捕捉到不需要的行为。
我们先从这样的原始评论开始:
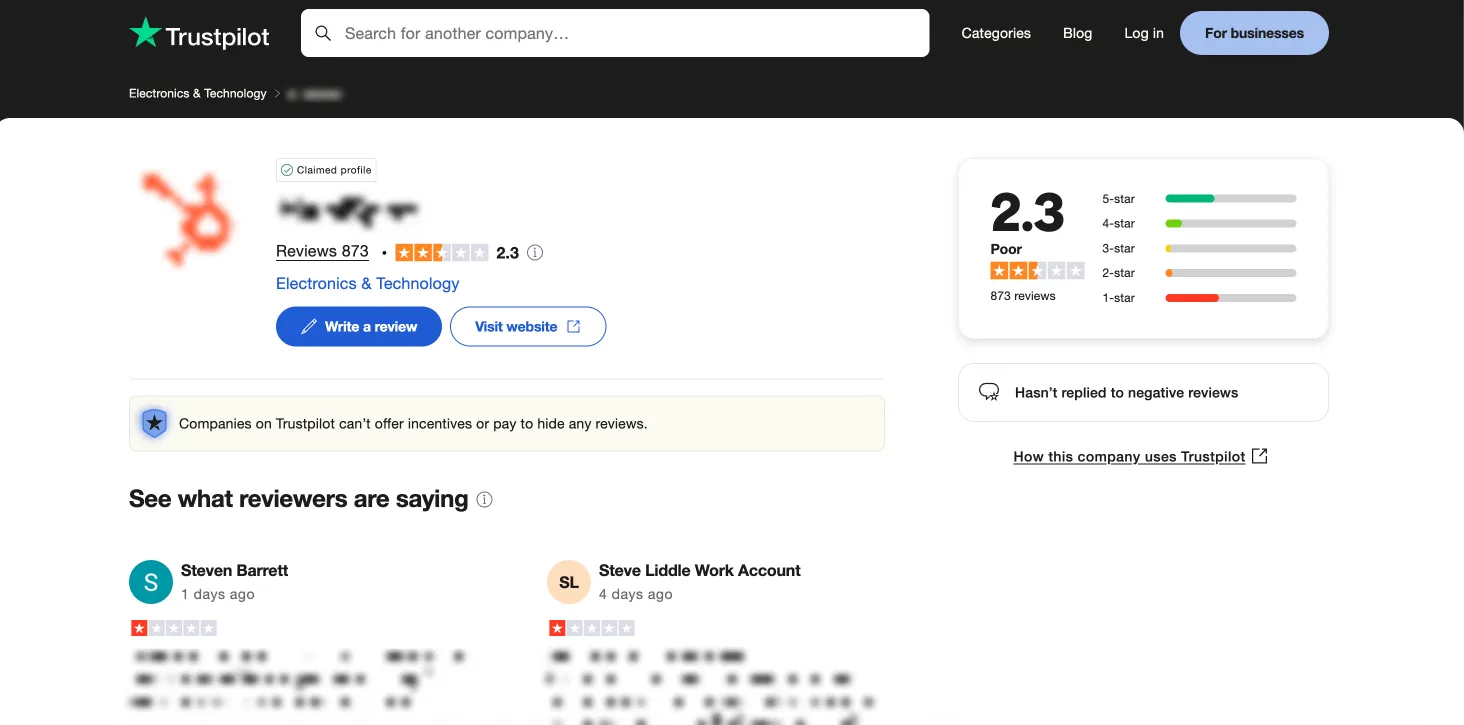
并将它们转化为这样的结构化问答对:
该数据集将教会 Gemma 3 从客户反馈中提取洞察力、识别情感模式并提供可行建议。
设置步骤
#1 安装库:打开项目环境,安装requirements.txt文件中列出的所有必要 Python 库。在终端或笔记本中运行以下命令即可:
pip install -r requirements.txt#2 配置环境变量:在项目根目录下创建.env文件,安全存储 API 密钥。
OPENAI_API_KEY="your_openai_key_here"
HF_TOKEN="your_hugging_face_token_here"
步骤 1:利用明亮数据收集数据
关键的第一步是收集数据。为了建立微调数据集,我们将从 Trustpilot 收集原始评论数据。由于 Trustpilot 强大的反僵尸措施,我们将使用Bright Data 的 Trustpilot Scraper API。该应用程序接口可有效管理 IP 轮换、验证码解析和动态内容处理,从而高效地大规模收集结构化评论,避开了构建刮擦解决方案的复杂性。
下面是一个 Python 脚本,逐步展示了如何使用 Bright Data 的 API 收集评论:
import time
import json
import requests
from typing import Optional

# --- Configuration ---
API_KEY = "YOUR_API_KEY"  # Replace with your Bright Data API key
DATASET_ID = "gd_lm5zmhwd2sni130p"  # Replace with your Dataset ID
TARGET_URL = "https://www.trustpilot.com/review/hubspot.com"  # Target company page
OUTPUT_FILE = "trustpilot_reviews.json"  # Output file name
HEADERS = {"Authorization": f"Bearer {API_KEY}"}
TIMEOUT = 30  # Request timeout in seconds

# --- Functions ---
def trigger_snapshot() -> Optional[str]:
    """Triggers a Bright Data snapshot collection job."""
    print(f"Triggering snapshot for: {TARGET_URL}")
    try:
        resp = requests.post(
            "https://api.brightdata.com/datasets/v3/trigger",
            headers=HEADERS,
            params={"dataset_id": DATASET_ID},
            json=[{"url": TARGET_URL}],
            timeout=TIMEOUT,
        )
        resp.raise_for_status()  # Raise HTTPError for bad responses (4xx or 5xx)
        snapshot_id = resp.json().get("snapshot_id")
        print(f"Snapshot triggered successfully. ID: {snapshot_id}")
        return snapshot_id
    except requests.RequestException as e:
        print(f"Error triggering snapshot: {e}")
    except json.JSONDecodeError:
        print(f"Error decoding trigger response: {resp.text}")
    return None

def wait_for_snapshot(snapshot_id: str) -> Optional[list]:
    """Polls the API until snapshot data is ready and returns it."""
    check_url = f"https://api.brightdata.com/datasets/v3/snapshot/{snapshot_id}"
    print(f"Waiting for snapshot {snapshot_id} to complete...")
    while True:
        try:
            resp = requests.get(
                check_url,
                headers=HEADERS,
                params={"format": "json"},
                timeout=TIMEOUT,
            )
            resp.raise_for_status()
            # Check if response is the final data (list) or status info (dict)
            if isinstance(resp.json(), list):
                print("Snapshot data is ready.")
                return resp.json()
            else:
                pass
        except requests.RequestException as e:
            print(f"Error checking snapshot status: {e}")
            return None  # Stop polling on error
        except json.JSONDecodeError:
            print(f"Error decoding snapshot status response: {resp.text}")
            return None  # Stop polling on error

        print("Data not ready yet. Waiting 30 seconds...")
        time.sleep(30)

def save_reviews(reviews: list, output_file: str) -> bool:
    """Saves the collected reviews list to a JSON file."""
    try:
        with open(output_file, "w", encoding="utf-8") as f:
            json.dump(reviews, f, indent=2, ensure_ascii=False)
        print(f"Successfully saved {len(reviews)} reviews to {output_file}")
        return True
    except (IOError, TypeError) as e:
        print(f"Error saving reviews to file: {e}")
        return False
    except Exception as e:
        print(f"An unexpected error occurred during saving: {e}")
        return False

def main():
    """Main execution flow for collecting Trustpilot reviews."""
    print("Starting Trustpilot review collection process...")
    snapshot_id = trigger_snapshot()
    if not snapshot_id:
        print("Failed to trigger snapshot. Exiting.")
        return

    reviews = wait_for_snapshot(snapshot_id)
    if not reviews:
        print("Failed to retrieve reviews from snapshot. Exiting.")
        return

    if not save_reviews(reviews, OUTPUT_FILE):
        print("Failed to save the collected reviews.")
    else:
        print("Review collection process completed.")

if __name__ == "__main__":
    main()
该脚本执行以下步骤:
- 身份验证:它使用您的
API_KEY通过授权头与 Bright Data API 进行身份验证。 - 触发收集:它会发送一个 POST 请求,触发与
DATASET_ID相关联的指定TARGET_URL(本例中为 HubSpot 的 Trustpilot 页面)的数据收集 “快照”。 - 等待完成:它会使用返回的
snapshot_id定期轮询 API,检查数据收集是否完成。 - 获取数据:一旦 API 显示数据已准备就绪,脚本就会以 JSON 格式获取审核数据。
- 保存输出:它会将收集到的评论对象列表保存到结构化的 JSON 文件
(trustpilot_reviews.json)中。
生成的 JSON 文件中的每个审查都提供了详细信息,例如
{
    "review_id": "680af52fb0bab688237f75c5",
    "review_date": "2026-04-25T04:36:31.000Z",
    "review_rating": 1,
    "review_title": "Cancel Auto Renewal Doesn't Work",
    "review_content": "I was with Hubspot for almost 3 years...",
    "reviewer_name": "Steven Barrett",
    "reviewer_location": "AU",
    "is_verified_review": false,
    "review_date_of_experience": "2026-04-19T00:00:00.000Z",
    // Additional fields omitted for brevity
}
通过我们的指南了解如何为 LLM 培训找到最佳数据:法律硕士培训数据的顶级来源。
步骤 2:将 JSON 转换为 Markdown
收集完原始评论数据后,下一步就是将其转换成适合处理的简洁可读格式。我们将使用 Markdown,它提供了一种轻量级的纯文本结构,可以减少标记化过程中的噪音,潜在地提高微调性能,并确保不同内容部分之间的一致分隔。
要执行转换,只需运行以下脚本 👉convert-trustpilot-json-to-markdown.py
该脚本从步骤 1 的输出中读取 JSON 数据,并生成一个包含结构化摘要和单个客户评论的 Markdown 文件。
下面是 Markdown 输出结构的示例:
# HubSpot Review Summary
[Visit Website](https://www.hubspot.com/)
**Overall Rating**: 2.3
**Total Reviews**: 873
**Location**: United States
**Industry**: Electronics & Technology

> HubSpot is a leading growth platform... Grow Better.
---

### Review by Steven Barrett (AU)
- **Posted on**: April 25, 2026
- **Experience Date**: April 19, 2026
- **Rating**: 1
- **Title**: *Cancel Auto Renewal Doesn't Work*

I was with Hubspot for almost 3 years... Avoid.

[View Full Review](https://www.trustpilot.com/reviews/680af52fb0bab688237f75c5)

---阅读我们的指南,了解为什么人工智能代理更喜欢 Markdown 而不是 HTML。
步骤 3:对文档进行分块和处理
准备好 Markdown 文档后,下一个关键步骤就是将其分割成较小的、易于管理的块。这一点非常重要,因为大型语言模型(LLM)有输入标记限制,而微调通常需要适当长度的示例才能达到最佳效果。此外,处理这些语块可以提高模型的清晰度和连贯性。
我们使用LangChain 的RecursiveCharacterTextSplitter来分割 Markdown 文件。该方法根据分隔符列表递归分割文本,有助于将相关的文本保持在一起。为了保留可能跨越分割点的上下文,我们会在连续的块之间应用重叠。在此过程中,我们使用的分块大小为 1,024 个字符,重叠部分为 256 个字符。
拆分后,每个分块都会被选择性地传递给一个 LLM(如 GPT-4o),以提高其整体清晰度和连贯性,同时严格保持评论文本的原意。这一增强步骤的目的是使每个分块内的数据结构和内容达到最佳清晰度,以便于后续的微调过程。
然后,每个处理过的数据块都会被分配一个唯一的标识符,并以 JSON Lines (.jsonl) 文件格式存储,为管道的下一阶段做好准备。
下面是使用 LLM 的 Python 函数,以提高清晰度:
def improve_review_chunk(text: str, client: OpenAI, model: str = "gpt-4o") -> str:
    prompt = """Improve this review's clarity while preserving its meaning:
{text}

Return only the improved text without additional commentary."""
    response = client.chat.completions.create(
            model=model,
            messages=[
                {"role": "system", "content": prompt},
                {"role": "user", "content": text}
            ]
        )
    return response.choices[0].message.content
在此查看此步骤的完整代码 👉split-markdown-into-chunks.py
输出结果是一个 JSON 行文件,其中每一行代表一个评论块,带有唯一标识符和可能改进的评论内容:
[
  {
    "id": "f8a3b1c9-e4d5-4f6a-8b7c-2d9e0a1b3c4d", // Unique chunk ID
    "review": "# HubSpot Review Summary\n\n[Visit Website](https://www.hubspot.com/)...\n---\n\n### Review by Steven Barrett (AU)\n- **Posted on**: April 25, 2024...\n- **Rating**: 1\n- **Title**: *Cancel Auto Renewal Doesn't Work*\n\nI was with Hubspot for almost 3 years... [Text continues - may be improved]" // Chunk content (potentially refined)
  },
  // ... more chunk objects
]
步骤 4:生成质量保证对
最后一个数据准备步骤是将处理过的评论块转换成适合微调语言模型的结构化问答(QA)对。我们使用 OpenAI 的 GPT-4o 为步骤 3 中创建的.jsonl文件中的每个块生成一个 QA 对。
对于每个块,脚本都会使用精心设计的系统提示调用 OpenAI API:
SYSTEM_PROMPT = """
You are an expert at transforming customer reviews into insightful question–answer pairs. For each review, generate exactly 1 high-quality QA pair.

PURPOSE:
These QA pairs will train a customer service AI to understand feedback patterns about HubSpot products and identify actionable insights.

GUIDELINES FOR QUESTIONS:
- Make questions general and applicable to similar situations
- Phrase from a stakeholder perspective (e.g., "What feature gaps are causing customer frustration?")
- Focus on product features, usability, pricing, or service impact

GUIDELINES FOR ANSWERS:
- Provide analytical responses (3–5 sentences)
- Extract insights without quoting verbatim
- Offer actionable recommendations
- Maintain objectivity and clarity

FORMAT REQUIREMENTS:
- Start with "Q: " followed by your question
- Then "A: " followed by a plain-text answer
"""
脚本包含内置的速率限制和重试机制,以处理临时的 API 中断,确保稳定执行。你可以在generate-qa-pairs.py 中找到完整的实现。
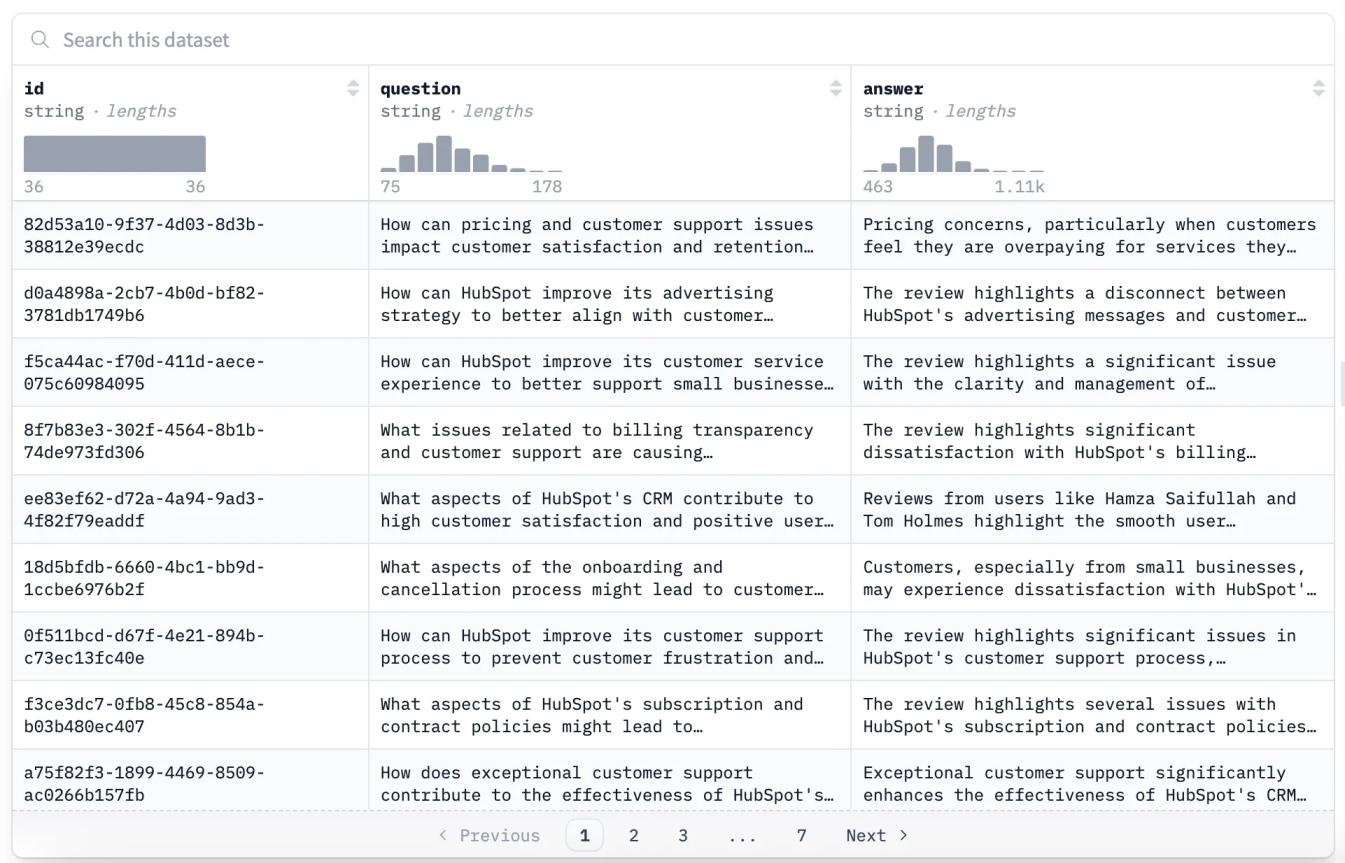
输出结果以 JSON 数组的形式保存,其中每个对象都包含生成的问题和答案对,并由原始块的 ID 链接:
[
  {
    "id": "82d53a10-9f37-4d03-8d3b-38812e39ecdc",
    "question": "How can pricing and customer support issues impact customer satisfaction and retention for HubSpot?",
    "answer": "Pricing concerns, particularly when customers feel they are overpaying for services they find unusable or unsupported, can significantly impact customer satisfaction and retention..."
  }
  // ... more QA pairs
]
生成后,强烈建议将生成的 QA 数据集推送到抱抱脸中心。这样可以方便地进行微调和共享。您可以在此处查看已发布数据集的示例:Trustpilot-reviews-qa-dataset。
用 Unsloth 微调 Gemma 3:步骤
现在我们已经准备好了自定义问答数据集,让我们对 Gemma 3 模型进行微调。我们将使用Unsloth,它是一个开源库,与标准的 Hugging Face 实现相比,它为 LoRA/QLoRA 训练提供了显著的内存和速度改进。这些优化使 Gemma 3 等模型的微调更容易在单 GPU 设置上实现,前提是 GPU 有足够的 VRAM。
| Gemma 3 尺寸 | 大约所需 VRAM* | 合适的平台 |
|---|---|---|
| 4B | ~15 GB | 免费 Google Colab (T4)、Kaggle (P100 16 GB) |
| 12B | ≥24 GB | Colab Pro+(A100/A10)、RTX 4090、A40 |
| 27B | 22-24 GB(使用 4 位 QLoRA,批量大小 = 1);否则 ~40 GB | A100 40 GB、H100、多 GPU 设置 |
注:VRAM 需求会因批次大小、序列长度和特定量化技术而异。27B 型号的要求是 4 位 QLoRA 和较小的批量(如 1 或 2);较高的批量或不太激进的量化将需要更多的 VRAM(~40 GB+)。
对于初学者,建议从免费 Colab 笔记本上的4B型号开始,因为它可以轻松支持 Unsloth 的加载、培训和部署。只有在可以使用更高内存的 GPU 或付费云层级时,才可考虑升级到 12B 或 27B 型号。
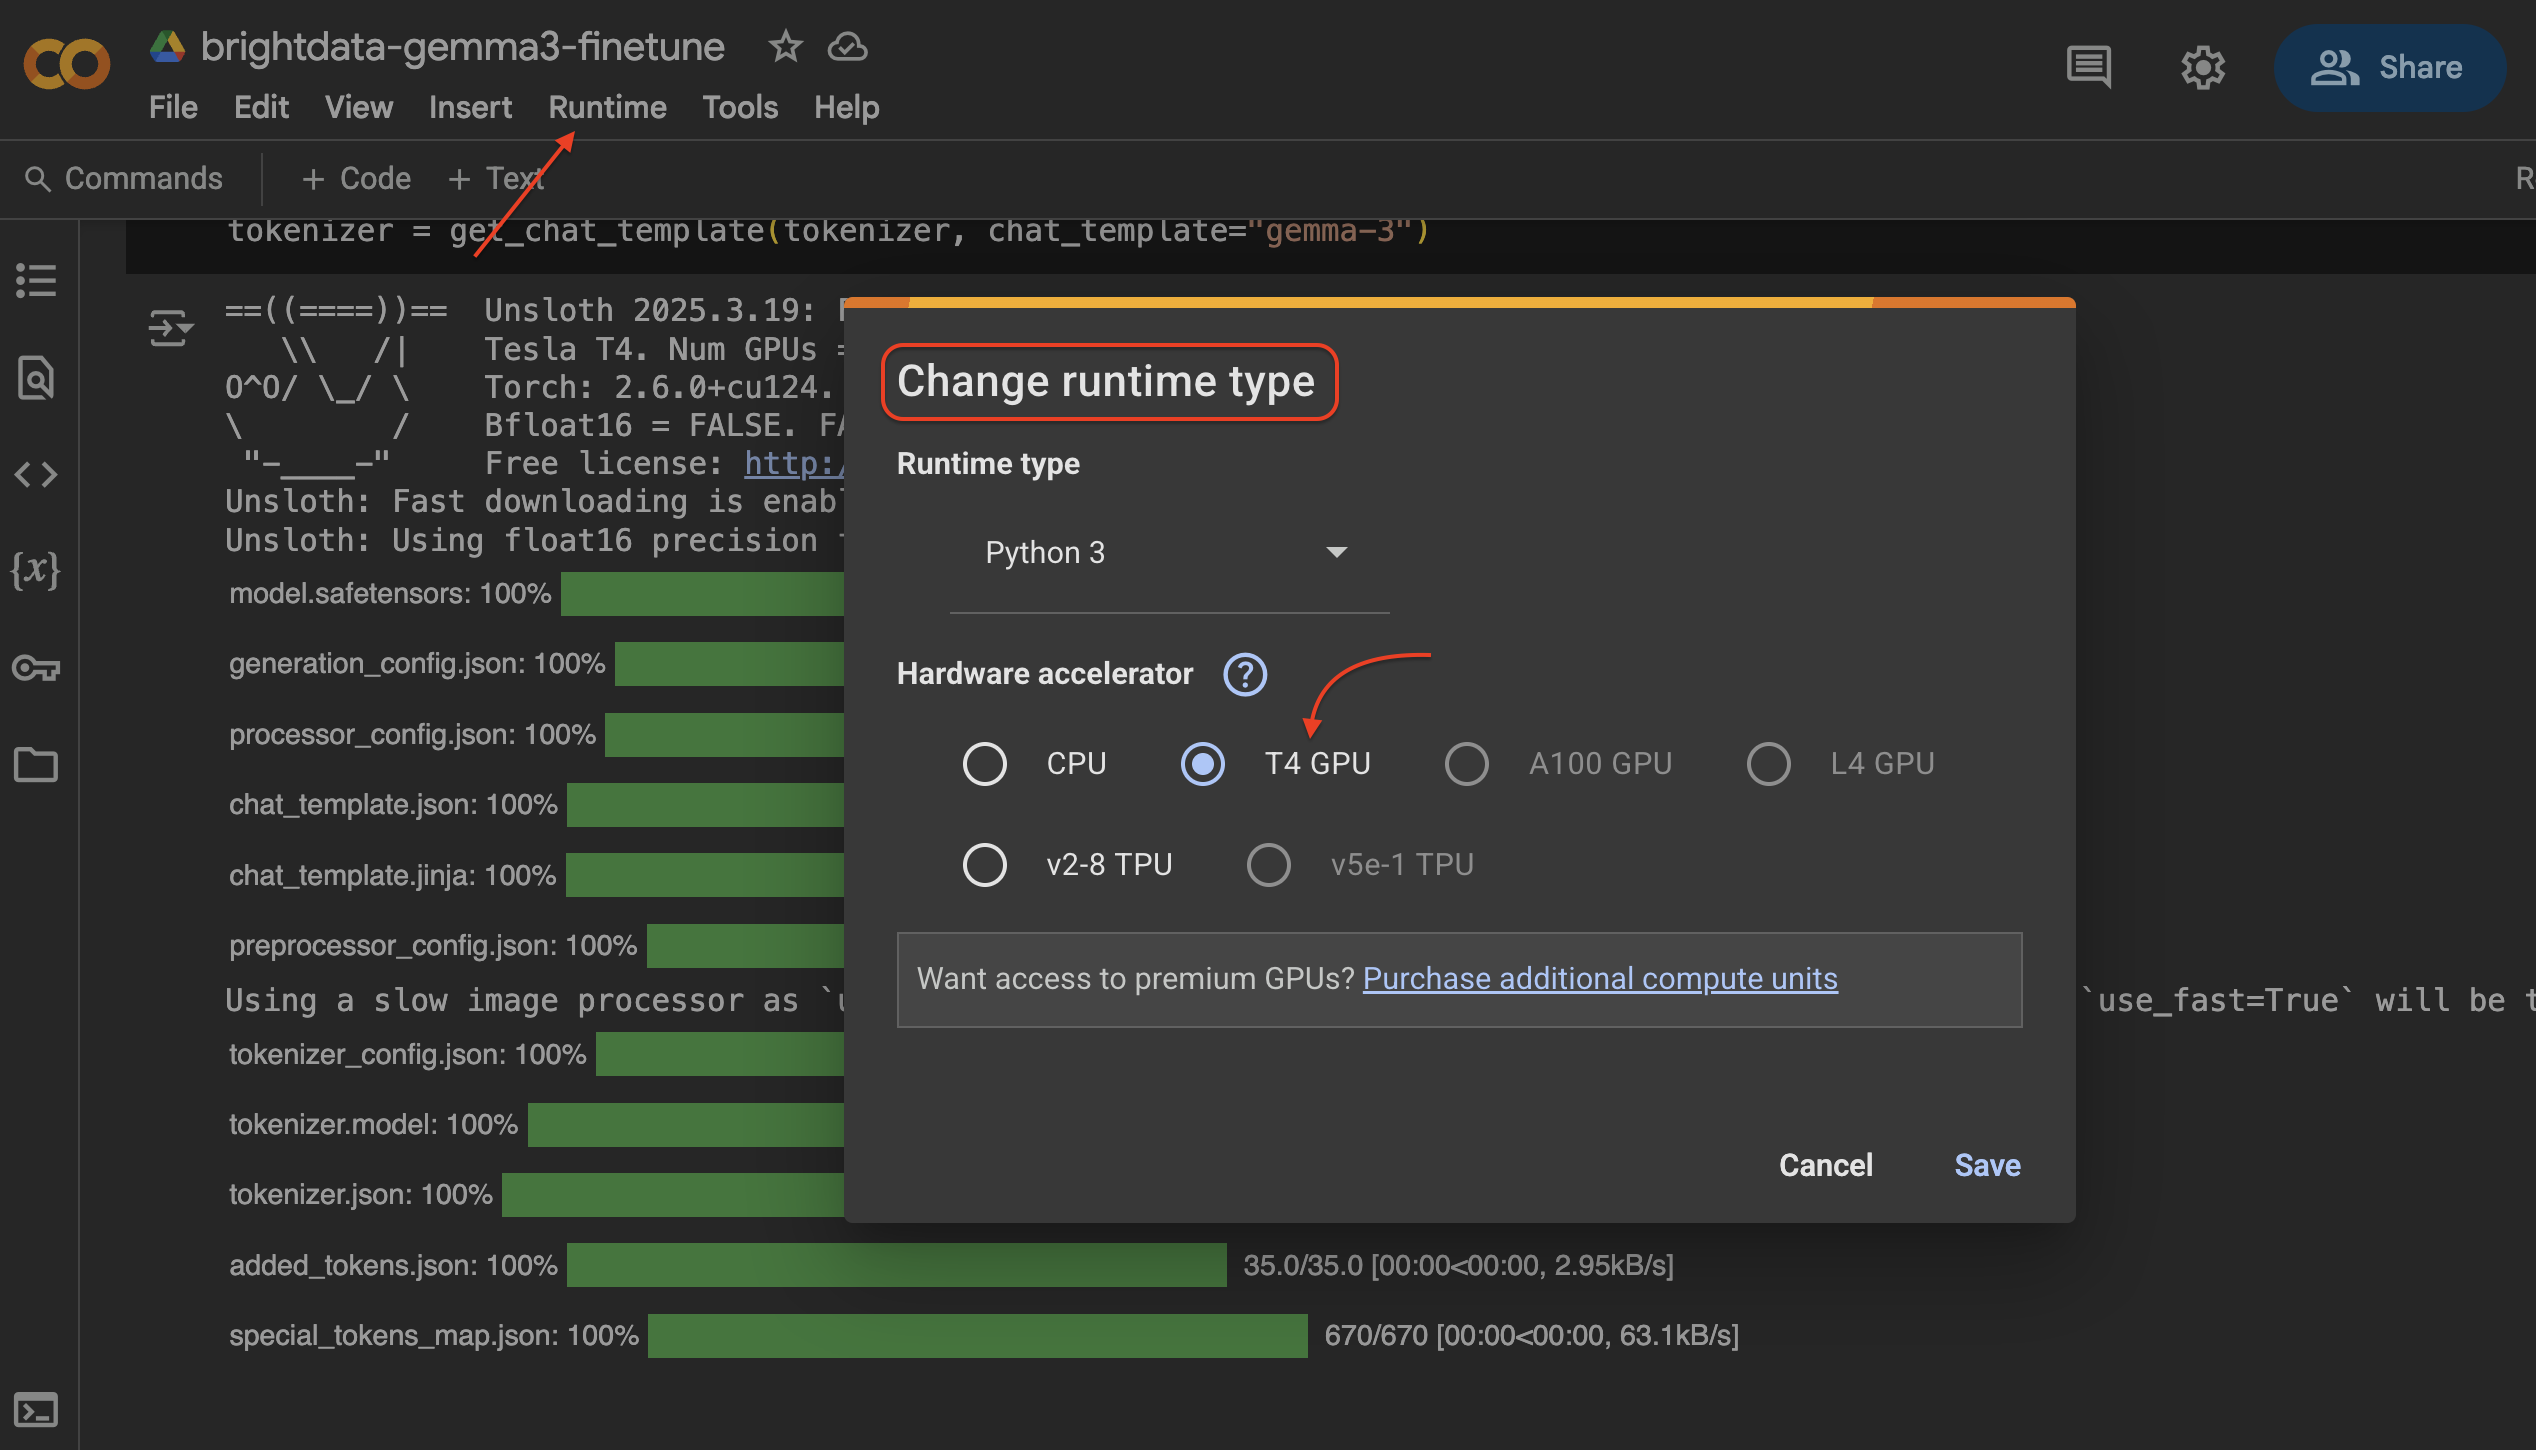
要在 Google Colab 中更改运行时类型并选择 T4 GPU,请按照以下步骤操作:
- 点击顶部的运行时菜单。
- 选择更改运行时类型。
- 在出现的对话框中,在硬件加速器下选择GPU。
- 单击保存应用更改。
步骤 1:设置环境
首先,安装必要的库。如果您在 Colab 或 Jupyter 环境中,可以直接在代码单元中运行这些命令。
%%capture
!pip install --no-deps unsloth vllm
import sys, re, requests; modules = list(sys.modules.keys())
for x in modules: sys.modules.pop(x) if "PIL" in x or "google" in x else None
!pip install --no-deps bitsandbytes accelerate xformers==0.0.29.post3 peft "trl==0.15.2" triton cut_cross_entropy unsloth_zoo
!pip install sentencepiece protobuf datasets huggingface_hub hf_transfer

# vLLM requirements - vLLM breaks Colab due to reinstalling numpy
f = requests.get("https://raw.githubusercontent.com/vllm-project/vllm/refs/heads/main/requirements/common.txt").content
with open("vllm_requirements.txt", "wb") as file:
    file.write(re.sub(rb"(transformers|numpy|xformers)[^n]{1,}n", b"", f))
!pip install -r vllm_requirements.txt
下面简要介绍一下安装的主要软件包:
unsloth:利用融合内核等技术,为更快、更节省内存的 LLM 训练和加载提供核心优化。peft:参数效率微调方法(如 LoRA)。只允许训练少量附加参数,而不是整个模型。trl:变压器强化学习。包括简化监督微调过程的SFTTrainer。比特和字节启用 k 位(4 位和 8 位)量化,大幅减少模型的内存占用。加速:Hugging Face 库可在各种硬件设置(单 GPU、多 GPU 等)下无缝运行 PyTorch 训练。数据集:抱脸库:用于高效加载、处理和管理数据集。transformers:Hugging Face 的核心库,包含预训练模型、标记化器和实用程序。huggingface_hub:与拥抱脸枢纽互动的实用工具(登录、下载、上传)。vllm(可选):快速 LLM 推断引擎。如有部署需要,可单独安装。
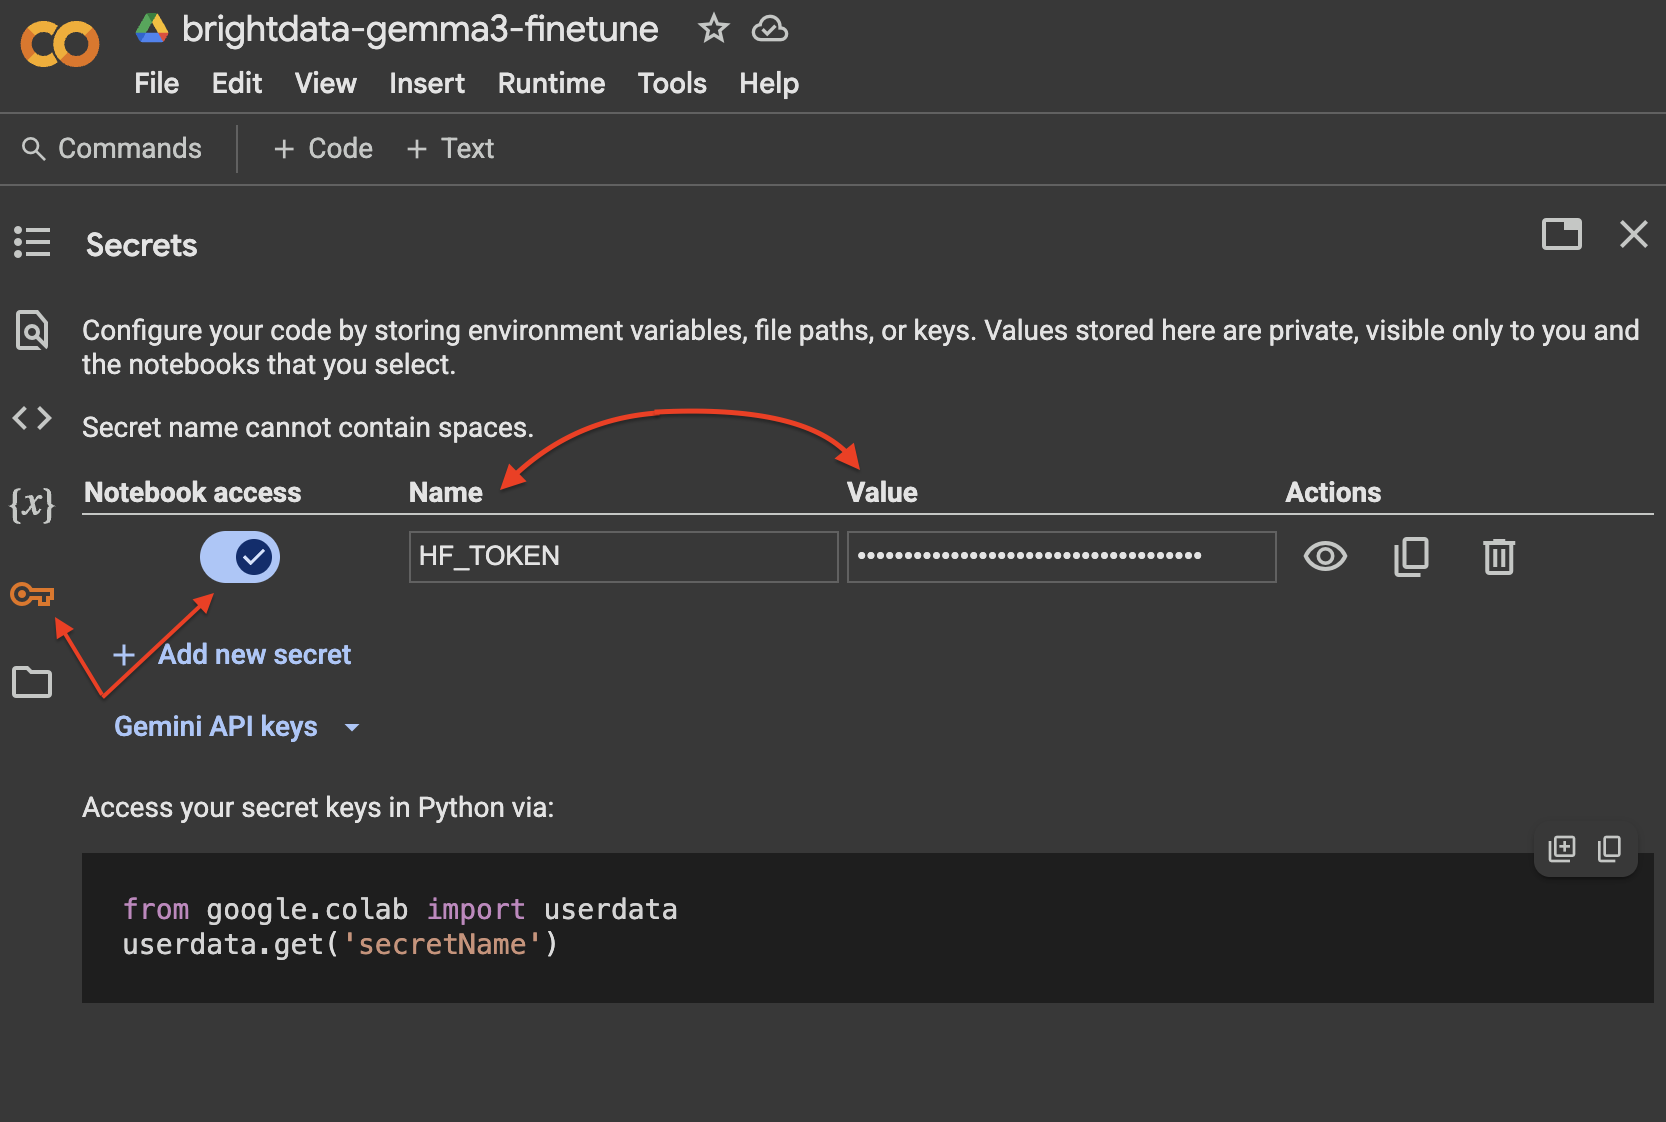
步骤 2:拥抱脸部验证
您需要从您的环境登录到 Hugging Face Hub 下载模型,并可能在稍后上传微调后的结果。
import os
from huggingface_hub import login
from google.colab import userdata

hf_token = userdata.get('HF_TOKEN')
if not hf_token:
    raise ValueError("Please set your HF_TOKEN environment variable before running.")

try:
    login(hf_token)
    print("Successfully logged in to Hugging Face Hub.")
except Exception as e:
    print(f"Error logging in to Hugging Face Hub: {e}")
在 Google Colab 中,使用 “秘密 “选项卡是管理拥抱表情令牌最安全的方法:
第 3 步:加载模型和标记符
为了开始微调,我们将使用 Unsloth 的FastModel 高效加载 Gemma 3 指令调整模型。在本例中,我们将使用unsloth/gemma-3-4b-it模型,它是 Unsloth 优化过的 4 位量化版本,以适应典型 Colab GPU 的内存限制。
在 Hugging Face 上查看Unsloth 的 Gemma 3 系列。它包括 1B、4B、12B 和 27B 尺寸的模型,有 GGUF、4 位和 16 位格式。
from unsloth import FastModel
from unsloth.chat_templates import get_chat_template
import torch # Import torch for checking CUDA

# Ensure CUDA is available
if not torch.cuda.is_available():
    raise RuntimeError("CUDA is not available. A GPU is required for this tutorial.")
print(f"CUDA available: {torch.cuda.is_available()}")
print(f"CUDA device name: {torch.cuda.get_device_name(0)}")

model, tokenizer = FastModel.from_pretrained(
    model_name="unsloth/gemma-3-4b-it", # Using the 4B instruction-tuned model optimized by Unsloth
    max_seq_length=2048, # Set max context length
    load_in_4bit=True,   # Enable 4-bit quantization
    full_finetuning=False, # Use PEFT (LoRA)
    token=hf_token,      # Pass your Hugging Face token
)

# Apply the correct chat template for Gemma 3
tokenizer = get_chat_template(tokenizer, chat_template="gemma-3")

print("Model and Tokenizer loaded successfully.")
这段代码中发生了什么?
FastModel.from_pretrained():Unsloth 的优化模型加载器。model_name="unsloth/gemma-3-4b-it":指定要加载的模型变体。我们选择经过 Unsloth 预先优化的 4B 指令调整(it)版本。max_seq_length=2048:设置模型一次可处理的最大标记数。请根据数据块的长度和所需的上下文窗口进行调整,以平衡内存使用和处理较长输入的能力。load_in_4bit=True:在有限的 VRAM 上进行训练时必不可少。这会使用bitsandbytes以 4 位精度加载模型权重。full_finetuning=假:告诉 Unsloth 为 PEFT/LoRA 微调准备模型,这意味着只训练适配器层,而不是所有模型参数。get_chat_template(tokenizer,chat_template="gema-3"):封装标记化器,以自动将提示格式化为 Gemma 3 的预期聊天格式(<start_of_turn>user/n...n<end_of_turn><start_of_turn>model/n...n<end_of_turn>)。这对于正确微调指令跟随模型和确保模型学会在预期的会话轮次中生成应答至关重要。
步骤 4:加载和准备用于训练的数据集
我们加载之前上传到拥抱脸部中心的数据集,然后将其转换为标记化器和训练器所期望的基于聊天的格式。
from datasets import load_dataset
from unsloth.chat_templates import standardize_data_formats, train_on_responses_only # train_on_responses_only imported earlier

# 1. Load the dataset from Hugging Face Hub
dataset_name = "triposatt/trustpilot-reviews-qa-dataset" # Replace with your dataset name
dataset = load_dataset(dataset_name, split="train")

print(f"Dataset '{dataset_name}' loaded.")
print(dataset)

# 2. Normalize any odd formats (ensure 'question' and 'answer' fields exist)
dataset = standardize_data_formats(dataset)
print("Dataset standardized.")

# 3. Define a function to format examples into chat template
def formatting_prompts_func(examples):
    """Formats question-answer pairs into Gemma 3 chat template."""
    questions = examples["question"]
    answers = examples["answer"]
    texts = []
    for q, a in zip(questions, answers):
        # Structure the conversation as a list of roles and content
        conv = [
            {"role": "user", "content": q},
            {"role": "assistant", "content": a},
        ]
        # Apply the chat template
        txt = tokenizer.apply_chat_template(
            conv,
            tokenize=False, # Return string, not token IDs
            add_generation_prompt=False # Don't add the model's start tag at the end yet
        )
        # Gemma 3 tokenizer adds <bos> by default, which the trainer will re-add
        # We remove it here to avoid double <bos> tokens
        txt = txt.removeprefix(tokenizer.bos_token)
        texts.append(txt)
    return {"text": texts}

# 4. Apply the formatting function to the dataset
dataset = dataset.map(formatting_prompts_func, batched=True, remove_columns=["question", "answer"])
print("Dataset formatted with chat template.")
print(dataset) # Inspect the new 'text' column
在此代码中
load_dataset():从拥抱脸枢纽获取我们的问答数据集。standardize_data_formats():确保不同数据集中的字段名称一致,在本例中特别是查找 “问题 “和 “答案”。formatting_prompts_func():这个关键函数用于处理成批的问答对。它使用tokenizer.apply_chat_template()方法将其转换为格式正确的字符串,以便进行 Gemma 3 指令微调。这种格式包括特殊的回合标记,如<start_of_turn>usern和<start_of_turn>model/n,它们对模型理解对话结构至关重要。我们删除了初始<bos>标记,因为SFTTrainer会添加自己的标记。dataset.map(...):将formatting_prompts_func有效应用于整个数据集,创建包含格式化字符串的新 “文本 “列,并移除原有列。
步骤 5:配置 LoRA 和培训员
现在,我们配置 PEFT (LoRA) 设置和trl库中的SFTTrainer。LoRA 的工作原理是向预训练模型的关键层注入可训练的小矩阵。微调时只更新这些小的适配器矩阵,大大减少了需要训练的参数数量,从而最大限度地减少了内存使用。
from trl import SFTTrainer, SFTConfig
import torch

# 1. Configure LoRA
model = FastModel.get_peft_model(
    model,
    r=8, # LoRA rank (a common value) - lower rank means fewer parameters, higher means more expressive
    target_modules=[
        "q_proj", "k_proj", "v_proj", "o_proj", # Attention layers
        "gate_proj", "up_proj", "down_proj"      # MLP layers
    ],
    # Set True if you want to fine-tune language layers (recommended for text tasks)
    # and Attention/MLP modules (where LoRA is applied)
    finetune_language_layers=True,
    finetune_attention_modules=True,
    finetune_mlp_modules=True,
    # finetune_vision_layers=False, # Only relevant for multimodal models (12B/27B)
    lora_alpha=8, # LoRA scaling factor (often set equal to r)
    lora_dropout=0, # Dropout for LoRA layers
    bias="none", # Don't train bias terms
    use_gradient_checkpointing="unsloth", # Memory optimization
    random_state=1000, # Seed for reproducibility
    use_rslora=False, # Rank-Stabilized LoRA (optional alternative)
    # modules_to_save=["embed_tokens", "lm_head"], # Optional: train embedding/output layers
)

print("Model configured for PEFT (LoRA).")

# 2. Configure the SFTTrainer
# Determine a reasonable max_steps based on dataset size and epochs
# For demonstration, a small number of steps is used (e.g., 30)
# For a real use case, calculate steps = (dataset_size / batch_size / grad_accum) * num_epochs
dataset_size = len(dataset)
per_device_train_batch_size = 2 # Adjust based on your GPU VRAM
gradient_accumulation_steps = 4 # Accumulate gradients to simulate larger batch size (batch_size * grad_accum = 8)
num_train_epochs = 3 # Example: 3 epochs

# Calculate total training steps
total_steps = int((dataset_size / per_device_train_batch_size / gradient_accumulation_steps) * num_train_epochs)
# Ensure max_steps is not 0 if dataset is small or calculation results in < 1 step
max_steps = max(30, total_steps) # Set a minimum or calculate properly

print(f"Calculated total training steps for {num_train_epochs} epochs: {total_steps}. Using max_steps={max_steps}")

sft_config = SFTConfig(
    dataset_text_field="text", # The column in our dataset containing the formatted chat text
    per_device_train_batch_size=per_device_train_batch_size,
    gradient_accumulation_steps=gradient_accumulation_steps,
    warmup_steps=max(5, int(max_steps * 0.03)), # Warmup for first few steps (e.g., 3% of total steps)
    max_steps=max_steps, # Total number of training steps
    learning_rate=2e-4, # Learning rate
    logging_steps=max(1, int(max_steps * 0.01)), # Log every 1% of total steps (min 1)
    optim="adamw_8bit", # 8-bit AdamW optimizer (memory efficient)
    weight_decay=0.01, # L2 regularization
    lr_scheduler_type="linear", # Linear learning rate decay
    seed=3407, # Random seed
    report_to="none", # Disable reporting to platforms like W&B unless needed
    output_dir="./results", # Directory to save checkpoints and logs
)

# 3. Build the SFTTrainer instance
trainer = SFTTrainer(
    model=model,
    tokenizer=tokenizer,
    train_dataset=dataset,
    eval_dataset=None, # Optional: provide a validation dataset
    args=sft_config,
)

print("SFTTrainer built.")

# 4. Mask out the input portion for training
# This teaches the model to only generate the assistant’s response
# It prevents the model from just copying the user’s prompt
# Pass the literal prefixes for instruction and response turns from the chat template
trainer = train_on_responses_only(
    trainer,
    instruction_part="<start_of_turn>usern", # Literal string before user content
    response_part="<start_of_turn>modeln",  # Literal string before model content
)

print("Trainer configured to train only on responses.")
在此代码中
FastModel.get_peft_model():target_modules指定了哪些模型层(如注意力和 MLP 投影)将接收这些适配器。SFTConfig():learning_rate、optim、weight_decay和lr_scheduler_type控制优化过程。dataset_text_field告诉训练器数据集中哪一列包含格式化的训练示例。SFTTrainer():初始化训练器,将 LoRA 配置的模型、准备好的数据集、标记化器和SFTConfig中定义的训练参数整合在一起。train_on_responses_only():是一个实用函数(trl的一部分,与 Unsloth 兼容),用于修改训练器的损失计算。它将损失设置为只计算与模型预期响应相对应的标记(<start_of_turn>modeln...),而忽略用户提示的标记(<start_of_turn>usern...)。这对于教会模型生成相关答案而不是简单地重复或完成输入提示是至关重要的。我们提供了聊天模板中用于划分这些部分的确切字符串前缀。
步骤 6:训练模型
一切就绪后,我们就可以启动微调程序了。trainer.train()方法将根据SFTConfig 中提供的配置处理训练循环。
# Optional: clear CUDA cache before training
torch.cuda.empty_cache()

print("Starting training...")
# Use mixed precision training for efficiency
# Unsloth automatically handles float16/bf16 based on GPU capabilities and model
with torch.amp.autocast(device_type="cuda", dtype=torch.float16): # Or torch.bfloat16 if supported
     trainer.train()

print("Training finished.")
训练器将输出进度更新,包括训练损失。你应该能观察到损失随着步数的增加而减少,这表明模型正在从数据中学习。总的训练时间取决于数据集大小、模型大小、超参数以及所使用的特定 GPU。对于我们的示例数据集和 T4 GPU 上的 4B 模型,200 步的训练应该能相对较快完成(例如,15-30 分钟以内,具体取决于具体设置和数据长度)。
步骤 7:测试微调模型(推理)
训练完成后,让我们测试一下经过微调的模型,看看它对基于 Trustpilot 评论数据的问题的反应如何。我们将使用带有TextStreamer的model.generate方法来获得更具交互性的输出。
from transformers import TextStreamer

# Define some test questions related to the dataset content
questions = [
    "What are common issues or complaints mentioned in the reviews?",
    "What do customers like most about the product/service?",
    "How is the customer support perceived?",
    "Are there any recurring themes regarding pricing or value?"
    # Add more questions here based on your dataset content
]

# Set up a streamer for real-time output
# skip_prompt=True prevents printing the input prompt again
# skip_special_tokens=True removes chat template tokens from output
streamer = TextStreamer(tokenizer, skip_prompt=True, skip_special_tokens=True)

print("n--- Testing Fine-Tuned Model ---")

# Iterate through questions and generate answers
for idx, q in enumerate(questions, start=1):
    # Build the conversation prompt in the correct Gemma 3 chat format
    conv = [{"role": "user", "content": q}]

    # Apply the chat template and add the generation prompt token
    # add_generation_prompt=True includes the <start_of_turn>model tag
    prompt = tokenizer.apply_chat_template(
        conv,
        add_generation_prompt=True,
        tokenize=False
    )

    # Tokenize the prompt and move to GPU
    inputs = tokenizer([prompt], return_tensors="pt", padding=True).to("cuda")

    # Display the question
    print(f"n=== Question {idx}: {q}n")

    # Generate the response with streaming
    # Pass the tokenized inputs directly to model.generate
    _ = model.generate(
        **inputs,
        streamer=streamer, # Use the streamer for token-by-token output
        max_new_tokens=256, # Limit the response length
        temperature=0.7, # Control randomness (lower=more deterministic)
        top_p=0.95, # Nucleus sampling
        top_k=64, # Top-k sampling
        use_cache=True, # Use cache for faster generation
        # Add stopping criteria if needed, e.g., stopping after <end_of_turn>
        # eos_token_id=tokenizer.eos_token_id,
    )
    # Add a separator after each answer
    print("n" + "="*40)

print("n--- Testing Complete ---")
请看下图中模特的回答:
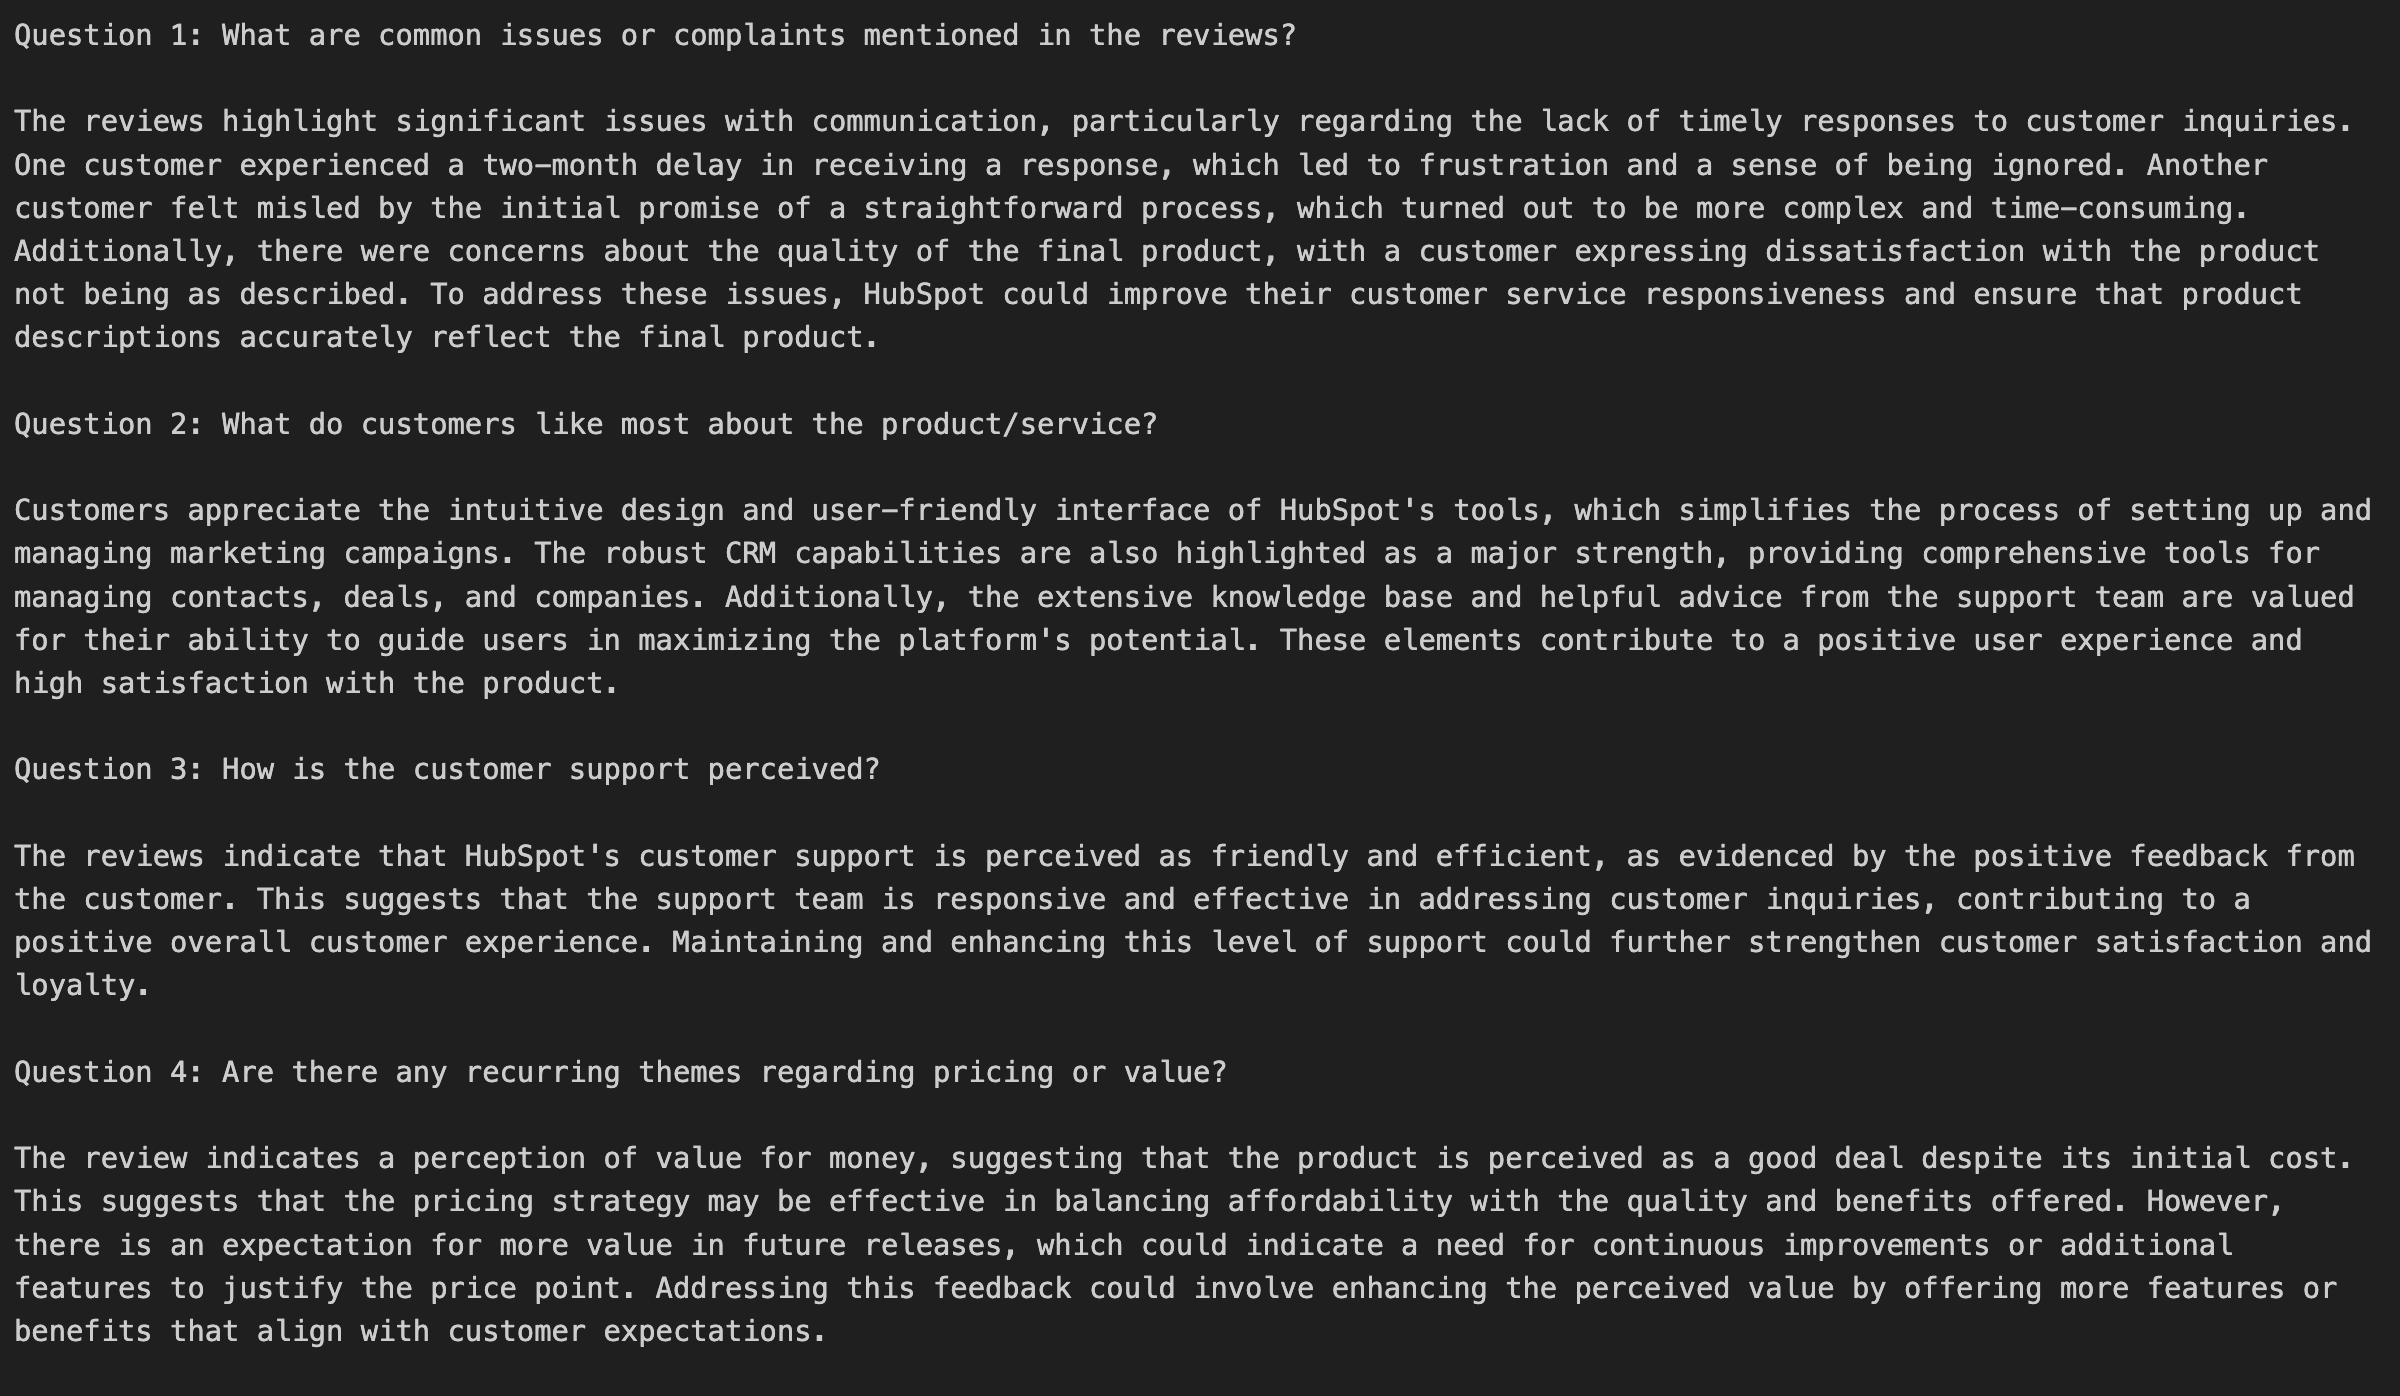
🔥 很好,运行正常!
成功的微调过程意味着模型生成的答案更具分析性,并直接来自于微调后的评论内容,反映了您自定义数据集中的风格和见解,而不是通用的回答。
步骤 8:保存和推送微调模型
最后,保存经过微调的 LoRA 适配器和令牌器。您可以将它们保存在本地,也可以将它们推送到 Hugging Face Hub,以方便共享、版本管理和部署。
# Define local path and Hub repository ID
new_model_local = "gemma-3-4b-trustpilot-qa-adapter" # Local directory name
new_model_online = "YOUR_HF_USERNAME/gemma-3-4b-trustpilot-qa" # Hub repo name
# 1. Save locally
print(f"Saving model adapter and tokenizer locally to '{new_model_local}'...")
model.save_pretrained(new_model_local)
tokenizer.save_pretrained(new_model_local)
print("Saved locally.")
# 2. Push to Hugging Face Hub
print(f"Pushing model adapter and tokenizer to Hugging Face Hub '{new_model_online}'...")
model.push_to_hub(new_model_online, token=hf_token)
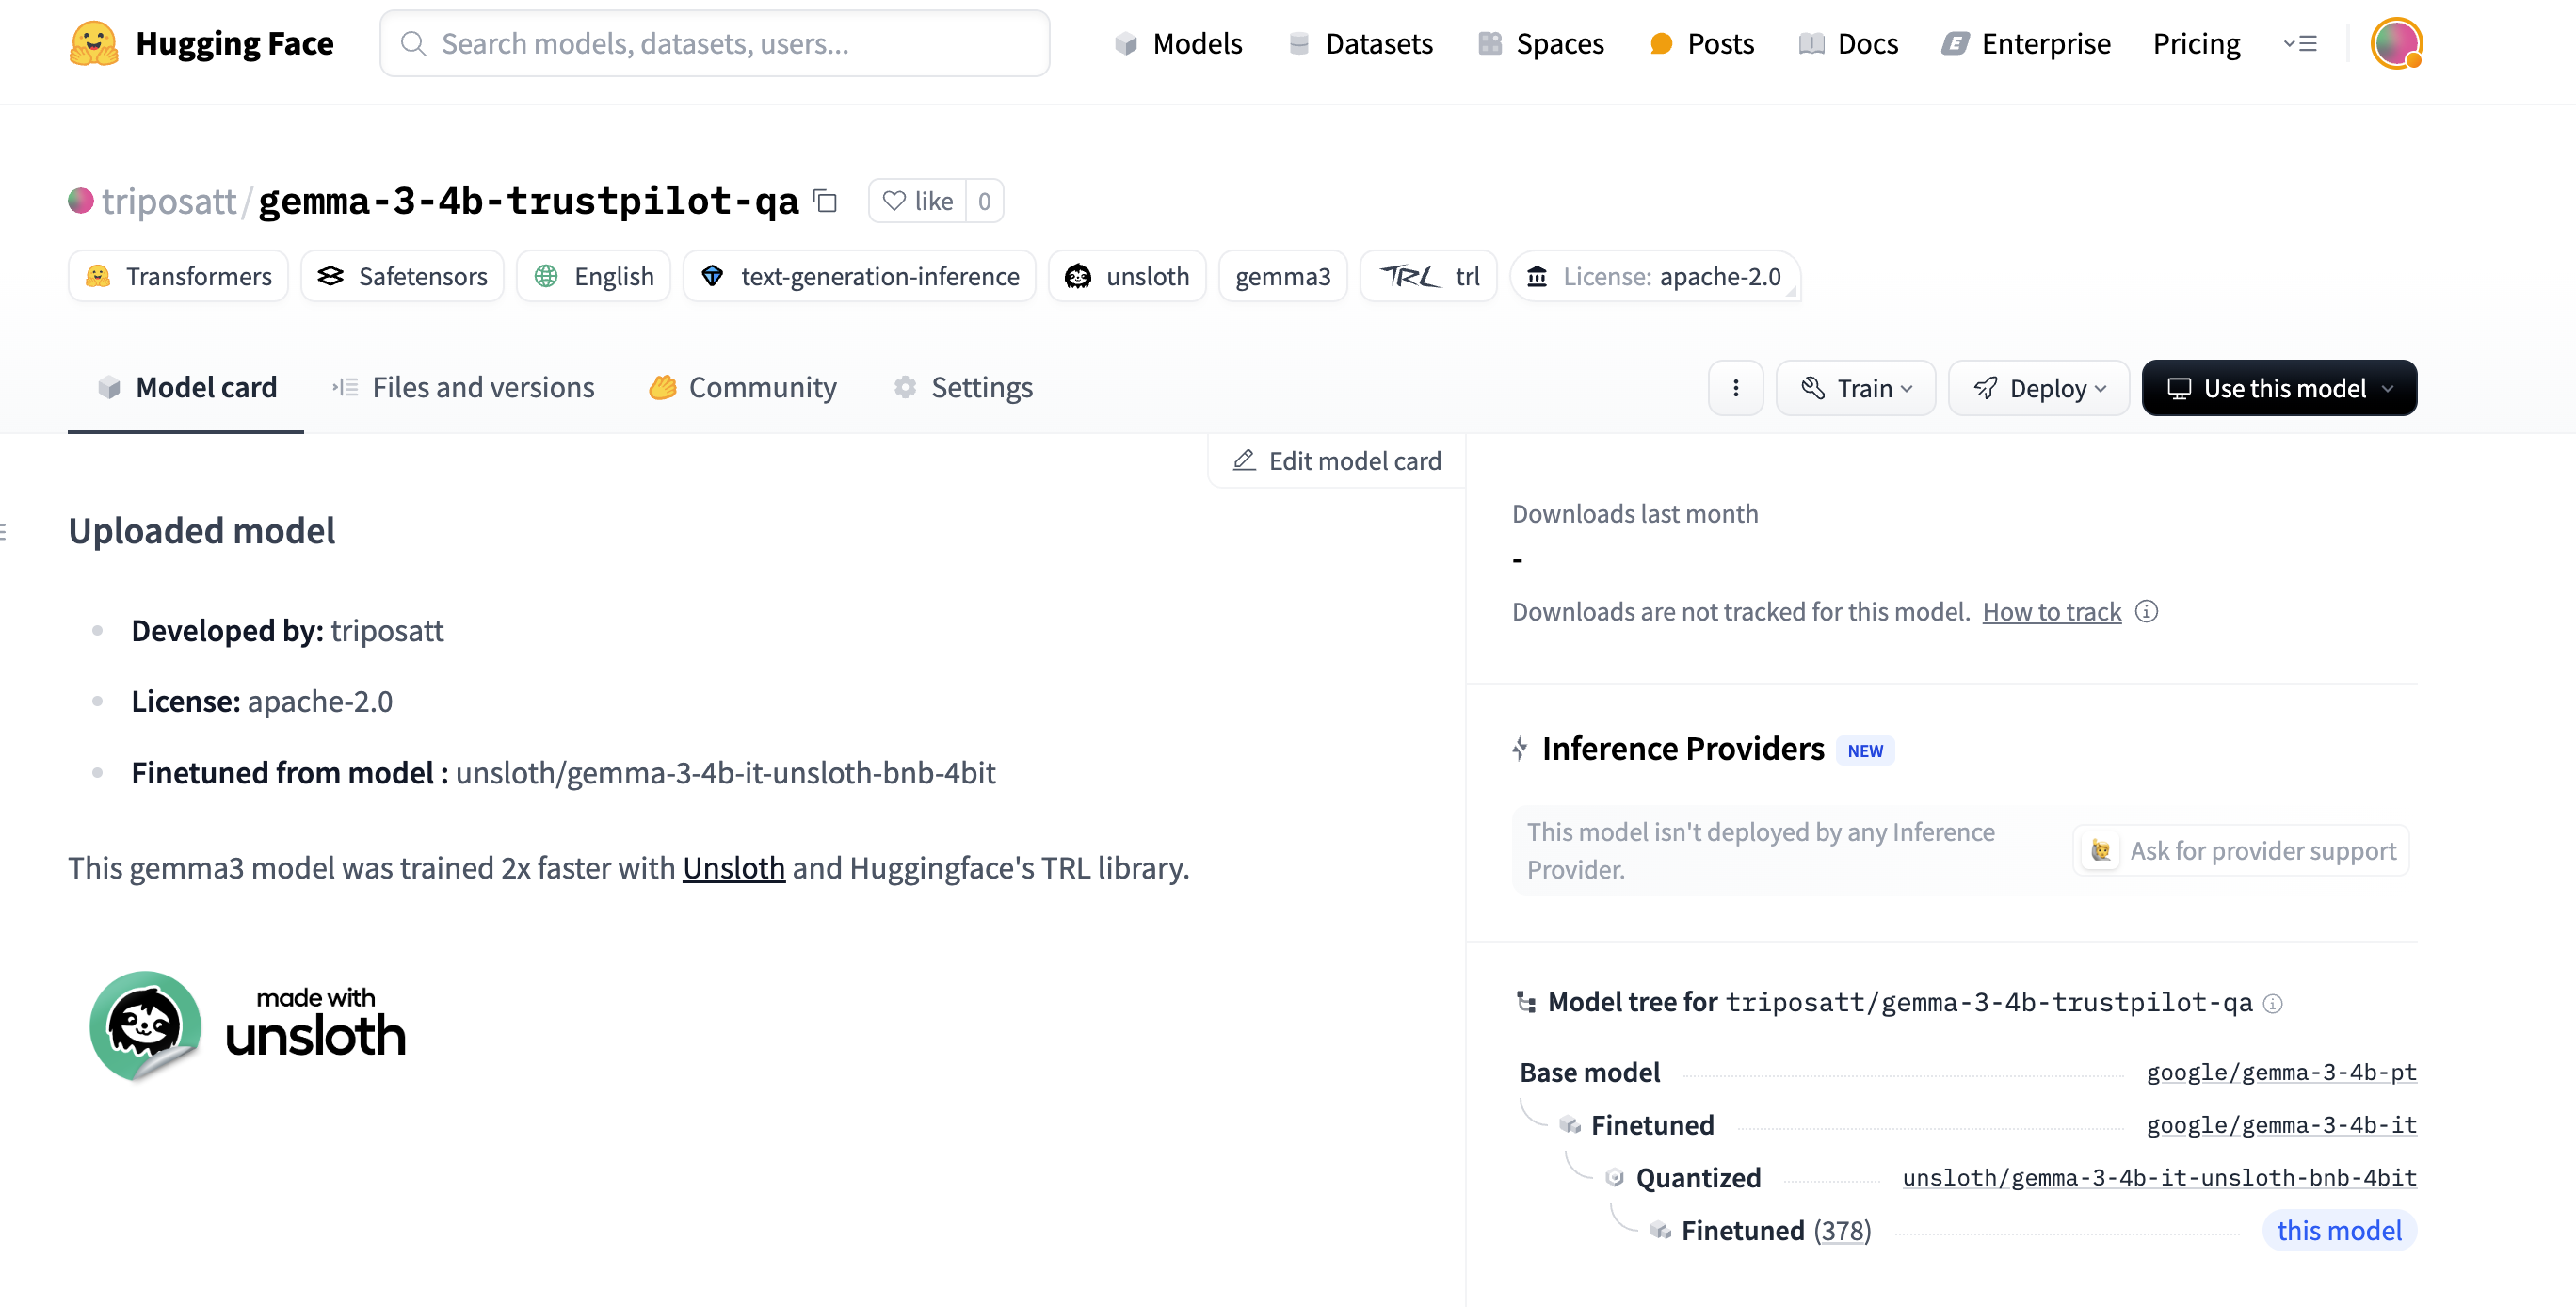
tokenizer.push_to_hub(new_model_online, token=hf_token)经过微调的模型现已在 Hugging Face Hub 上发布:
结论
本指南展示了一种端到端的方法,用于微调 Google Gemma 3 的实际用例:从客户评论生成分析答案。我们介绍了整个工作流程–从通过Bright Data 的 Web scraper API 收集高质量、特定领域的数据,到使用 LLM 驱动的处理将数据结构化为 QA 格式,再到在资源受限的硬件上使用 Unsloth 库高效地微调 Gemma 3 4B 模型。
这样就产生了一个专门的 LLM,它善于从原始评论数据中提取洞察力和解读情感,并将其转化为结构化、可操作的答案。这种方法具有很强的适应性–您可以应用相同的工作流程,在各种特定领域的数据集上对 Gemma 3(或其他合适的 LLM)进行微调,以创建适合不同需求的人工智能助手。
如需进一步了解人工智能驱动的数据提取策略,请参考这些其他资源:
有关使用 Unsloth 的更多微调优化和示例,请查看Unsloth 笔记本集。


技术写作者
 5 years experience
Satyam Tripathi 帮助 SaaS 和数据初创公司将复杂技术转化为可执行的内容,提升开发者采用度并增强用户理解。