在本指南中,您将了解到
- LlamaIndex 是什么?
- 它在人工智能代理开发方面的独特之处,尤其是它对数据集成的内置支持。
- 如何使用 LlamaIndex 建立一个具有从一般网站和特定搜索引擎检索数据能力的人工智能代理。
让我们深入了解一下!
什么是 LlamaIndex?
LlamaIndex是一个开源 Python 数据框架,用于构建由 LLM 驱动的应用程序。
它可以帮助您创建生产就绪的人工智能工作流和代理,这些工作流和代理能够查找和检索相关信息、综合见解、生成详细报告、采取自动行动等。
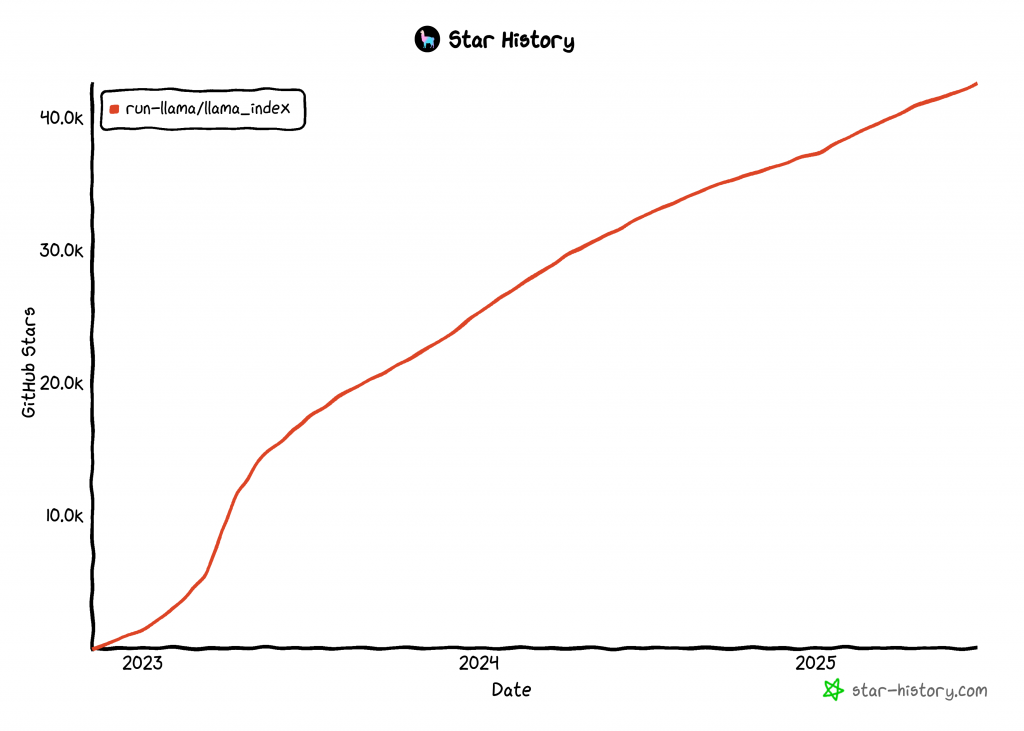
LlamaIndex 是用于构建人工智能代理的增长最快的库之一,在 GitHub 上拥有 42k 多颗星:
将数据整合到您的 LlamaIndex 人工智能代理中
与其他人工智能代理构建技术相比,LlamaIndex 专注于数据。因此,项目的 GitHub 存储库将 LlamaIndex 定义为 “数据框架”。
具体来说,LlamaIndex 解决了 LLM 最大的局限之一。那就是它们缺乏对当前或实时事件的了解。之所以存在这种局限性,是因为LLM 是在静态数据集上训练出来的,无法内置访问最新信息的权限。
为了解决这个问题,LlamaIndex 引入了对以下工具的支持:
- 提供数据连接器,从应用程序接口、PDF、Word 文档、SQL 数据库、网页等摄取数据。
- 使用索引、图表和其他专为 LLM 使用而优化的格式来构建数据。
- 启用高级检索功能,您可以输入 LLM 提示,然后收到基于相关上下文的知识增强响应。
- 支持与LangChain、Flask、Docker 和 ChatGPT 等外部框架无缝集成。
换句话说,使用 LlamaIndex 构建通常意味着将核心库与一套针对您的使用情况量身定制的插件/集成相结合。例如,探索一个LlamaIndex 网络抓取方案。
现在,网络是地球上最大、最全面的数据源。因此,人工智能代理最好能够访问这些数据,以便更有效地做出响应和执行任务。这就是LlamaIndex 亮数据工具发挥作用的地方!
有了 Bright Data 工具,您的 LlamaIndex AI 代理就能获益:
- 从任何网页上实时抓取网络信息的功能。
- 来自亚马逊、LinkedIn、Zillow、Facebook 等网站的结构化产品和平台数据。
- 能够检索任何搜索查询的搜索引擎结果。
- 通过整页屏幕截图捕捉可视化数据,有助于进行总结或可视化分析。
下一章将介绍如何进行集成!
构建一个 LlamaIndex 代理,它可以使用明亮的数据工具获取网络资源
在本节中,您将逐步了解如何使用 LlamaIndex 构建一个连接到 Bright Data 工具的 Python AI 代理。
这种集成将为您的代理提供强大的网络数据访问功能。具体来说,人工智能代理将获得从任何网页中提取内容、获取实时搜索引擎结果等能力。更多信息,请参阅我们的官方文档。
请按照以下步骤使用 LlamaIndex 创建由 Bright Data 驱动的人工智能代理!
先决条件
要学习本教程,您需要以下材料:
- 计算机上安装Python 3.9 或更高版本(建议使用最新版本)。
- 用于与
BrightDataToolSpec集成的 Bright Data API 密钥。 - 受支持的 LLM 提供商提供的 API 密钥(在本指南中,我们将使用 Gemini,它可通过 API 免费使用。您也可以使用 LlamaIndex 支持的任何提供商)。
如果您还没有 Gemini 或 Bright Data API 密钥,请不要担心。我们将在接下来的步骤中指导您如何创建这两个密钥。
步骤 #1:创建 Python 项目
首先打开终端,为你的 LlamaIndex AI 代理项目创建一个新文件夹:
mkdir llamaindex-bright-data-agentllamaindex-bright-data-agent/将包含由 Bright Data 提供网络数据检索功能的人工智能代理的代码。
接下来,进入项目目录,在其中创建一个虚拟环境:
cd llamaindex-bright-data-agent
python -m venv venv
现在,在您最喜欢的 Python IDE 中打开项目文件夹。我们推荐使用 Visual Studio Code(带 Python 扩展)或PyCharm Community Edition。
在文件夹根目录下新建一个名为agent.py的文件。现在您的项目结构应该是这样的
llamaindex-bright-data-agent/
├── venv/
└── agent.py
在终端中,激活虚拟环境。在 Linux 或 macOS 中,运行此命令:
source venv/bin/activate在 Windows 系统中,执行
venv/Scripts/activate在接下来的步骤中,我们将指导你安装所需的软件包。不过,如果你想现在就全部安装,请运行
pip install python-dotenv llama-index-tools-brightdata llama-index-llms-gemini llama-index注意:我们安装llama-index-llms-gemini是因为本教程使用Gemini 作为 LLM 提供商。如果计划使用其他提供商,请务必安装相应的 LlamaIndex 集成。
一切就绪!现在您已经有了一个 Python 开发环境,可以使用 LlamaIndex 和 Bright Data 工具构建一个人工智能代理。
步骤 #2:设置环境变量 阅读
您的 LlamaIndex 代理将通过 API 密钥连接到 Gemini 和 Bright Data 等外部服务。出于安全考虑,切勿将 API 密钥直接硬编码到 Python 代码中。相反,请使用环境变量来保持它们的私密性。
为方便使用环境变量,请安装python-dotenv库。在已激活的虚拟环境中,运行
pip install python-dotenv然后,打开agent.py文件,在顶部添加以下几行,以便从.env文件加载变量:
from dotenv import load_dotenv

load_dotenv()load_dotenv()函数会在项目根目录中查找.env文件,并自动将其值加载到环境中。
现在,在你的agent.py文件旁创建一个.env文件,就像这样:
llamaindex-bright-data-agent/
├── venv/
├── .env # <-------------
└── agent.py
完美!您现在已经为第三方服务设置了管理敏感 API 凭据的安全方法。现在继续初始设置,在.env文件中填入所需的 envs。
步骤 #3:开始使用 Bright Data
截至目前,BrightDataToolSpec在 LlamaIndex 中公开了以下工具:
scrape_as_markdown:抓取任何网页的原始内容,并以 Markdown 格式返回。get_screenshot:捕捉网页的整页截图并保存到本地。search_engine:在 Google、Bing、Yandex 等搜索引擎上执行搜索查询。它会返回整个 SERP 或该数据的 JSON 结构版本。web_data_feed:从知名平台读取结构化 JSON 数据。
前三个工具–scrape_as_markdown、get_screenshot 和search_engine--使用了 Bright Data 的 Web Unlocker API。该解决方案为从任何网站,甚至是那些有严格的反僵尸保护的网站进行网页抓取和截图打开了大门。此外,它还支持从所有主要搜索引擎访问 SERP 网页数据。
相比之下,web_data_feed利用的是Bright Data 的 Web Scraper API。该端点从亚马逊、Instagram、LinkedIn、ZoomInfo 等支持平台的预定义列表中返回预结构化数据。
要整合这些工具,您需要
- 在 Bright Data 面板中启用 Web 解锁器解决方案。
- 检索您的 Bright Data API 令牌,该令牌允许访问 Web Unlocker 和 Web Scraper API。
请按照以下步骤完成设置!
首先,如果您还没有 Bright Data 帐户,请[创建一个]()。如果您已经有一个账户,请登录并打开您的仪表板。单击 “获取代理产品 “按钮:
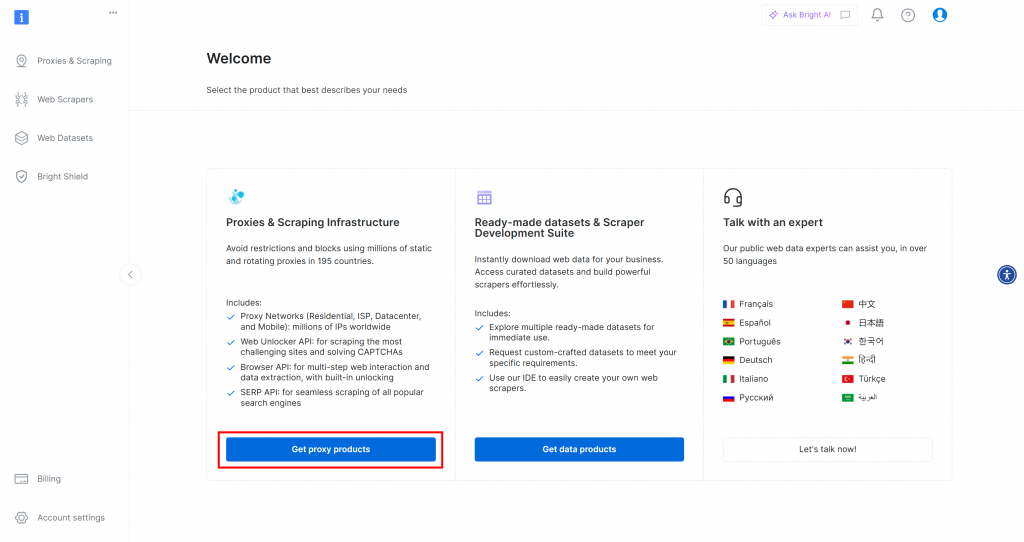
您将被重定向到 “代理和搜索基础设施 “页面:
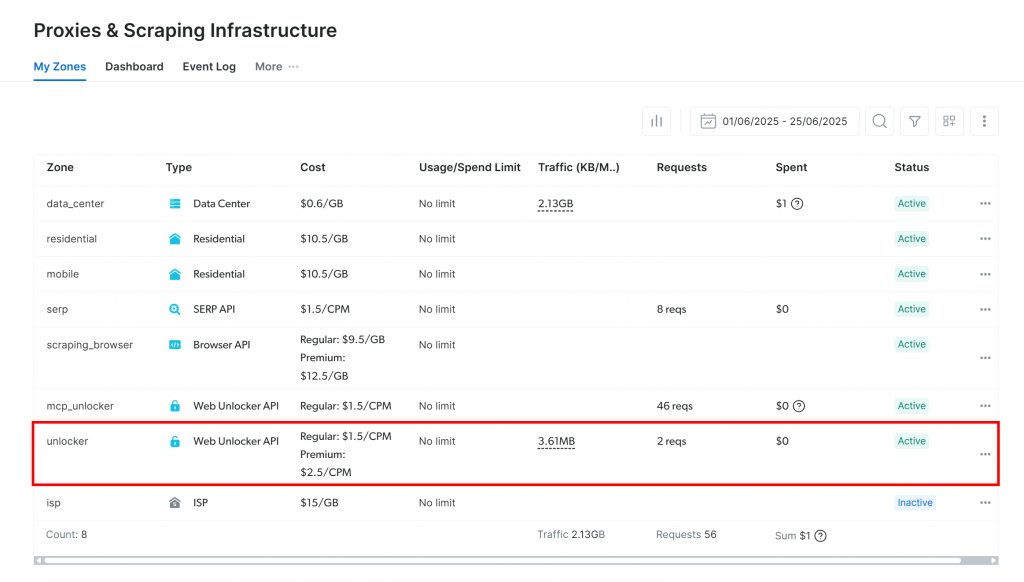
如果你已经看到一个激活的 Web Unlocker API 区域(如上所述),那么你就可以开始了。区名(本例中为unlocker)很重要,因为稍后在代码中会用到。
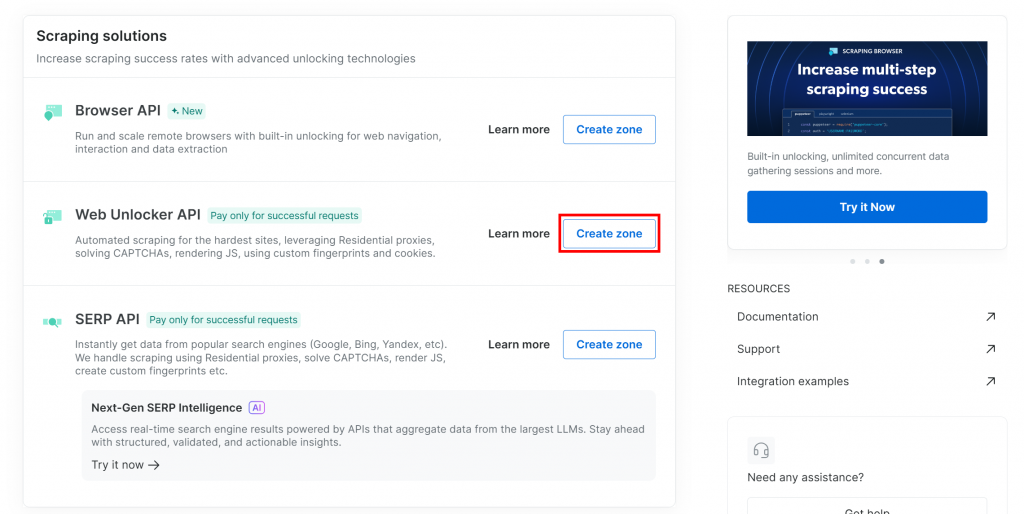
如果还没有,请向下滚动到 “Web Unlocker API “部分,然后单击 “创建区域”:
为新区域命名,如解锁程序,启用高级功能以提高性能,然后点击 “添加”:
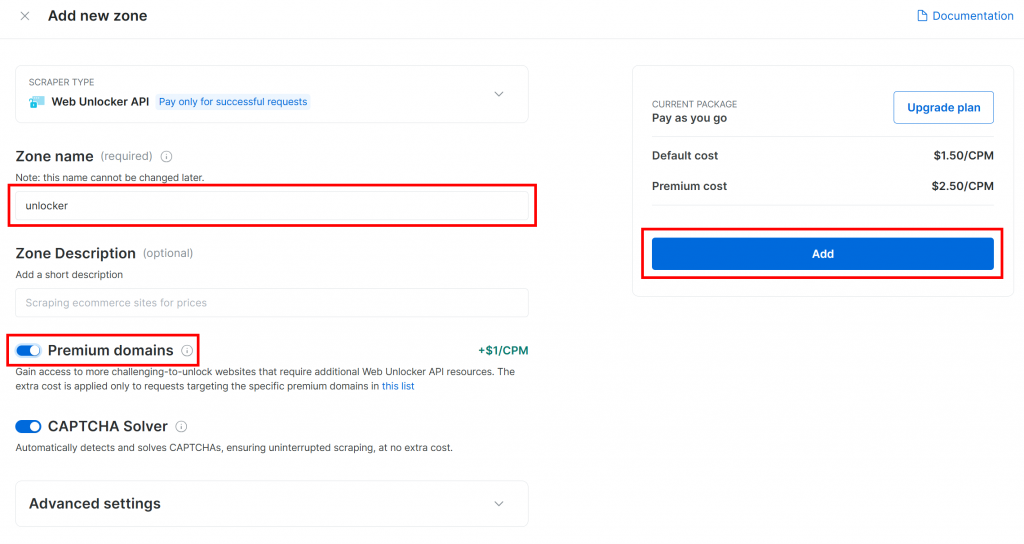
创建区域后,您将被重定向到区域的配置页面:

确保激活切换开关设置为 “激活”。这将确认区段已正确配置并可以使用。
接下来,按照Bright Data 官方指南生成 API 密钥。获得密钥后,像这样将其安全地保存在.env文件中:
BRIGHT_DATA_API_KEY="<YOUR_BRIGHT_DATA_API_KEY>"将 占位符替换为实际的 API 密钥值。
太神奇了是时候将 Bright Data 工具集成到您的 LlamaIndex 代理脚本中了。
步骤 #4:安装和配置 LlamaIndex 亮数据工具
在agent.py 中,首先从环境中加载您的 Bright Data API 密钥:
BRIGHT_DATA_API_KEY = os.getenv("BRIGHT_DATA_API_KEY")请别忘记从 Python 标准库中导入 os:
import os激活虚拟环境后,安装LlamaIndex Bright Data 工具包:
pip install llama-index-tools-brightdata在agent.py文件中,导入BrightDataToolSpec类:
from llama_index.tools.brightdata import BrightDataToolSpec然后,使用 API 密钥和区域名称创建一个BrightDataToolSpec实例:
brightdata_tool_spec = BrightDataToolSpec(
    api_key=BRIGHT_DATA_API_KEY,
    zone="<BRIGHT_DATA_WEB_UNLOCKER_API_ZONE_NAME>", # Replace with the actual value
    verbose=True, # Useful while developing
)
将 占位符替换为之前设置的 Web Unlocker API 区域名称。在本例中,名称为unlocker:
brightdata_tool_spec = BrightDataToolSpec(
    api_key=BRIGHT_DATA_API_KEY,
    zone="unlocker",
    verbose=True,
)请注意,verbose选项已设置为"True"。这在开发过程中很有帮助,因为当 LlamaIndex 代理通过 Bright Data 发出请求时,它会打印出有关正在发生的事情的有用信息。
然后,将工具规格转换为代理中可用工具的列表:
brightdata_tools = brightdata_tool_spec.to_tool_list()太棒了Bright Data 工具现已集成,并准备好为您的 LlamaIndex 代理提供动力。下一步是连接您的 LLM。
步骤 #5:准备 LLM 模型
要使用 Gemini(所选 LLM 提供商),首先要安装所需的集成包:
pip install llama-index-llms-google-genai接下来,从已安装的软件包中导入GoogleGenAI类:
from llama_index.llms.google_genai import GoogleGenAI现在,像这样初始化双子座 LLM:
llm = GoogleGenAI(
    model="models/gemini-2.5-flash",
)在本例中,我们使用的是gemini-2.5-flash型号。您可以根据需要将其换成任何其他受支持的 Gemini 型号。
在后台,GoogleGenAI会自动查找名为GEMINI_API_KEY 的环境变量。要设置它,请打开.env文件并添加以下一行:
GEMINI_API_KEY="<YOUR_GEMINI_API_KEY>"将 占位符替换为您实际的双子座 API 密钥。如果没有,请按照官方指南免费获取。
注:如果您喜欢使用不同的 LLM 提供商,LlamaIndex 支持多种选择。有关设置说明,请参阅 LlamaIndex 官方文档。
干得好现在你已经将所有核心组件连接在一起,构建了一个具有网络数据检索功能的 LlamaIndex 代理。
步骤 #6:创建 LlamaIndex 代理
首先,安装主要的 LlamaIndex 软件包:
pip install llama-index然后,在agent.py文件中导入FunctionCallingAgent类:
from llama_index.core.agent import FunctionCallingAgentFunctionCallingAgent是一种特殊类型的 LlamaIndex AI代理,可以与外部工具(如您之前配置的 Bright Data 工具)进行交互。
像这样用 LLM 和 Bright Data 工具初始化代理:
agent = FunctionCallingAgent.from_tools(
    tools=brightdata_tools,
    llm=llm,
    verbose=True, # Useful while developing
)
这样就设置了一个人工智能代理,它可以使用您的 LLM 处理用户输入,并根据需要调用 Bright Data 工具来检索信息。在开发过程中,verbose=True标志非常方便,因为它可以显示代理在每个请求中使用了哪些工具。
干得漂亮!LlamaIndex 与 Bright Data 的集成现已完成。下一步是构建 REPL(交互式环境) 供交互使用。
步骤 #7:实施 REPL
REPL 是 “Read-Eval-Print Loop”(读取-评估-打印循环)的缩写,是一种交互式编程模式,在这种模式下,您可以输入命令,然后对其进行评估,并立即查看结果。在这种情况下,您可以
- 输入命令或任务。
- 让人工智能代理来评估和处理。
- 请参见答复。
这个循环将无限期地持续下去,直到您键入"退出"。
与人工智能代理打交道时,REPL 往往比发送孤立的提示更实用。原因在于,它能让 LlamaIndex 代理保持会话上下文,通过学习以前的交互来改进其响应。
现在,在agent.py中实现 REPL 逻辑,如下所示:
# Implement the REPL interaction loop
print("Gemini-powered Agent with Bright Data tools for web data retrieval. Type 'exit' to quit.n")

while True:
    # Read the user request for the AI agent from the CLI
    request = input("Request -> ")

    # Terminate the execution if the user type "exit"
    if request.strip().lower() == "exit":
        print("nAgent terminated")
        break

    try:
        # Execute the request
        response = agent.chat(request)
        print(f"nResponse ->:n{response}n")
    except Exception as e:
        print(f"nError: {str(e)}n")
该 REPL:
- 通过
input()从命令行读取用户输入。 - 使用由 Gemini 和 Bright Data 支持的 LlamaIndex 代理与
agent.chat()进行评估。 - 将响应打印回控制台。
太棒了LlamaIndex 人工智能代理已经准备就绪。
步骤 #8:整合并运行代理
这是您的agent.py文件现在应该包含的内容:
from dotenv import load_dotenv
import os
from llama_index.tools.brightdata import BrightDataToolSpec
from llama_index.llms.google_genai import GoogleGenAI
from llama_index.core.agent import FunctionCallingAgent

# Load environment variables from the .env file
load_dotenv()

# Read the Bright Data API key from the envs
BRIGHT_DATA_API_KEY = os.getenv("BRIGHT_DATA_API_KEY")

# Set up the Bright Data Tools
brightdata_tool_spec = BrightDataToolSpec(
    api_key=BRIGHT_DATA_API_KEY,
    zone="unlocker",
    verbose=True, # Useful while developing
)
brightdata_tools = brightdata_tool_spec.to_tool_list()

# Configure the connection to Gemini
llm = GoogleGenAI(
    model="models/gemini-2.5-flash",
)

# Create the LlamaIndex agent powered by Gemini and connected to Bright Data tools
agent = FunctionCallingAgent.from_tools(
    tools=brightdata_tools,
    llm=llm,
    verbose=True, # Useful while developing
)

# Implement the REPL interaction loop
print("Gemini-powered Agent with Bright Data tools for web data retrieval. Type 'exit' to quit.n")

while True:
    # Read the user request for the AI agent from the CLI
    request = input("Request -> ")

    # Terminate the execution if the user type "exit"
    if request.strip().lower() == "exit":
        print("nAgent terminated")
        break

    try:
        # Execute the request
        response = agent.chat(request)
        print(f"nResponse ->:n{response}n")
    except Exception as e:
        print(f"nError: {str(e)}n")
使用以下命令运行代理脚本:
python agent.py脚本启动后,您会看到类似下面的内容:

在终端中输入以下提示:
Generate a report summarizing the most important information about the product "Death Stranding 2" using data from its Amazon page: "https://www.amazon.com/Death-Stranding-2-Beach-PlayStation-5/dp/B0F19GPDW3/"结果将是

时间过得真快,让我们来分析一下发生了什么:
- 代理确定该任务需要亚马逊产品数据,因此调用
web_data_feed工具并输入以下信息:{"source_type":"amazon_product", "url":"https://www.amazon.com/Death-Stranding-2-Beach-PlayStation-5/dp/B0F19GPDW3/"} - 该工具可以异步查询Bright Data 的 Amazon Web Scraper API,以获取结构化产品数据。
- 一旦返回 JSON 响应,代理就会将其输入 Gemini LLM。
- Gemini 处理新数据并生成清晰、准确的摘要。
换句话说,根据提示,代理会聪明地选择最佳工具。在本例中,就是web_data_feed。它以异步方式从给定的亚马逊页面上获取实时产品数据。然后,LLM 利用这些数据生成有意义的摘要。
在这种情况下,人工智能代理返回:
Here's a summary report for "Death Stranding 2: On The Beach - PS5" based on its Amazon product page:

**Product Report: Death Stranding 2: On The Beach - PS5**

*   **Title:** Death Stranding 2: On The Beach - PS5
*   **Brand/Manufacturer:** Sony Interactive Entertainment
*   **Price:** $69.99 USD
*   **Release Date:** June 26, 2026
*   **Availability:** Available for pre-order.

**Description:**
"Death Stranding 2: On The Beach" is an upcoming PlayStation 5 title from legendary game creator Hideo Kojima. Players will embark on a new journey with Sam and his companions to save humanity from extinction, traversing a world filled with otherworldly enemies and obstacles. The game explores the question of human connection and promises to once again change the world through its unique narrative and gameplay.

**Key Features:**
*   **Pre-order Bonus:** Includes Quokka Hologram, Battle Skeleton Silver (LV1,LV2,LV3), Boost Skeleton Silver (LV1,LV2,LV3), and Bokka Silver (LV1,LV2,LV3).
*   **Open World:** Features large, varied open-world environments with unique challenges.
*   **Gameplay Choices:** Offers multiple approaches to combat and stealth, allowing players to choose between aggressive tactics, sneaking, or avoiding danger.
*   **New Story:** Continues the narrative from the original Death Stranding, following Sam on a fresh journey with unexpected twists.
*   **Player Interaction:** Player actions can influence how other players interact with the game's world.

**Category & Ranking:**
*   **Categories:** Video Games, PlayStation 5, Games
*   **Best Sellers Rank:** #10 in Video Games, #1 in PlayStation 5 Games

**Sales Performance:**
*   **Bought in past month:** 7,000 units
请注意,如果没有 “光明数据 “工具,人工智能代理将无法实现这样的结果。这是因为
- 目标亚马逊商品为一款新发布产品,而大语言模型(LLMs)并未经过此类实时数据的训练。
- 大语言模型本身可能无法独立抓取或访问实时网页内容。
- 抓取亚马逊产品数据向来有难度,这是因为亚马逊具有严格的反爬虫机制,例如臭名昭著的亚马逊验证码(CAPTCHA)。
重要: 如果尝试其他提示,您会发现代理会自动选择并使用适当的配置工具来检索生成接地回复所需的数据。
就是这样!您现在拥有了一个 LlamaIndex AI 代理,它具有一流的网络数据访问功能,并与 Bright Data 集成。
结论
在本文中,您将了解到如何使用 LlamaIndex 构建一个人工智能代理,借助 Bright Data 工具实时访问网络数据。
这种集成使您的代理能够检索 Markdown 格式、结构化 JSON 格式甚至截图形式的公共网络内容。网站和搜索引擎都是如此。
请记住,这里的集成只是一个基本示例。如果您的目标是建立更高级的代理,您将需要可靠的工具来检索、验证和转换实时网络数据。Bright Data 的人工智能基础架构正是为此而构建的。
创建一个免费的 Bright Data 账户,立即开始探索我们的人工智能就绪数据工具!


技术写作
 5.5 years experience
Antonello是一名软件工程师,但他更喜欢称自己为技术传教士。通过写作传播知识是他的使命。