
在本指南中,您将学习到有关幽灵光标的知识。完成本教程后,您将能够回答以下问题。
- 什么是幽灵光标?
- Ghost Cursor 与哪些工具兼容?
- 如何使用幽灵光标?
- 是否与解封工具(代理服务器、远程浏览器等)兼容?
- 什么时候使用幽灵光标是正确的选择?
什么是幽灵光标,为什么要关注它?
Ghost Cursor 是Puppeteer 的一个插件。它允许你控制鼠标光标,并使用更像人类的动作进行页面交互。
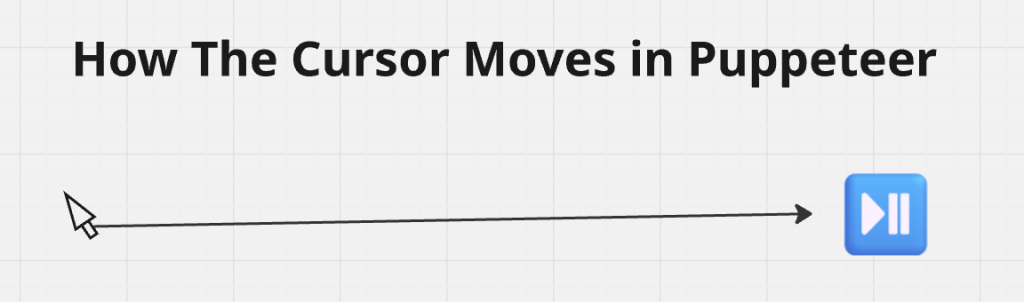
使用 Puppeteer 点击按钮时,光标会立即移动到按钮上并点击它。这非常机械。是的,这样做既快速又高效,但这也是你在搜索网页时经常被屏蔽的原因之一。
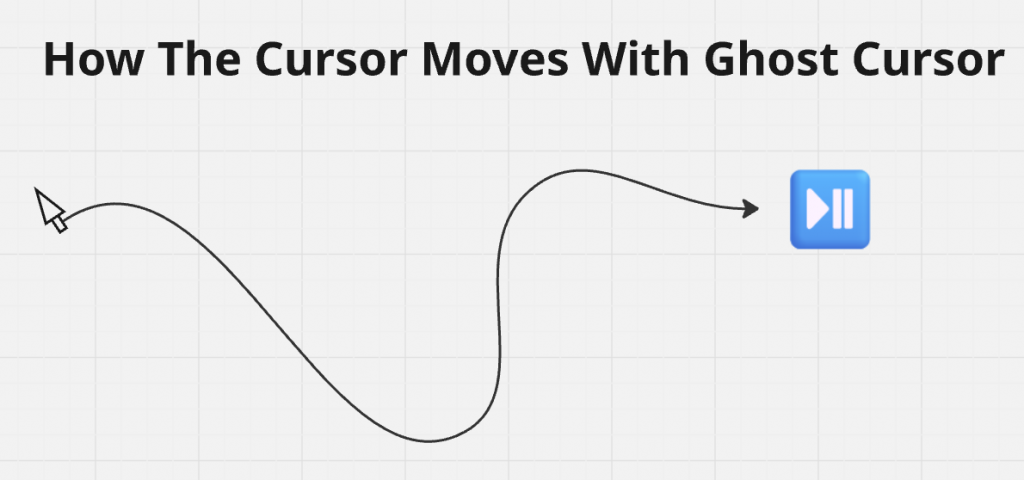
利用幽灵光标,我们可以在页面两点之间的曲线上创建无限多的点。然后,光标会沿着这条曲线从当前位置到达目标元素。这条曲线看起来更加人性化。
入门
在开始编码之前,我们假设你已经对 JavaScript 有了基本的了解。首先,我们需要创建一个新的项目文件夹,并初始化一个 JavaScript 项目。
下面的命令创建了一个新文件夹,并跳转到我们的项目目录。
mkdir your-ghost-cursor-project
cd your-ghost-cursor-project您可以使用npm init将新文件夹转换为 NodeJS 项目。我们使用--y标志是因为这是一个教程。我们不需要提示设置许可决定。
npm init --y现在,我们安装依赖项。很简单,我们只有两个。
npm install ghost-cursor puppeteer幽灵光标的基本用法
在下面的脚本中,我们将演示 Ghost Cursor 的基本用法。首先,我们将启动一个头部浏览器–这并非必要条件,但您将能看到 Ghost Cursor 的运行情况。
创建新页面后,我们将其传入installMouseHelper()。这样我们就可以查看光标在渲染页面中的移动情况。然后,我们创建一个光标对象。光标会获取图书的位置,然后点击图书。
最后,在关闭浏览器并退出程序之前,我们会截取产品页面的截图。
const puppeteer = require('puppeteer');
const { createCursor, installMouseHelper } = require('ghost-cursor');

//this function holds our runtime
async function run() {

    //launch a headed browser to watch ghost cursor in action
    const browser = await puppeteer.launch({
        headless: false,
    });

    const page = await browser.newPage();

    //this allows you to watch the cursor as it moves around
    await installMouseHelper(page);

    //create the actual cursor object
    const cursor = createCursor(page);

    await page.goto("https://books.toscrape.com");

    //find the link inside the product pod
    const book = await cursor.getElement("article[class='product_pod'] a");

    //get its location (x,y) coordinates
    const location = cursor.getLocation(book);

    //move to the coordinates
    await cursor.moveTo(location);

    //click on the book
    await cursor.click(book);

    //take a screenshot of the product page
    await page.screenshot({path: "book.png"});

    await browser.close();
}

run().catch(console.error);
幽灵光标中的可用方法
现在你已经看到了 Ghost Cursor 的实际操作,让我们来看看它的各个方法的作用。每一个方法都是你抓取工具箱中的新成员。
installMouseHelper()
我们使用installMouseHelper()在渲染的浏览器中跟踪鼠标移动。使用该方法可以观察光标的移动。光标的使用并不需要这个程序,而且它需要一个完整的浏览器才能运行。与其说这是一个有用的工具,不如说是一个新颖的调试工具。
//launch a headed browser to watch ghost cursor in action
const browser = await puppeteer.launch({
    headless: false,
});

const page = await browser.newPage();

//this allows you to watch the cursor as it moves around
await installMouseHelper(page);
getElement()
getElement()的工作方式与 Puppeteer 中的page.$()基本相同。事实上,我们甚至把普通的 Puppeteer 元素传入其他方法,光标也出现了错误,但它仍能继续工作。在页面上查找元素时,最好使用cursor.getElement()。
//find the link inside the product pod
const book = await cursor.getElement("article[class='product_pod'] a");
getLocation()
找到元素后,您通常需要检索其位置。通过这种方法,您只需编写最少的代码,就能获取任何页面元素的 (x,y) 坐标。
//get its location (x,y) coordinates
const location = cursor.getLocation(book);
移动()
move()是一个非常方便的方法。您可以将选择器对象或页面元素直接传入move(),光标就会自然而然地移动到该对象上,就像人一样。
//move straight to the book
await cursor.move(book);

//click on the book
await cursor.click(book);
moveTo()
moveTo可以将坐标直接传递到游标中。我们使用getLocation()并通过moveTo() 将其输出传递到游标,而不是移动到书本。
//move to the coordinates
await cursor.moveTo(location);

//click on the book
await cursor.click(book);
scrollIntoView()
有时,你并不想将光标直接移到一个对象上。scrollIntoView()允许你传递一个选择器或页面元素并滚动,直到你的元素显示在视口中。
//scroll until the book is in the viewport
await cursor.scrollIntoView(book);

//click on the book
await cursor.click(book);
scrollTo()
scrollTo()是另一个非常方便的函数。它允许你输入顶部、底部、左侧和右侧。使用自然语言控制滚动动作,无需人工智能!
//scroll to the top of the page
await cursor.scrollTo('top');

//click on the book
await cursor.click(book);
滚动()
scroll()可能是最基本的滚动操作。使用 scroll 时,你需要传递 (x,y) 坐标–还记得getLocation() 吗?然后光标就会滚动,直到位于视口内。
//move to the coordinates
await cursor.scroll(location);

//click on the book
await cursor.click(book);
幽灵光标的常见限制
- 验证码:Ghost Cursor 可以让你看起来更像人类,但归根结底,你仍然是那个控制着抓取器的人。了解更多信息,请参阅 “十大验证码解决工具“。
- Puppeteer:Ghost cursor 只正式支持 Puppeteer。与Selenium和Playwright 等其他无头浏览器相比,Puppeteer 功能有限,缺乏维护。
- 仅限本地:Ghost Cursor 需要在本地运行。这严重限制了解锁选项。有了Scraping Browser,你就可以运行远程无头浏览器,并自动管理代理和验证码。由于不支持远程浏览,Ghost Cursor 无法充分利用现有的最佳工具。
代理集成
Puppeteer 不支持 Scraping Browser,但能与本地代理集成。Puppeteer 使用基本代理 URL、用户名和密码进行标准代理验证。
下面的代码为你提供了一个基本脚本,你可以针对任何 Puppeteer/Ghost Cursor 运行时进行调整。确保用你自己的凭据替换用户名、区域名和密码!
const puppeteer = require('puppeteer');
const { createCursor } = require('ghost-cursor');

async function run() {
    const browser = await puppeteer.launch({
        headless: false,

        args: [
            '--proxy-server=http://brd.superproxy.io:33335',
            '--ignore-certificate-errors'
        ]

    });

    const page = await browser.newPage();

    const cursor = createCursor(page);

    await page.authenticate({
        username: "brd-customer-<your-username>-zone-<your-zone-name>",
        password: "<your-password>"
    });

    await page.goto("https://ipinfo.io");

    await cursor.click("a[href='/what-is-my-ip']");


    await page.screenshot({path: "ipinfo.png"});


    await browser.close();
}

run().catch(console.error);
如前所述,有了 Puppeteer 和 Ghost Cursor,你就无法充分利用 Scraping Browser 本身的优势。下面的明细显示了使用上述搜索器的单次运行成本。成本之高令人大开眼界。

手动管理代理时,最好使用轮换方式。正如您在 Web Unlocker 中看到的,执行此搜索的成本为 0.23 美元。如果使用住宅连接,费用为 0.05 美元;如果使用数据中心连接,费用仅为 0.01 美元。
使用 Ghost Cursor 和 Puppeteer 管理代理时,请使用数据中心代理。只有在目标网站阻止数据中心连接时,才可使用驻地代理。
结论
Ghost Cursor 是一种简单而有效的方法,可让您的抓取工具显得更人性化。当你的滚动和点击更自然时,你就不太可能被目标网站屏蔽。该工具可与一般代理集成,但与远程浏览器不兼容。
对于基本的抓取任务,Ghost Cursor 可以为你的代码增加一些人性化的功能,而不需要太多的模板。看看本文中提到的抓取产品,让你的抓取技术更上一层楼。
- 网络解锁器:自动验证码解决和代理管理。只需将其连接起来并继续编码即可。
- 抓取浏览器:使用受管代理和验证码解码器进行远程浏览。
- 住宅代理:通过消费者设备上的真实家庭互联网连接路由您的流量。与最好的流量融为一体。
- 数据中心代理:高端硬件,连接速度快如闪电。低成本抓取中间网站。
注册免费试用,立即开始使用!


技术写作者
 6 years experience
Jacob Nulty 是一位常驻底特律的软件开发者和技术写作者,探索人工智能与人类哲学,具备 Python、Rust 和区块链方面的经验。