在本指南中,你将看到:
- 什么是 AG2,它如何支持单智能体和多智能体系统开发,以及通过集成 Bright Data 带来的优势。
- 开始集成前所需的前置条件。
- 如何通过自定义工具,用 Bright Data 驱动 AG2 多智能体架构。
- 如何将 AG2 连接到 Bright Data 的 Web MCP。
让我们开始吧!
AG2(原 AutoGen)简介
AG2 是一个开源的 AgentOS 框架,用于构建能够自主协作解决复杂任务的 AI 智能体和多智能体系统。它支持你构建单智能体工作流、编排多个专业智能体,并将外部工具集成到模块化、可投入生产的流水线中。
AG2(原 AutoGen)是对 Microsoft AutoGen 库的演进。它保留了原有架构和向后兼容性,同时增强了多智能体工作流、工具集成以及人类参与(human-in-the-loop)AI 能力。它使用 Python 编写,在 GitHub 上有 4k+ Star。
(如果你正在寻找将 Bright Data 集成到 AutoGen 的指南,请参考专门的博客文章。)
AG2 提供了将智能体 AI 项目从实验阶段推向生产所需的灵活性和高级编排模式。
它的一些核心特性包括多智能体对话模式、人类参与支持、工具集成,以及结构化工作流管理。其最终目标是帮助你以最低的管理成本构建复杂 AI 系统。
尽管具备这些强大的能力,AG2 智能体仍然面临大型语言模型的核心限制:训练数据的知识是静态的,而且没有原生的实时网页访问能力!
将 AG2 与 Bright Data 这样的网页数据提供方集成可以解决这些问题。通过将 AG2 智能体连接到 Bright Data 的抓取、搜索和浏览器自动化 API,你可以为其提供实时、结构化的网页数据,大大提升智能体的智能程度、自主性和实用价值。
前置条件
要跟随本指南动手实践,你需要:
- 在本地机器上安装 Python 3.10 或更高版本。
- 一个已配置好 Web Unlocker API、SERP API 和 API Key 的 Bright Data 账号。(本教程会引导你完成所有所需配置。)
- 一个 OpenAI API Key(或来自 AG2 支持的其他 LLM 提供方的密钥)。
同时,了解一些 Bright Data 的产品与服务,以及对 AG2 工具系统工作原理有基本认识也会有所帮助。
如何将 Bright Data 集成到 AG2 多智能体工作流中
在本章节中,你将基于 Bright Data 服务搭建一个分步骤的 AG2 多智能体工作流。具体来说,一个专门负责网页数据获取的智能体将通过自定义 AG2 工具函数访问 Bright Data 的 Web Unlocker 和 SERP API。
该多智能体系统会在 Twitch 等平台上识别食品行业领域的顶级影响者,用于推广一款新型汉堡。本示例展示了 AG2 如何自动化数据收集、生成结构化商业报告,并支持数据驱动决策——全程无需人工干预。
下面看看如何实现!
步骤一:创建 AG2 项目
打开终端,为你的 AG2 项目创建一个新文件夹。例如命名为 ag2-bright-data-agent:
mkdir ag2-bright-data-agentag2-bright-data-agent/ 将包含实现和编排 AG2 智能体、并与 Bright Data 函数集成的 Python 代码。
接下来,进入项目目录,并在其中创建虚拟环境:
cd ag2-bright-data-agent
python -m venv .venv
在项目根目录下新增 agent.py 文件。此时项目结构应如下所示:
ag2-bright-data-agent/
├── .venv/
└── agent.py # <----
agent.py 文件将包含 AG2 智能体定义和编排逻辑。
在你喜欢的 Python IDE 中打开该项目文件夹,例如安装了 Python 插件的 Visual Studio Code 或 PyCharm Community Edition。
现在,激活刚才创建的虚拟环境。在 Linux 或 macOS 中,运行:
source .venv/bin/activate在 Windows 中,执行:
.venv/Scripts/activate激活虚拟环境后,安装所需的 PyPI 依赖:
pip install ag2[openai] requests python-dotenv本应用依赖以下库:
ag2[openai]:用于构建和编排基于 OpenAI 模型的多智能体 AI 工作流。requests:用于通过自定义工具向 Bright Data 服务发起 HTTP 请求。python-dotenv:用于从.env文件中加载环境变量里的密钥。
至此,你已经为使用 AG2 开发多智能体 AI 准备好了 Python 环境。
步骤二:配置 LLM 集成
接下来要构建的 AG2 智能体需要一个“大脑”,也就是 LLM。每个智能体都可以有自己的LLM 配置,但为简化起见,我们将所有智能体连接到同一个 OpenAI 模型。
AG2 内置了一种机制,可以从一个专用配置文件中加载 LLM 设置。在 agent.py 中添加以下代码:
from autogen import LLMConfig

# Load LLM configuration from the OpenAI config list file
llm_config = LLMConfig.from_json(path="OAI_CONFIG_LIST")
这段代码会从名为 OAI_CONFIG_LIST.json 的文件中加载 LLM 配置。在项目根目录下创建该文件:
ag2-bright-data-agent/
├── .venv/
├── OAI_CONFIG_LIST.json # <----
└── agent.py
然后在 OAI_CONFIG_LIST.json 中填入如下内容:
[
  {
    "model": "gpt-5-mini",
    "api_key": "<YOUR_OPENAI_API_KEY>"
  }
]
将 <YOUR_OPENAI_API_KEY> 替换为你实际的 OpenAI API Key。此配置将使用 GPT-5 Mini 模型为 AG2 智能体提供能力,你也可以替换为其他受支持的 OpenAI 模型。
llm_config 变量会被传入你的智能体以及群聊编排器,使其可以基于所配置的 LLM 进行推理、对话和执行任务。
步骤三:管理环境变量读取
你的 AG2 智能体现在已经可以连接 OpenAI,但它们还需要访问另一个第三方服务:Bright Data。与 OpenAI 类似,Bright Data 也通过外部 API Key来验证请求。
为避免安全风险,你绝不应该在代码中硬编码 API Key。最佳实践是从环境变量中加载,这就是我们之前安装 python-dotenv 的原因。
首先,在 agent.py 中引入 python-dotenv,并使用 load_dotenv() 函数从 .env 文件加载环境变量:
from dotenv import load_dotenv
import os

# Load environment variables from the .env file
load_dotenv()
接着,在项目根目录下添加 .env 文件:
ag2-bright-data-agent/
├── .venv/
├── OAI_CONFIG_LIST.json
├── .env # <----
└── agent.py
将你的密钥值写入 .env 文件后,就可以在代码中通过 os.getenv() 访问:
ENV_VALUE = os.getenv("ENV_NAME")这样,你的脚本就能安全地从环境变量加载第三方集成所需的密钥。
步骤四:配置 Bright Data 服务
如前文所述,负责网页数据的智能体将连接 Bright Data 的 SERP API 和 Web Unlocker API,以处理网页搜索和页面内容获取。这两个服务结合起来,即为智能体提供了一个智能体式 RAG 数据检索层。
要与这两个服务交互,你稍后需要在 AG2 中定义两个自定义工具。在此之前,先在 Bright Data 账号中完成相关配置。
如果你还没有账号,请先注册一个 Bright Data 账号。已有账号的话则直接登录并进入 Dashboard。进入“Proxies & Scraping”页面,查看“My Zones”表格,确认当前账号下已配置的服务: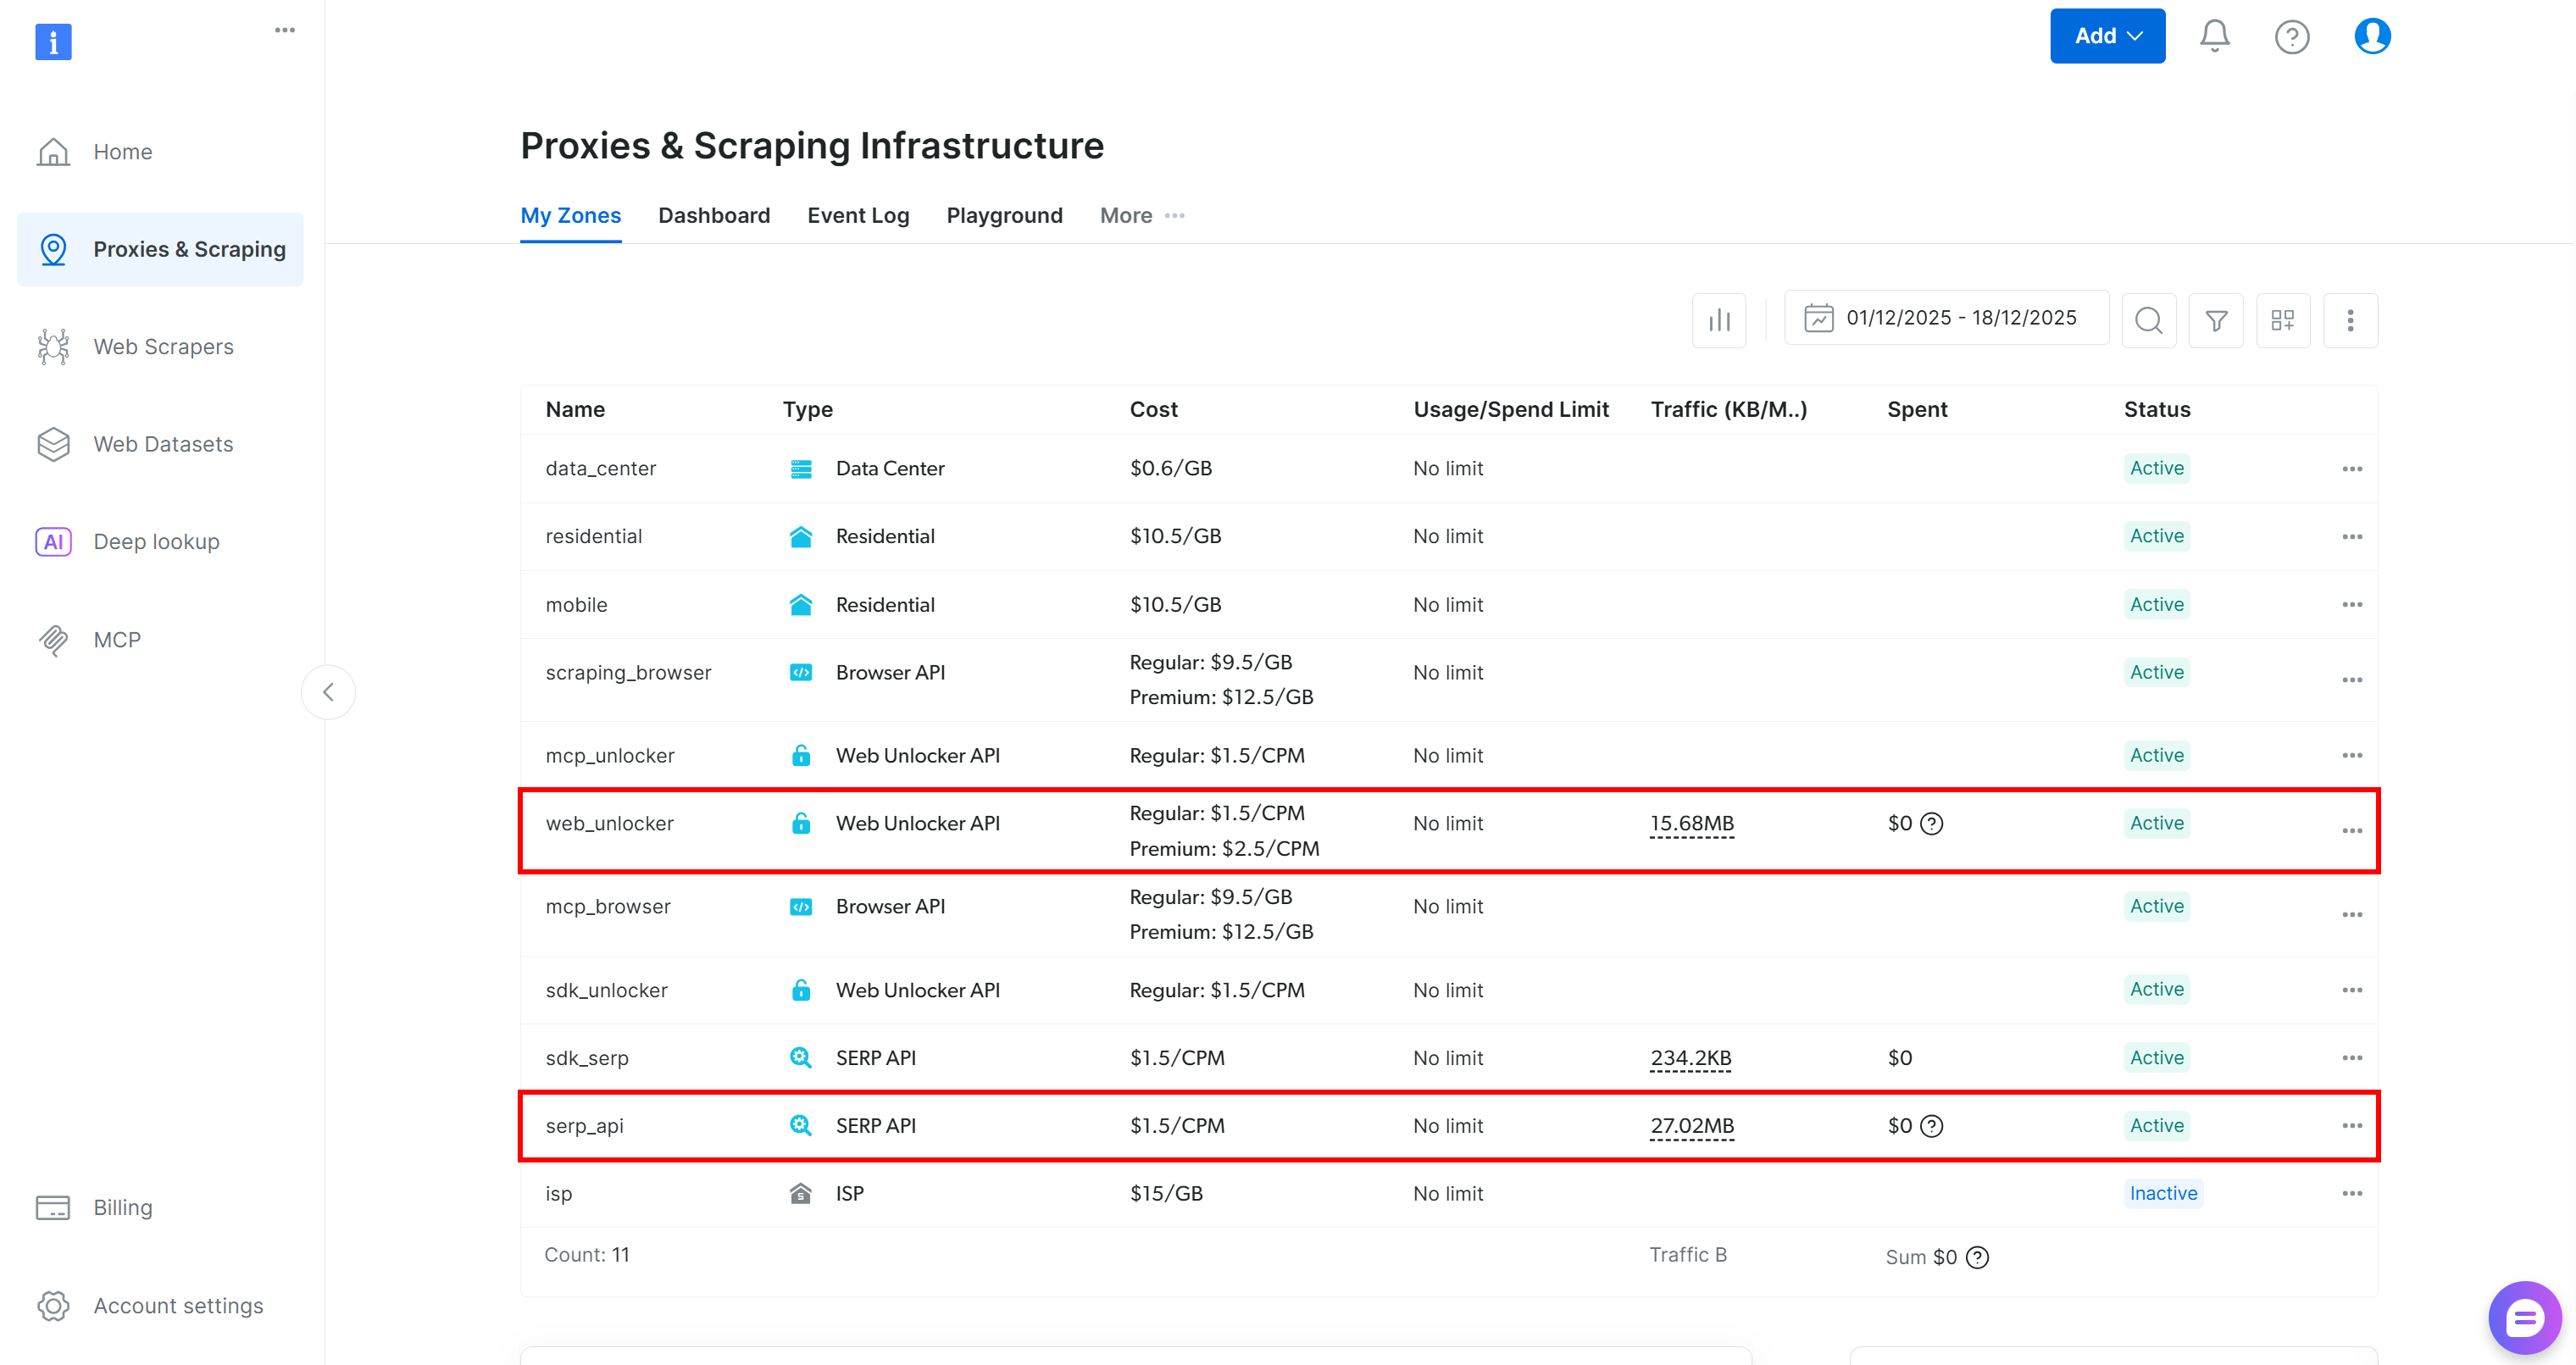
如果像上图一样,表格中已经包含 Web Unlocker API 区域(示例命名为 web_unlocker)和 SERP API 区域(示例命名为 serp_api),那就可以直接使用这两个区域为自定义 AG2 工具提供服务调用。
如果缺少其一或两者,请向下滚动至“Unblocker API”和“SERP API”卡片,并分别点击“Create zone”。按照向导完成两个区域的创建:
详细的操作步骤可参考官方文档:
重要:从此处开始,我们假定你的区域名称分别为 serp_api 和 web_unlocker。
区域就绪后,生成 Bright Data API Key,并将其存入 .env 文件中的环境变量:
BRIGHT_DATA_API_KEY="<YOUR_BRIGHT_DATA_API_KEY>"然后在 agent.py 中加载:
BRIGHT_DATA_API_KEY = os.getenv("BRIGHT_DATA_API_KEY")这样,你就具备了将 AG2 智能体连接到 Bright Data SERP API 和 Web Unlocker 服务的全部基础要素。
步骤五:为 AG2 智能体定义 Bright Data 工具
在 AG2 中,工具为智能体提供专门功能,智能体可调用这些工具执行动作并作出决策。工具本质上就是 AG2 以结构化方式暴露给智能体的自定义 Python 函数。
本步骤中,你将在 agent.py 中实现两个工具函数:
serp_api_tool():连接 Bright Data SERP API 执行 Google 搜索。web_unlocker_api_tool():连接 Bright Data Web Unlocker API 抓取网页内容并绕过反爬系统。
这两个工具都使用 Requests Python HTTP 客户端,根据文档通过认证的 POST 请求访问 Bright Data:
在 agent.py 中添加以下代码以定义两个工具函数:
from typing import Annotated
import requests
import urllib.parse

def serp_api_tool(
    query: Annotated[str, "The Google search query"],
) -> str:
    payload = {
        "zone": "serp_api",  # Replace it with the name of your Bright Data SERP API zone
        "url": f"https://www.google.com/search?q={urllib.parse.quote_plus(query)}&brd_json=1",
        "format": "raw",
    }

    headers = {
        "Authorization": f"Bearer {BRIGHT_DATA_API_KEY}",
        "Content-Type": "application/json",
    }

    response = requests.post(
        "https://api.brightdata.com/request",
        json=payload,
        headers=headers,
    )
    response.raise_for_status()

    return response.text


def web_unlocker_api_tool(
    url_to_fetch: Annotated[str, "Target page URL to fetch"],
    data_format: Annotated[
        str | None,
        "Output page format (e.g., 'markdown', or omit for raw HTML)"
    ] = "markdown",
) -> str:
    payload = {
        "zone": "web_unlocker",  # Replace it with the name of your Bright Data Web Unlocker zone
        "url": url_to_fetch,
        "format": "raw",
        "data_format": data_format,
    }

    headers = {
        "Authorization": f"Bearer {BRIGHT_DATA_API_KEY}",
        "Content-Type": "application/json",
    }

    response = requests.post(
        "https://api.brightdata.com/request",
        json=payload,
        headers=headers
    )
    response.raise_for_status()

    return response.text
这两个工具通过 Bright Data API Key 进行请求认证,并向同一 Bright Data API 端点发送 POST 请求:
serp_api_tool()通过设置brd_json=1参数,向 Google 发送查询并以结构化 JSON 格式获取搜索结果。web_unlocker_api_tool()抓取任意网页,并以 Markdown(或原始 HTML)格式返回页面内容。
重要:JSON 和 Markdown 都是非常适合被 AI 智能体中的 LLM 消化的数据格式。
注意,这两个函数都使用 Python 类型标注以及 Annotated 描述其参数。类型信息是将这些函数转换为正式 AG2 工具的必要条件,而注解中的说明则帮助 LLM 理解在调用工具时应如何填写每个参数。
此时,你的 AG2 应用已经包含了两个 Bright Data 工具,可以被智能体配置和调用。
步骤六:实现 AG2 智能体
工具就绪后,就可以实现前文描述的 AI 智能体结构了。本架构包含三个互补的智能体:
user_proxy:作为执行层,负责安全地运行工具调用,并在无人干预的情况下编排整个工作流。它是UserProxyAgent的实例,该智能体在 AG2 中作为用户代理,执行代码并视需要向其他智能体提供反馈。web_data_agent:负责网页数据发现与获取。该智能体通过 Bright Data SERP API 进行网页搜索,并通过 Web Unlocker API 获取页面内容。作为ConversableAgent,它可以与其他智能体和人类沟通,处理信息,遵循系统消息中的指令等。reporting_agent:分析收集到的数据,并将其转换为面向决策者的结构化、可读性强的 Markdown 报告。
这三个智能体组合在一起,构成了一个完全自治的多智能体流水线,用于识别 Twitch 主播并推广指定产品。
在 agent.py 中,通过以下代码声明这三个智能体:
from autogen import (
    UserProxyAgent,
    ConversableAgent,
)

# Executes tool calls and orchestrates the workflow without human intervention
user_proxy = UserProxyAgent(
    name="user_proxy",
    code_execution_config=False,
    human_input_mode="NEVER",
    llm_config=llm_config,
)

# Responsible for searching and retrieving web data
web_data_agent = ConversableAgent(
    name="web_data_agent",
    code_execution_config=False,
    llm_config=llm_config,
    system_message=(
        """
        You are a web data retrieval agent.
        You search the web using the Bright Data SERP API tool
        and retrieve page content using the Web Unlocker API tool.
        """
    ),
)

# Analyzes collected data and produces a structured report
reporting_agent = ConversableAgent(
    name="reporting_agent",
    code_execution_config=False,
    system_message=(
        """
        You are a marketing analyst.
        You produce structured, business-ready Markdown reports
        intended for decision-makers.
        """
    ),
    llm_config=llm_config,
    # Automatically terminate the conversation once the word "report" appears
    is_termination_msg=lambda msg: "report" in (msg.get("content", "") or "").lower()
)
在上述代码中:
- AG2 智能体可以执行消息中的代码(例如代码块),并把结果传给下一个智能体。为了安全起见,这里通过
code_execution_config=False禁用了代码执行。 - 所有智能体都使用在步骤二中加载的
llm_config。 reporting_agent定义了is_termination_msg函数,用于在消息中出现 “report” 一词时自动结束工作流,表示最终输出已生成。
下一步,你将把 Bright Data 工具注册到 web_data_agent 上,从而启用网页数据获取能力。
步骤七:在 AG2 中注册 Bright Data 工具
通过 register_function() 将 Bright Data 函数注册为工具,并指定由 web_data_agent 调用。根据 AG2 架构要求,user_proxy 将作为这些工具的执行者:
from autogen import register_function

# Register SERP search tool for the web data agent
register_function(
    serp_api_tool,
    caller=web_data_agent,
    executor=user_proxy,
    description="Use Bright Data's SERP API to perform a Google search and return raw results."
)

# Register Web Unlocker tool for fetching protected pages
register_function(
    web_unlocker_api_tool,
    caller=web_data_agent,
    executor=user_proxy,
    description="Fetch a web page using Bright Data's Web Unlocker API, bypassing common anti-bot protections.",
)
注意,每个函数都包含简要描述,以帮助 LLM 理解工具用途,并在需要时正确调用。
注册完成后,web_data_agent 即可规划网页搜索和页面访问,而具体执行由 user_proxy 负责。
此时,你的 AG2 多智能体流水线已经具备通过 Bright Data API 完成自主数据发现和抓取的能力。
步骤八:引入 AG2 多智能体编排逻辑
AG2 支持多种方式编排和管理多个智能体。本示例使用的是 GroupChat 模式。
GroupChat 的核心思想是所有智能体共同参与同一个会话线程,分享同一上下文。这种方式非常适合需要多个智能体协作的任务,例如本教程中的流水线。
随后,一个 GroupChatManager 负责协调群聊中的智能体。它支持多种策略来选择下一位发言的智能体。这里我们配置默认的 auto 策略,即通过管理器的 LLM 自动决定由哪一个智能体下一步行动。
将所有内容结合起来,实现多智能体编排:
from autogen import (
    GroupChat,
    GroupChatManager,
)

# Define the multi-agent group chat
groupchat = GroupChat(
    agents=[user_proxy, web_data_agent, reporting_agent],
    speaker_selection_method="auto",
    messages=[],
    max_round=20
)

# Manager responsible for coordinating agent interactions
manager = GroupChatManager(
    name="group_manager",
    groupchat=groupchat,
    llm_config=llm_config
)注意:当 reporting_agent 产生触发其 is_termination_msg 逻辑的消息,或当智能体之间的往返轮次达到 20(即 max_round 参数)时,工作流将终止,以先发生者为准。
至此,智能体定义和编排逻辑已经就绪。最后一步是启动工作流并导出结果。
步骤九:启动智能体工作流并导出结果
用详细描述来说明 Twitch 影响者搜索任务,并将其作为消息传递给 user_proxy 智能体以启动工作流:
prompt_message = """
Scenario:
---------
A food & beverage brand wants to promote a new type of hamburger.

Goal:
- Search for the Food & Drink category page on TwitchMetrics
- Fetch the content of the TwitchMetrics category page retrieved from the SERP and select the top 5 streamers
- Visit each streamer’s TwitchMetrics profile page and retrieve relevant information
- Produce a structured Markdown report including:
  - Channel name
  - Estimated reach
  - Content focus
  - Audience fit
  - Feasibility of brand outreach
"""

# Start the multi-agent workflow
user_proxy.initiate_chat(recipient=manager, message=prompt_message)
工作流结束后,将输出(即 Markdown 报告)持久化到磁盘:
with open("report.md", "w", encoding="utf-8") as f:
    f.write(user_proxy.last_message()["content"])
现在,你的 AG2 + Bright Data 多智能体工作流已经可以自动收集、分析并输出 Twitch 影响者数据。
步骤十:整合所有代码
最终,agent.py 中的完整代码如下:
from autogen import (
    LLMConfig,
    UserProxyAgent,
    ConversableAgent,
    register_function,
    GroupChat,
    GroupChatManager,
)
from dotenv import load_dotenv
import os
from typing import Annotated
import requests
import urllib.parse

# Load LLM configuration from the OpenAI config list file
llm_config = LLMConfig.from_json(path="OAI_CONFIG_LIST")

# Load environment variables from the .env file
load_dotenv()

# Retrieve the Bright Data API key from environment variables
BRIGHT_DATA_API_KEY = os.getenv("BRIGHT_DATA_API_KEY")

# Define the functions to implement the Bright Data tools
def serp_api_tool(
    query: Annotated[str, "The Google search query"],
) -> str:
    payload = {
        "zone": "serp_api",  # Replace it with the name of your Bright Data SERP API zone
        "url": f"https://www.google.com/search?q={urllib.parse.quote_plus(query)}&brd_json=1",
        "format": "raw",
    }

    headers = {
        "Authorization": f"Bearer {BRIGHT_DATA_API_KEY}",
        "Content-Type": "application/json",
    }

    response = requests.post(
        "https://api.brightdata.com/request",
        json=payload,
        headers=headers,
    )
    response.raise_for_status()

    return response.text


def web_unlocker_api_tool(
    url_to_fetch: Annotated[str, "Target page URL to fetch"],
    data_format: Annotated[
        str | None,
        "Output page format (e.g., 'markdown', or omit for raw HTML)"
    ] = "markdown",
) -> str:
    payload = {
        "zone": "web_unlocker",  # Replace it with the name of your Bright Data Web Unlocker zone
        "url": url_to_fetch,
        "format": "raw",
        "data_format": data_format,
    }

    headers = {
        "Authorization": f"Bearer {BRIGHT_DATA_API_KEY}",
        "Content-Type": "application/json",
    }

    response = requests.post(
        "https://api.brightdata.com/request",
        json=payload,
        headers=headers
    )
    response.raise_for_status()

    return response.text

# Executes tool calls and orchestrates the workflow without human intervention
user_proxy = UserProxyAgent(
    name="user_proxy",
    code_execution_config=False,
    human_input_mode="NEVER",
    llm_config=llm_config,
)

# Responsible for searching and retrieving web data
web_data_agent = ConversableAgent(
    name="web_data_agent",
    code_execution_config=False,
    llm_config=llm_config,
    system_message=(
        """
        You are a web data retrieval agent.
        You search the web using the Bright Data SERP API tool
        and retrieve page content using the Web Unlocker API tool.
        """
    ),
)

# Analyzes collected data and produces a structured report
reporting_agent = ConversableAgent(
    name="reporting_agent",
    code_execution_config=False,
    system_message=(
        """
        You are a marketing analyst.
        You produce structured, business-ready Markdown reports
        intended for decision-makers.
        """
    ),
    llm_config=llm_config,
    # Automatically terminate the conversation once the word "report" appears
    is_termination_msg=lambda msg: "report" in (msg.get("content", "") or "").lower()
)

# Register SERP search tool for the web data agent
register_function(
    serp_api_tool,
    caller=web_data_agent,
    executor=user_proxy,
    description="Use Bright Data's SERP API to perform a Google search and return raw results."
)

# Register Web Unlocker tool for fetching protected pages
register_function(
    web_unlocker_api_tool,
    caller=web_data_agent,
    executor=user_proxy,
    description="Fetch a web page using Bright Data's Web Unlocker API, bypassing common anti-bot protections.",
)

# Define the multi-agent group chat
groupchat = GroupChat(
    agents=[user_proxy, web_data_agent, reporting_agent],
    speaker_selection_method="auto",
    messages=[],
    max_round=20
)

# Manager responsible for coordinating agent interactions
manager = GroupChatManager(
    name="group_manager",
    groupchat=groupchat,
    llm_config=llm_config
)

prompt_message = """
Scenario:
---------
A food & beverage brand wants to promote a new type of hamburger.

Goal:
- Search for the Food & Drink category page on TwitchMetrics
- Fetch the content of the TwitchMetrics category page retrieved from the SERP and select the top 5 streamers
- Visit each streamer’s TwitchMetrics profile page and retrieve relevant information
- Produce a structured Markdown report including:
  - Channel name
  - Estimated reach
  - Content focus
  - Audience fit
  - Feasibility of brand outreach
"""

# Start the multi-agent workflow
user_proxy.initiate_chat(recipient=manager, message=prompt_message)

# Persist the final report to a Markdown file
with open("report.md", "w", encoding="utf-8") as f:
    f.write(user_proxy.last_message()["content"])
得益于强大的 AG2 API,仅靠约 170 行代码,你就构建出了一个复杂、企业级、由 Bright Data 驱动的多智能体工作流!
步骤十一:测试多智能体系统
在终端中运行以下命令,验证 AG2 智能体应用是否正常工作:
python agent.py预期输出如下所示:
具体来看,多智能体工作流按以下步骤推进:
web_data_agent判断需要调用serp_api_tool来定位所需的 TwitchMetrics “Food & Drink” 分类页面。- 通过
user_proxy智能体,多次执行搜索查询。 - 找到正确的 TwitchMetrics 分类页面后,调用
web_unlocker_api_tool将该页面内容以 Markdown 格式抓取下来。 - 从 Markdown 输出中提取 “Food & Drink” 分类下排名前 5 的主播 TwitchMetrics 个人资料链接。
- 再次调用
web_unlocker_api_tool,抓取每个主播的个人资料页面内容(Markdown 格式)。 - 将所有收集到的数据传递给
reporting_agent,由其进行分析,并生成最终报告。
该最终报告会按照代码中的配置保存为 report.md 文件: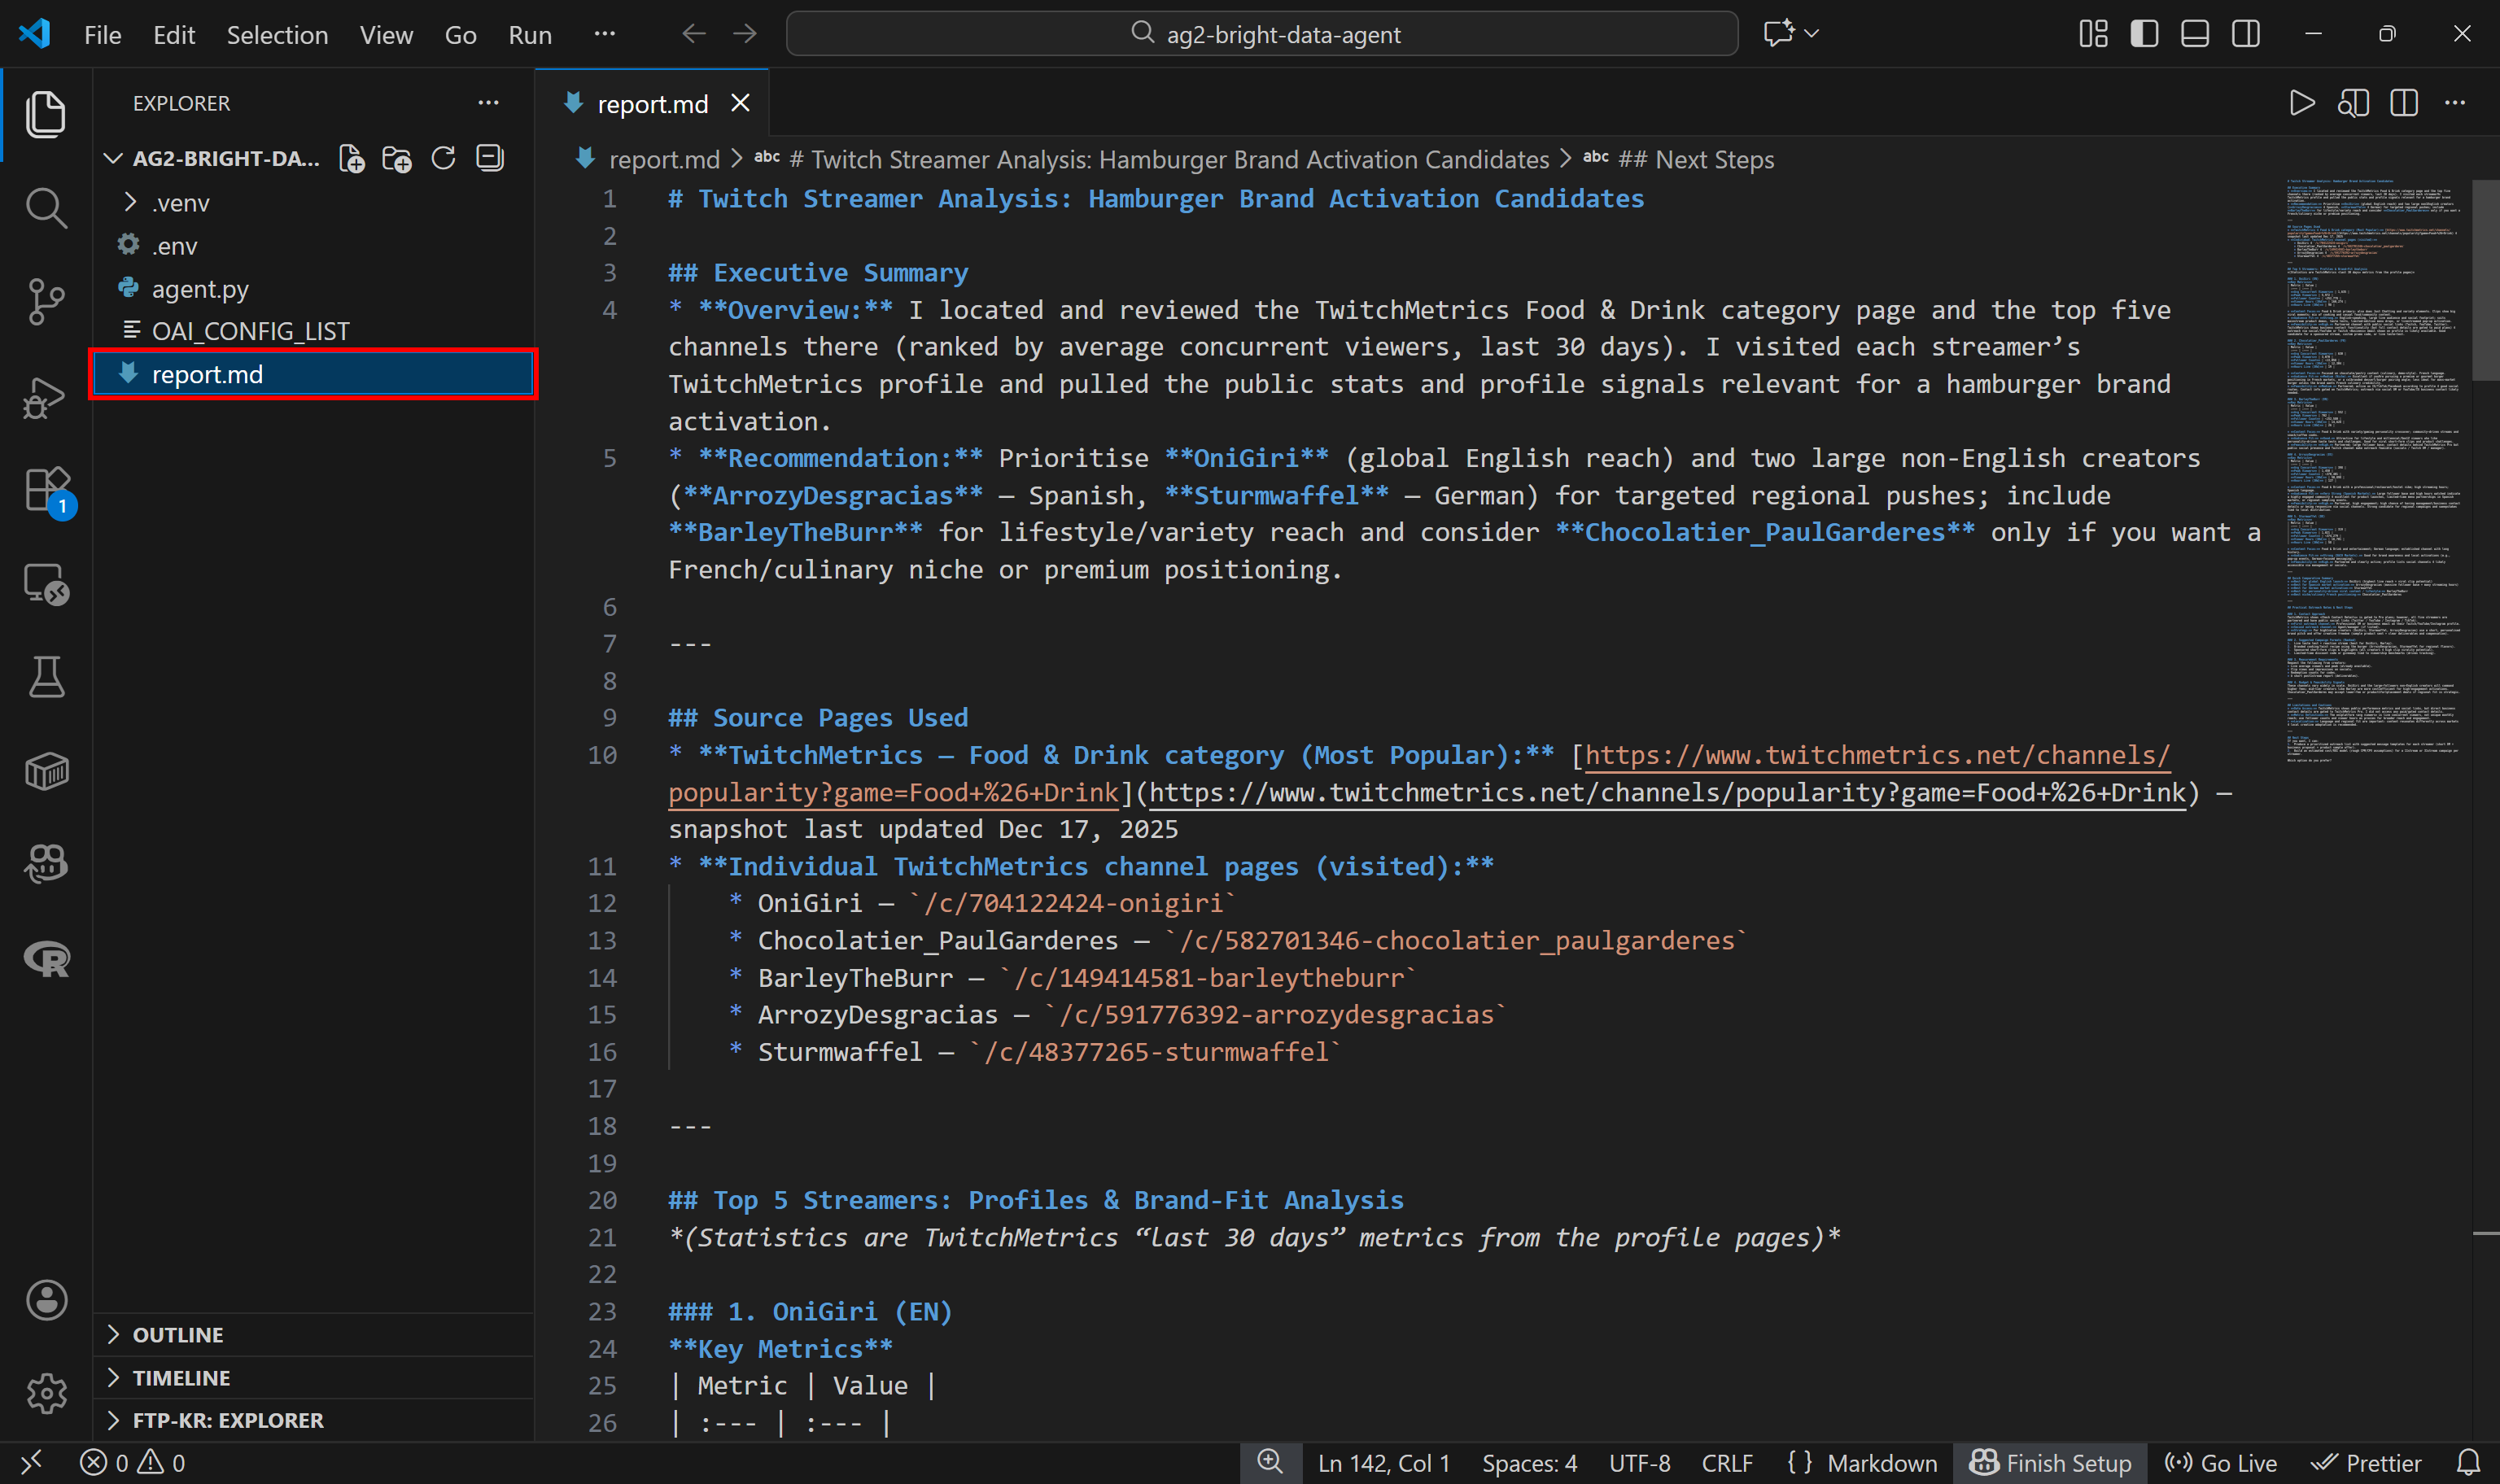
在 VS Code 中使用 Markdown 预览查看,你会发现报告内容详实且信息量大: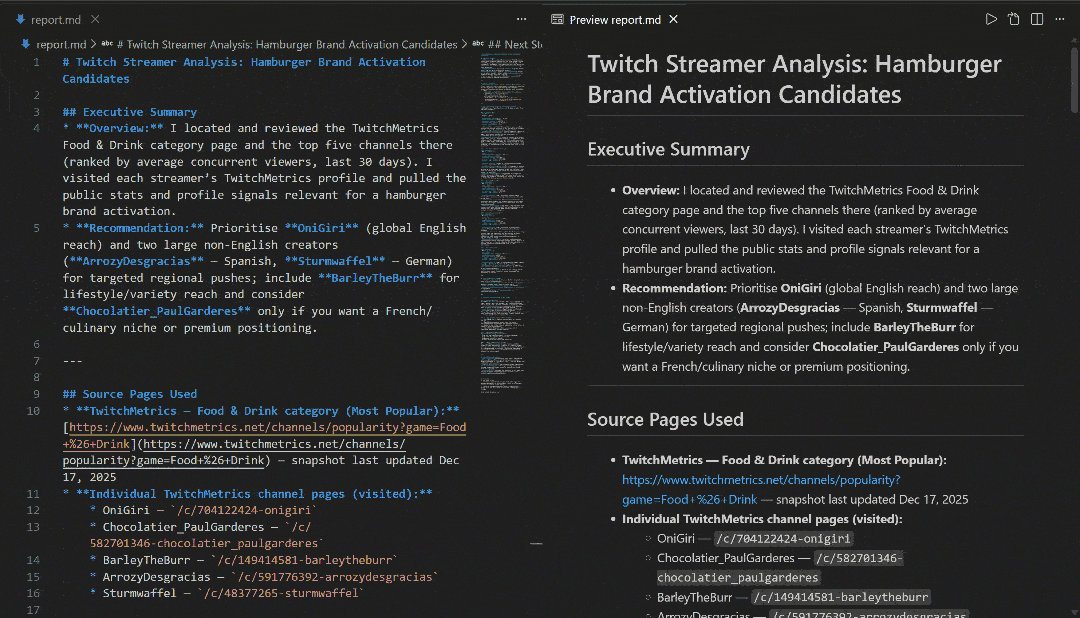
如果你想了解数据源,可以查看 TwitchMetrics 上的 Food & Drink 分类页面: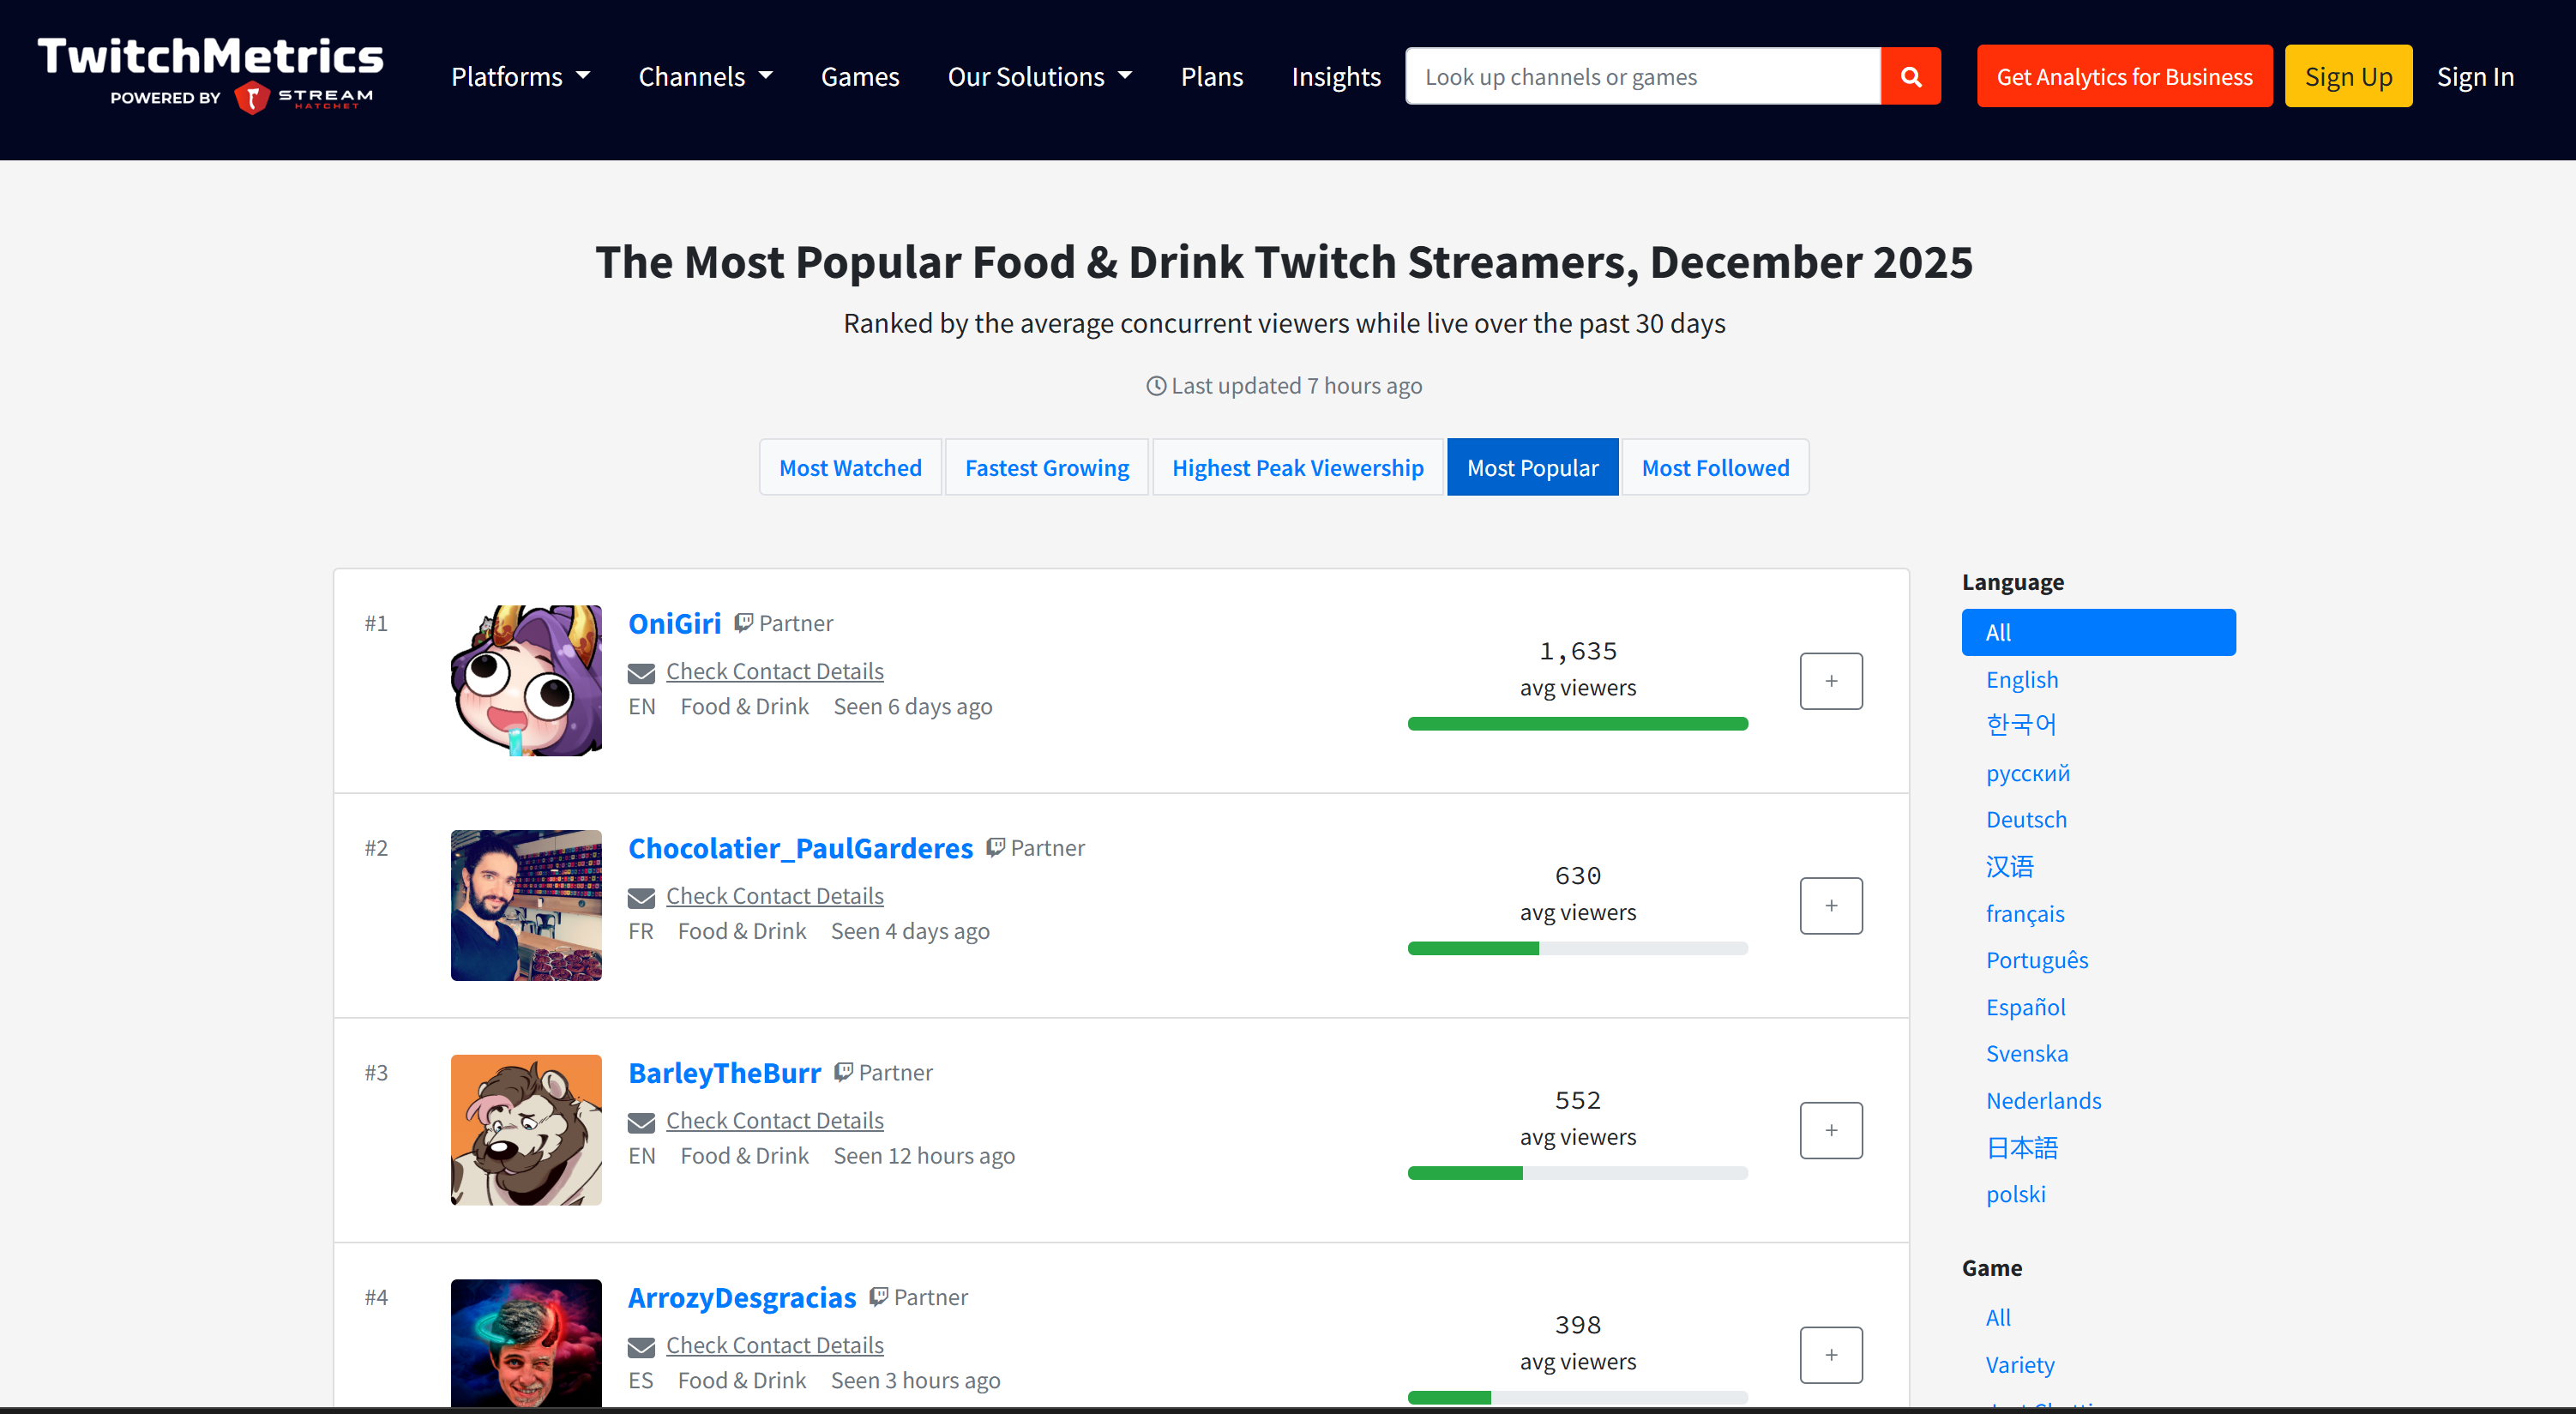
你会发现报告中的 Twitch 主播信息与该分类下前 5 名主播各自的 TwitchMetrics 个人资料页面高度一致: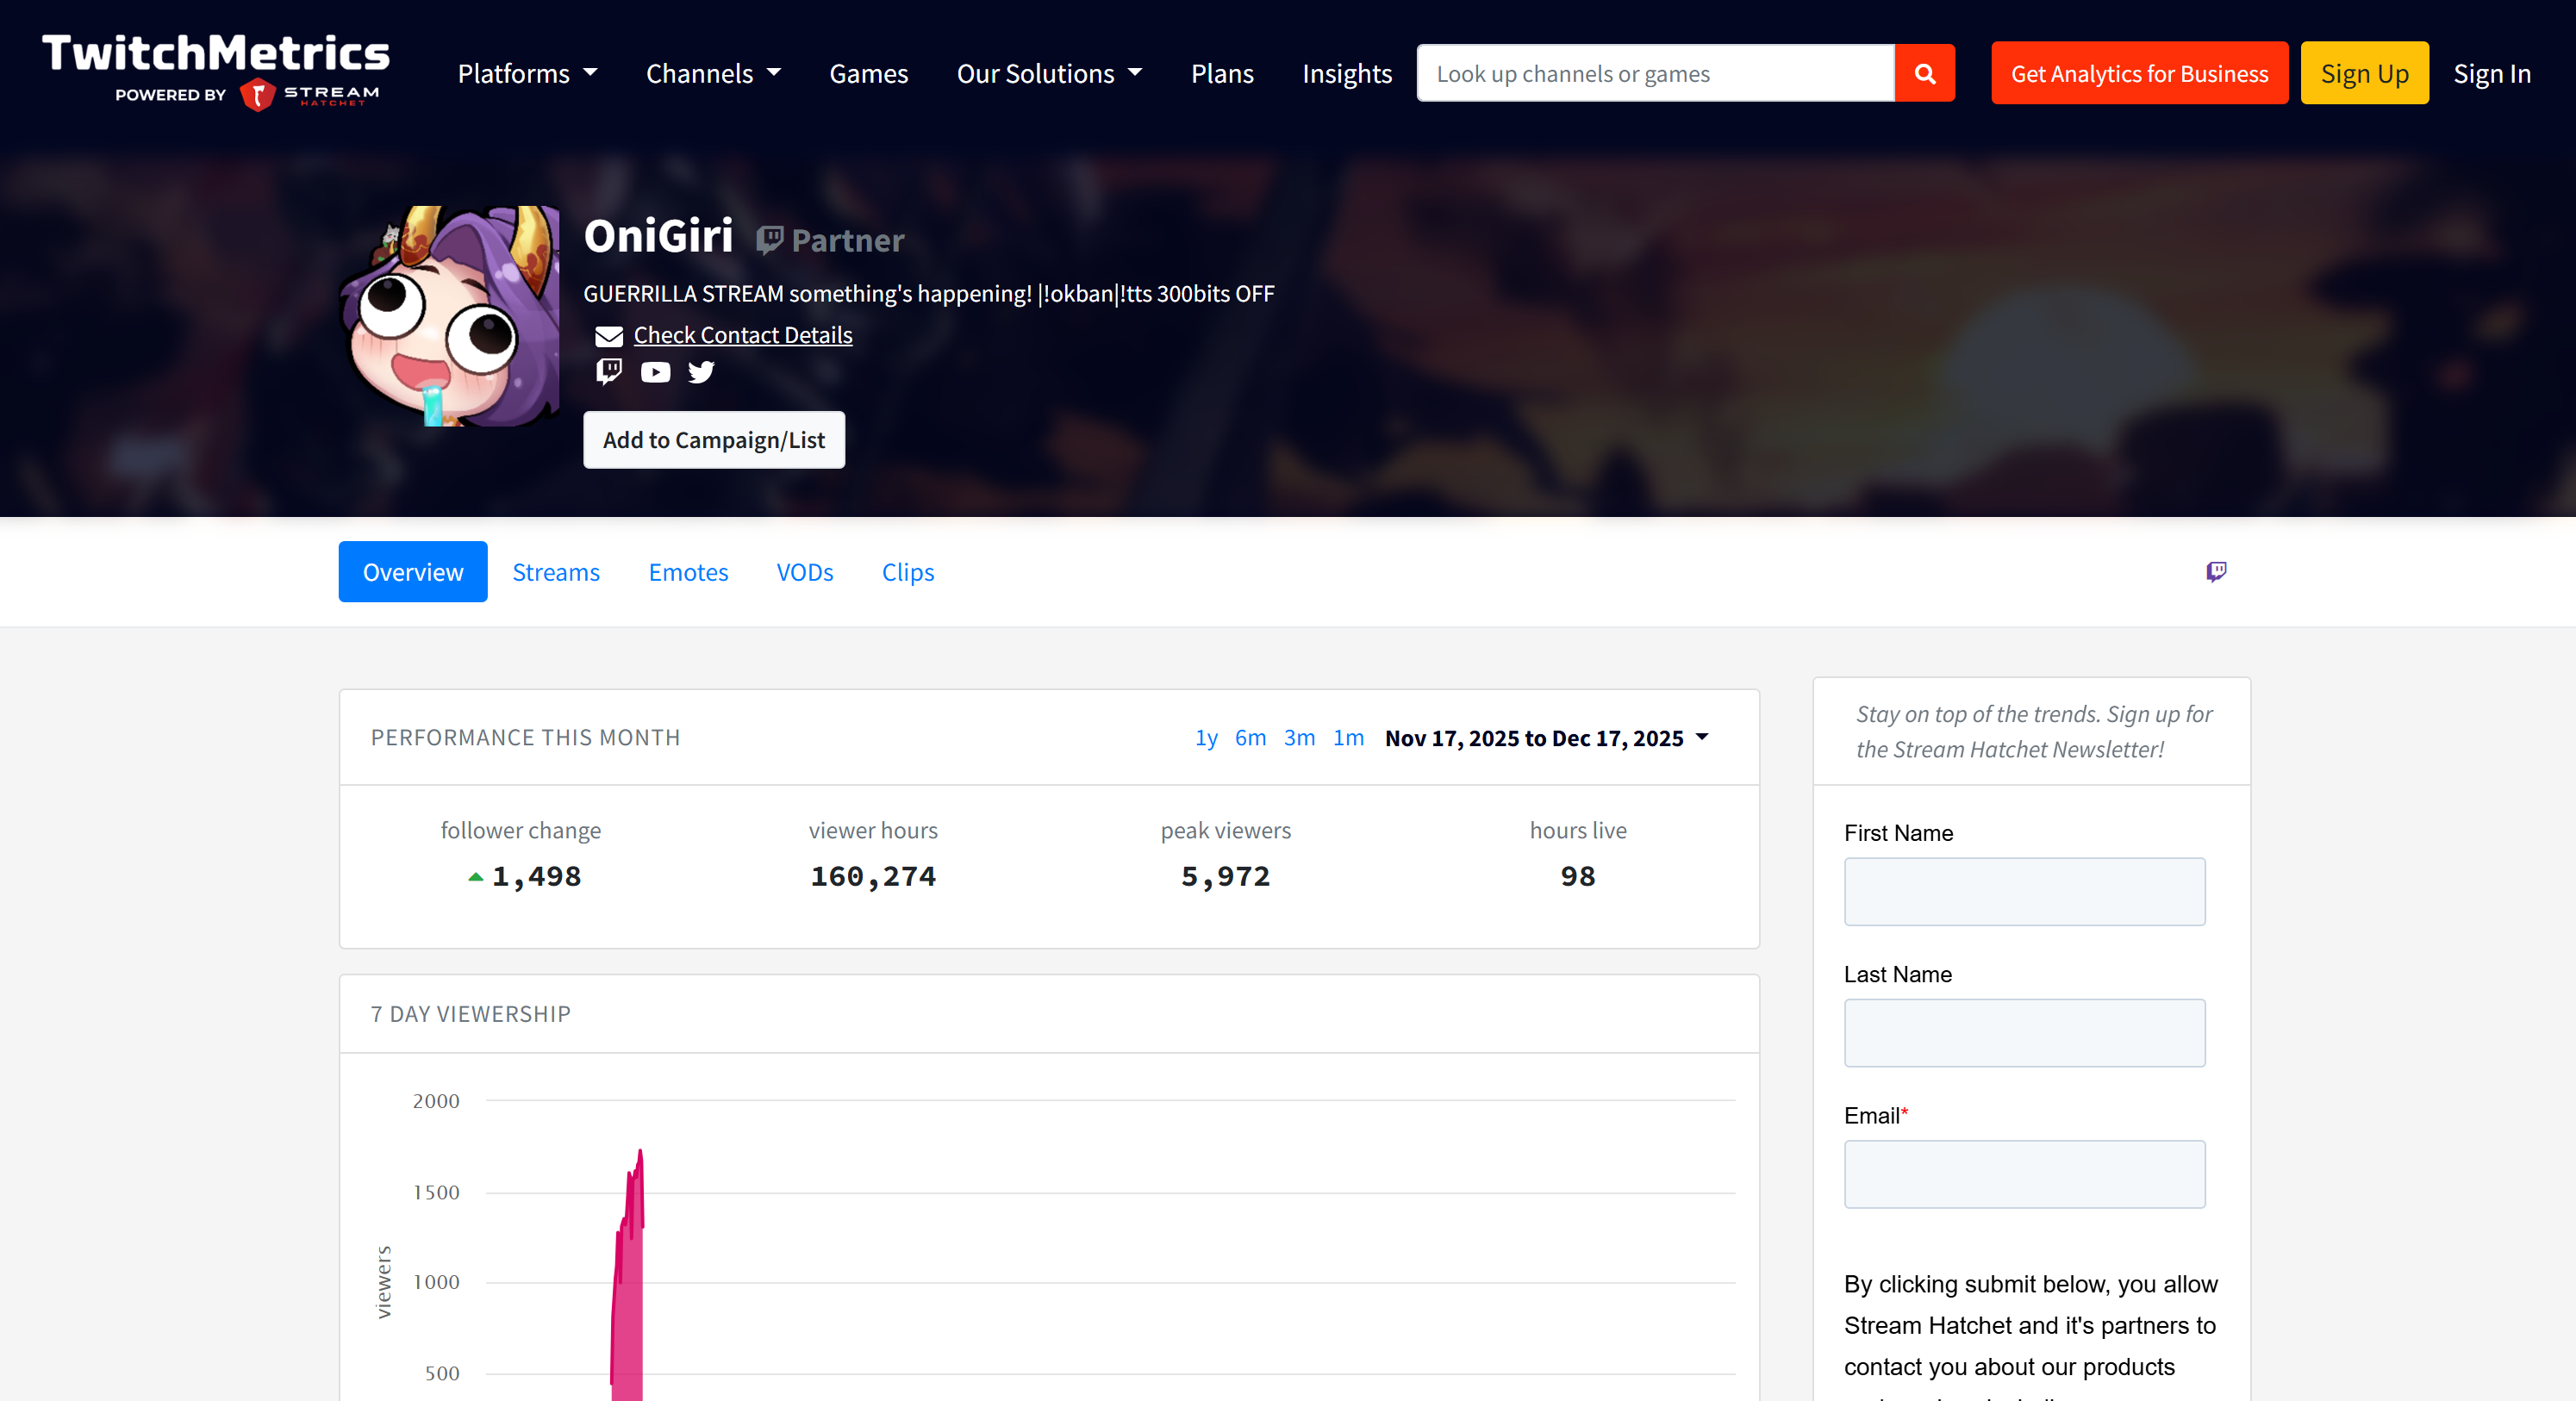
所有这些信息都由多智能体系统自动获取,充分展示了 AG2 与 Bright Data 集成的威力。
接下来,你可以尝试不同的输入提示。借助 Bright Data,你的 AG2 多智能体工作流能够处理各类真实业务场景。
至此,你已经见识了一个由 Bright Data 增强的 AG2 工作流的强大能力。
通过 Web MCP 将 AG2 连接到 Bright Data:分步指南
集成 Bright Data 到 AG2 的另一种方式是使用 Bright Data Web MCP 服务器。
Web MCP 为你提供60+ 个基于 Bright Data 网页自动化与数据采集平台之上的工具。即使在免费套餐中,它也暴露了两个非常强大的工具:
| 工具 | 描述 |
|---|---|
search_engine |
以 JSON 或 Markdown 格式返回 Google、Bing 或 Yandex 搜索结果。 |
scrape_as_markdown |
将任意网页抓取为干净的 Markdown,并自动绕过反爬措施。 |
Web MCP 的Pro 模式功能更加全面。该付费选项解锁对 Amazon、LinkedIn、Instagram、Reddit、YouTube、TikTok、Google Maps 等主流平台的结构化数据提取,并新增高级浏览器自动化工具。
注意:项目初始化可以参考上一章节中的步骤一。
下面来看看如何在 AG2 中使用 Bright Data Web MCP!
前置条件
要完成本部分教程,你需要在本地安装 Node.js,因为 Web MCP 服务器需要在本机运行。
你还需要安装 AG2 的 MCP 包:
pip install ag2[mcp]这样 AG2 才能作为 MCP 客户端。
步骤一:开始使用 Bright Data Web MCP
在将 AG2 连接到 Bright Data Web MCP 之前,先确保你可以在本地运行 MCP 服务器。这很重要,因为我们将演示如何连接本地 Web MCP 服务器。
注意:Web MCP 也支持通过 Streamable HTTP 作为远程服务器运行,这种方式更适用于需要无限扩展性的企业级场景。
首先确认你已经拥有 Bright Data 账号,如已注册则直接登录。快速配置可按照控制台中 “MCP” 区域里的说明操作: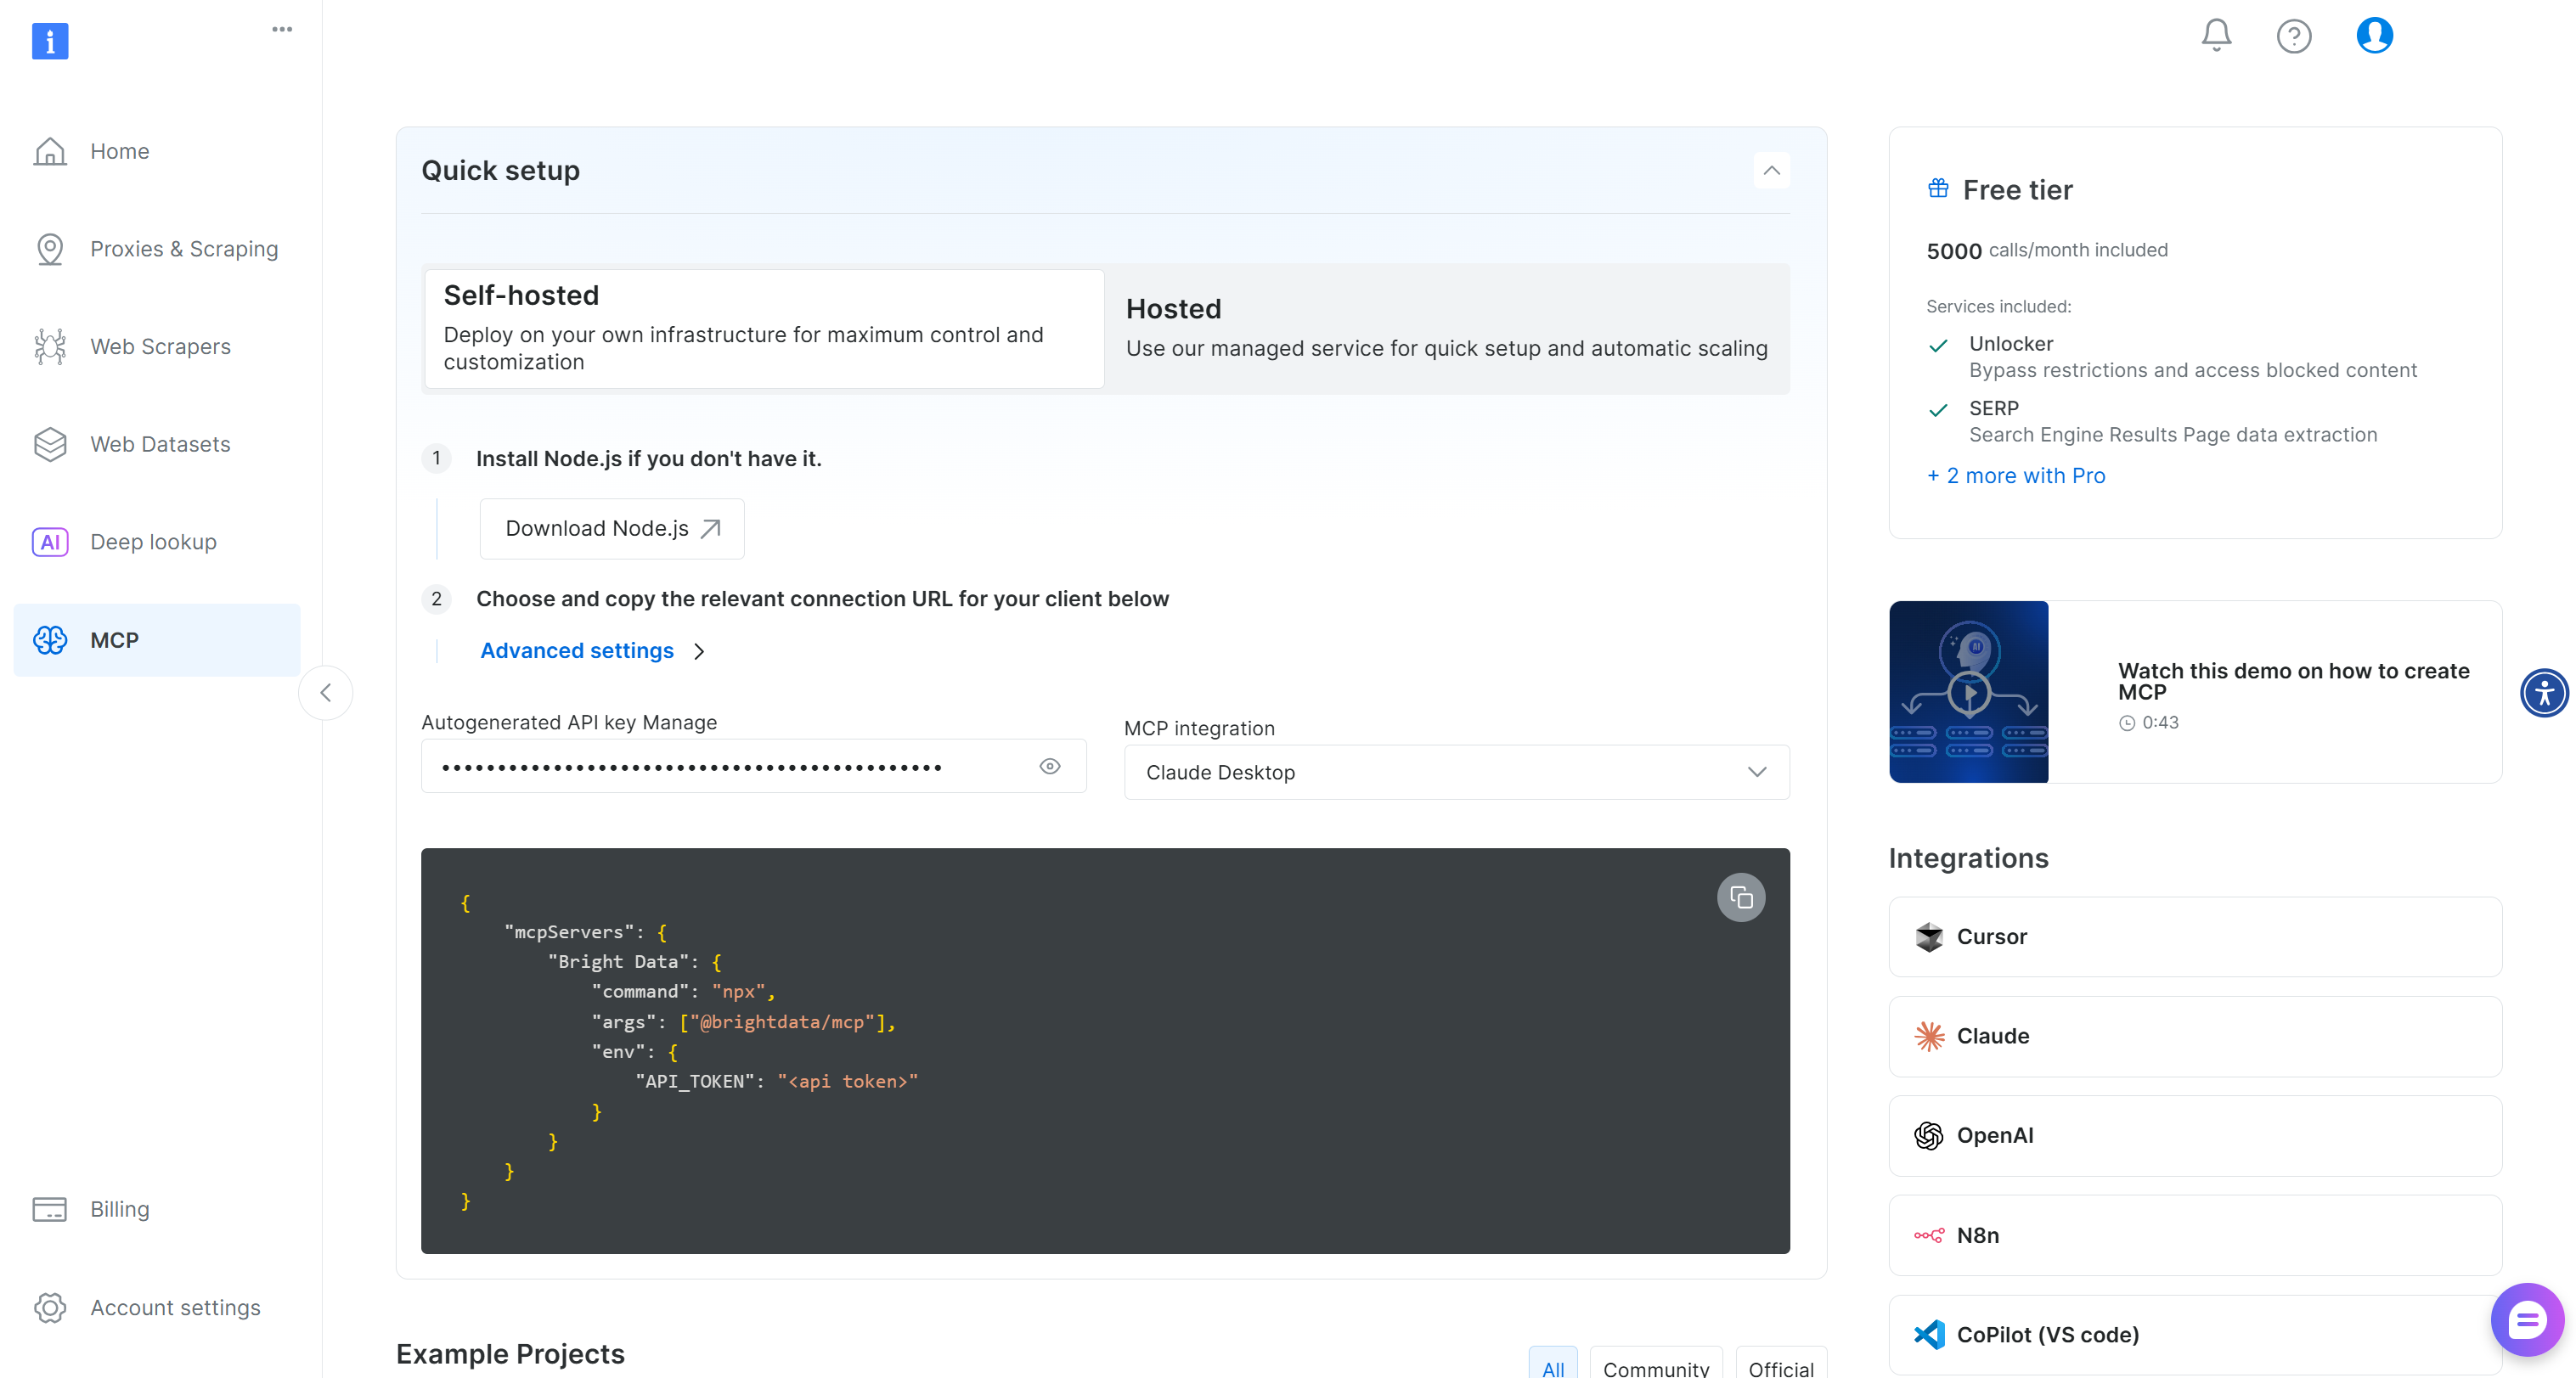
如需更多指导,可参考以下步骤。
先生成 Bright Data API Key,并妥善保存,因为你将使用它来为本地 Web MCP 实例进行身份验证。
然后使用 @brightdata/mcp 包在本机全局安装 Web MCP:
npm install -g @brightdata/mcp通过以下命令启动 MCP 服务器:
API_TOKEN="<YOUR_BRIGHT_DATA_API>" npx -y @brightdata/mcp在 PowerShell 中等价执行:
$Env:API_TOKEN="<YOUR_BRIGHT_DATA_API>"; npx -y @brightdata/mcp将 <YOUR_BRIGHT_DATA_API> 替换为你的 Bright Data API Token。这些命令会设置所需的 API_TOKEN 环境变量并在本地启动 Web MCP 服务器。
若启动成功,你应能看到类似如下的输出:
默认情况下,Web MCP 首次启动时会在你的 Bright Data 账号下创建两个区域:
mcp_unlocker:用于 Web Unlocker。mcp_browser:用于 Browser API。
这两个区域为 Web MCP 的 60+ 工具提供底层支持。
你可以在 Bright Data 控制台的 “Proxies & Scraping Infrastructure” 页面中看到它们: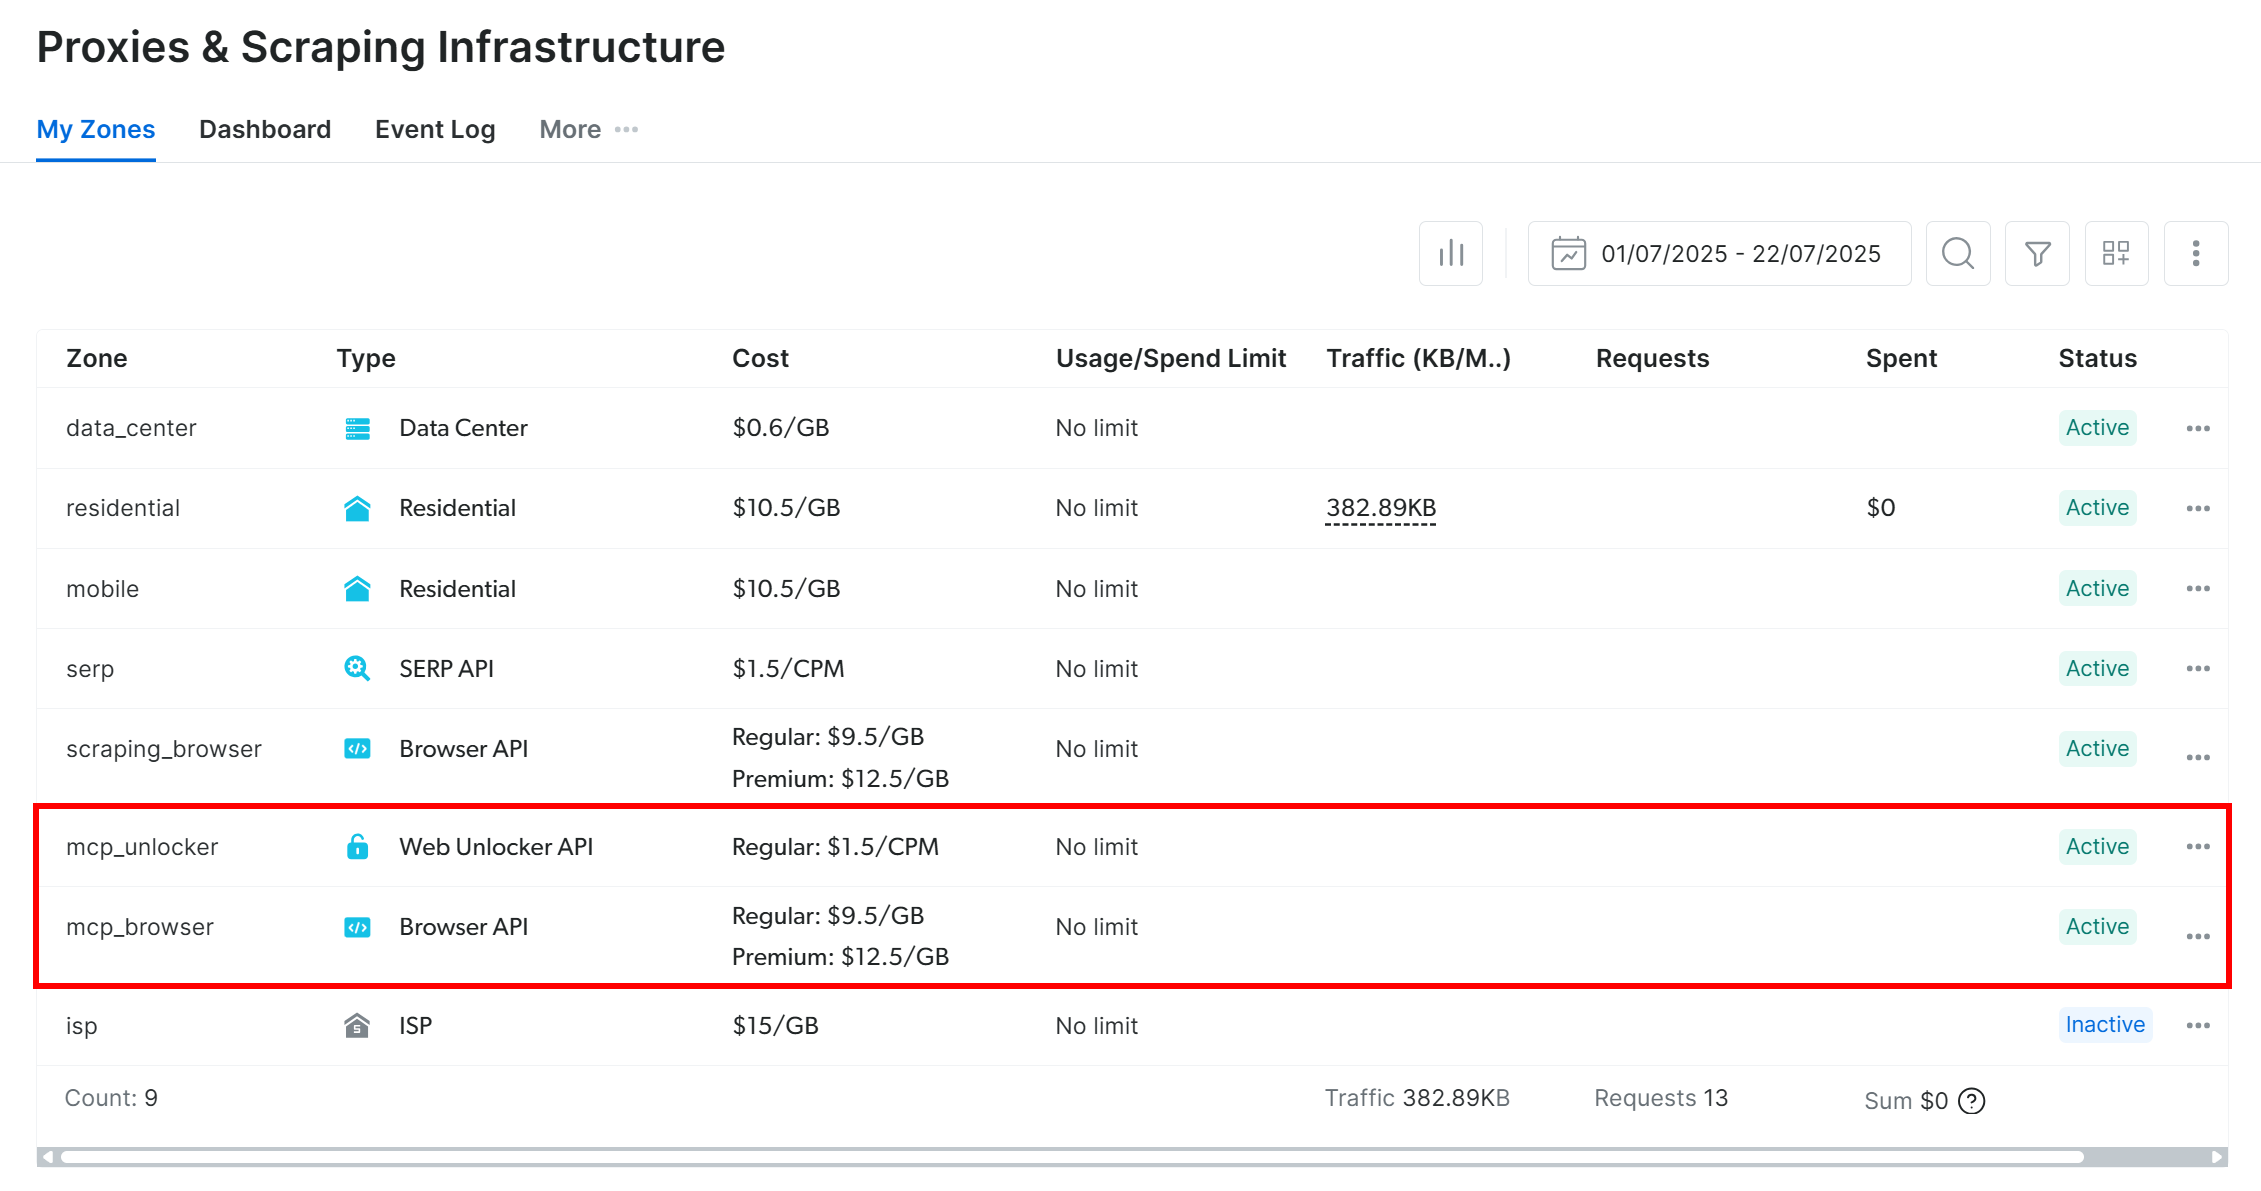
在 Web MCP 免费套餐下,仅有 search_engine 与 scrape_as_markdown(及其批量版本)可用。
若要解锁全部工具,可通过设置 PRO_MODE="true" 环境变量启用 Pro 模式:
API_TOKEN="<YOUR_BRIGHT_DATA_API>" PRO_MODE="true" npx -y @brightdata/mcp在 Windows 中:
$Env:API_TOKEN="<YOUR_BRIGHT_DATA_API>"; $Env:PRO_MODE="true"; npx -y @brightdata/mcpPro 模式会解锁全部 60+ 工具,但不包含在免费套餐中,可能会产生额外费用。
至此,你已验证 Web MCP 服务器可以在本地运行。你可以暂时停止 MCP 进程,下一步将在 AG2 中配置自动启动并连接该服务器。
步骤二:在 AG2 中集成 Web MCP
使用 AG2 MCP 客户端通过 STDIO 连接本地 Web MCP 实例,并获取可用工具:
from mcp import ClientSession, StdioServerParameters
from mcp.client.stdio import stdio_client
from autogen.mcp import create_toolkit

# Instructions to connect to a local Web MCP instance
server_params = StdioServerParameters(
    command="npx",
    args=["-y", "@brightdata/mcp"],
    env={
        "API_TOKEN": BRIGHT_DATA_API_KEY,
        "PRO_MODE": "true" # Optional
    },
)

async with stdio_client(server_params) as (read, write), ClientSession(read, write) as session:
    # Create an MCP connection session and retrieve the tools
    await session.initialize()
    web_mcp_toolkit = await create_toolkit(session, use_mcp_resources=False)
StdioServerParameters 对象与之前在命令行运行的 npx 命令等价,包括用于认证和配置的环境变量:
API_TOKEN:必填,设置为你的 Bright Data API Key。PRO_MODE:可选,如希望保持在免费套餐(仅search_engine与scrape_as_markdown及其批量版本)则可移除。
该会话用于连接 Web MCP,并通过 create_toolkit 创建 AG2 MCP 工具集。
注意:根据一个GitHub Issue 的说明,必须将 use_mcp_resources=False,否则会触发 mcp.shared.exceptions.McpError: Method not found 错误。
创建完成后,web_mcp_toolkit 对象中就包含了所有 Web MCP 工具。你可以这样检查:
for tool in web_mcp_toolkit.tools:
    print(tool.name)
    print(tool.description)
    print("---\n")
输出类似如下: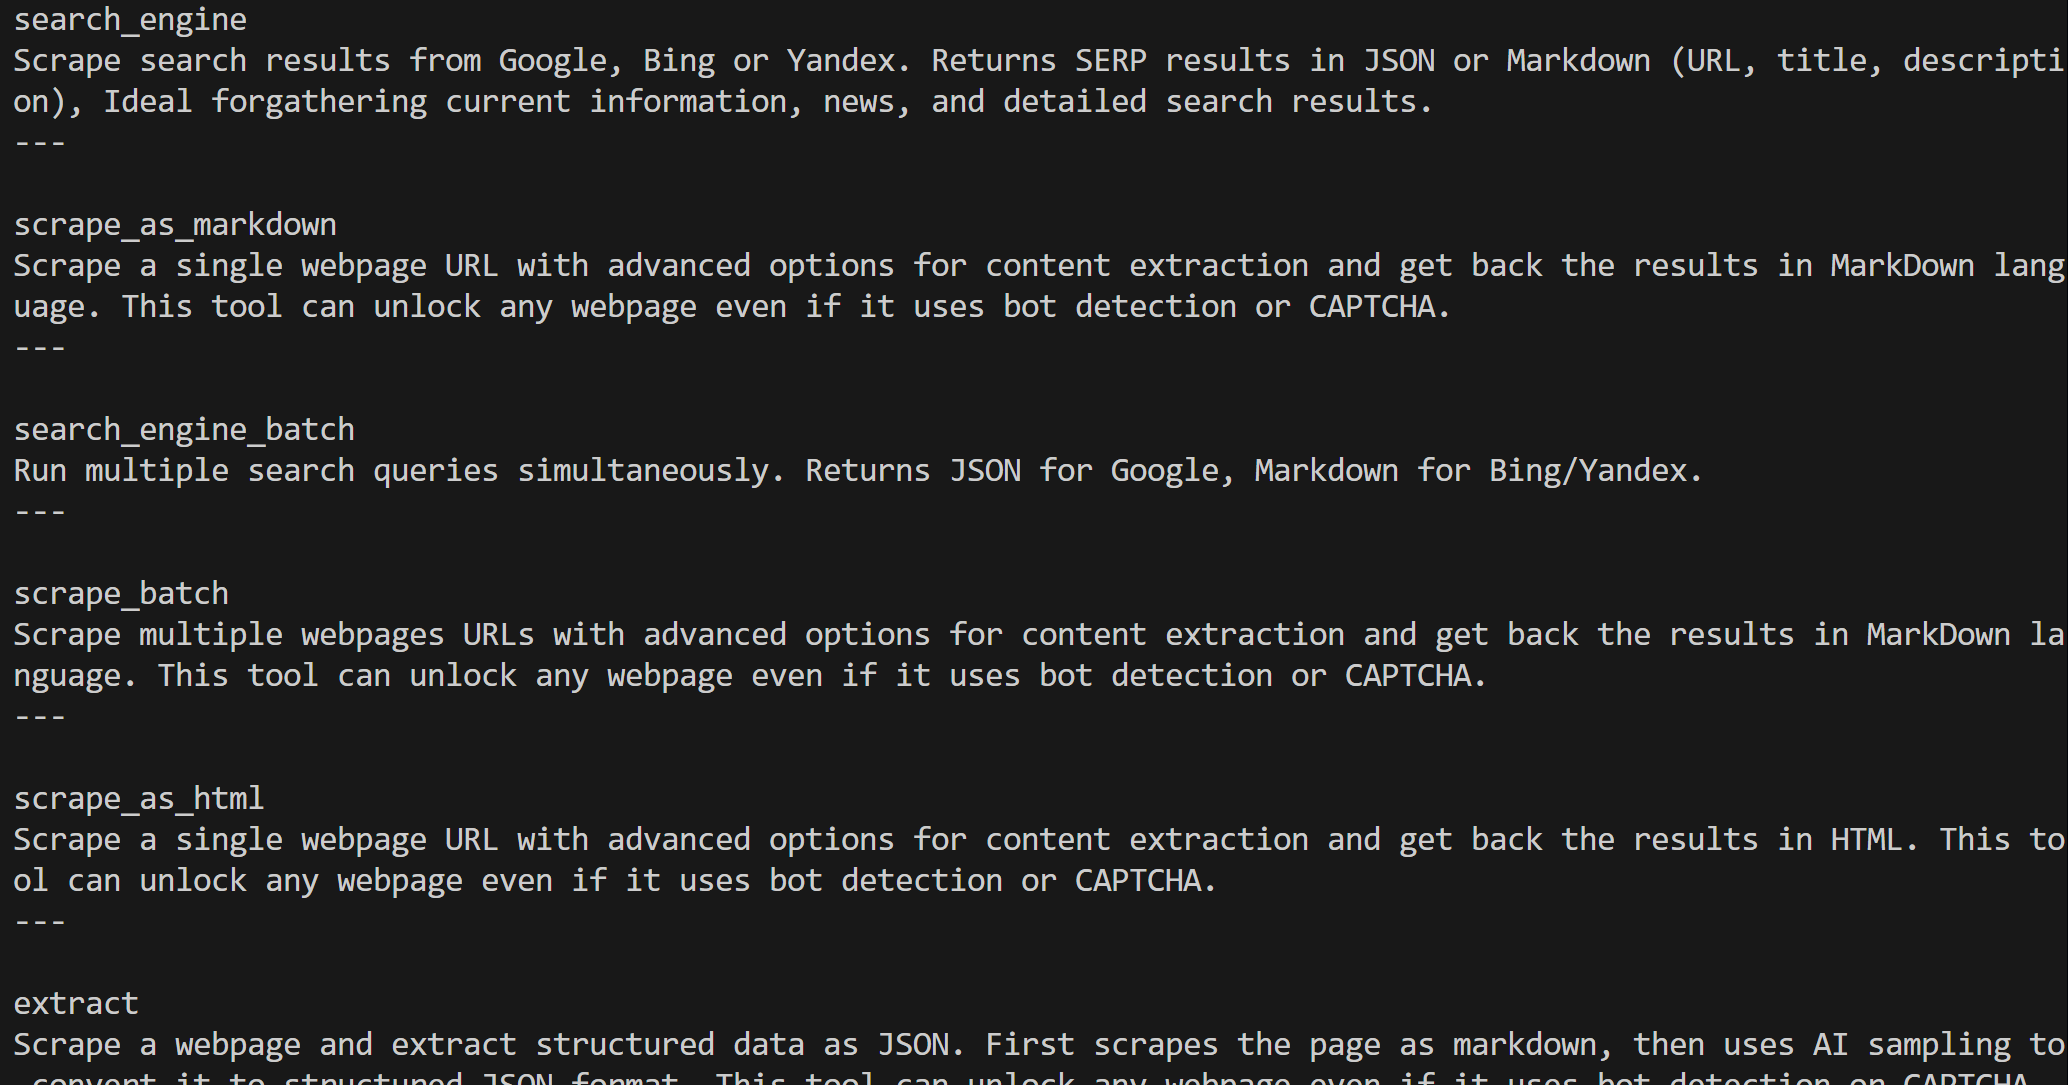
根据你所配置的套餐,你将看到全部 60+ Web MCP 工具(Pro 模式)或仅免费套餐工具。
到这里,你已经在 AG2 中建立了一个可用的 Web MCP 连接。
步骤三:将 Web MCP 工具连接到智能体
测试 Web MCP 与 AG2 集成的最简单方式是使用 AssistantAgent,它是 ConversableAgent 的子类,专为快速解决任务而设计。首先定义智能体并为其注册 Web MCP 工具集:
from autogen import AssistantAgent

# Define an agent capable of searching and retrieving web data
assistant_agent = AssistantAgent(
    name="assistant",
    code_execution_config=False,
    llm_config=llm_config,
    system_message="""
    You have access to all tools exposed by the Web MCP, including:
    - Web search
    - Web scraping and page fetching
    - Web data feeds
    - Browser-based user simulation

    Use these tools when required.
    """
)
# Register the Web MCP tools with the agent
web_mcp_toolkit.register_for_llm(assistant_agent)
注册完毕后,你可以使用 a_run() 函数启动智能体,并直接指定可用工具。例如,通过以下示例测试一个 Amazon 抓取任务:
prompt = """
Retrieve data from the following Amazon product and produce a quick summary with the main info:
https://www.amazon.com/Muddy-Mats-Premium-Absorbent-Chenille/dp/B08N6VLJKV/
"""

# Run the Web MCP-extended agent asynchronously
result = await assistant_agent.a_run(
        message=prompt,
        tools=web_mcp_toolkit.tools,
        user_input=False,
)
await result.process()重要:请注意,这只是一个演示示例。借助全部 Web MCP 工具,该智能体可以处理复杂度更高、涉及多步操作和多数据源的平台任务。
步骤四:完整代码与执行
以下是 AG2 + Bright Data Web MCP 集成的完整代码:
import asyncio
from autogen import (
    LLMConfig,
    AssistantAgent,
)
from dotenv import load_dotenv
import os
from mcp import ClientSession, StdioServerParameters
from mcp.client.stdio import stdio_client
from autogen.mcp import create_toolkit

# Load environment variables from the .env file
load_dotenv()

# Retrieve the Bright Data API key from environment variables
BRIGHT_DATA_API_KEY = os.getenv("BRIGHT_DATA_API_KEY")

# Define the MCP toolkit containing all the Web MCP tools
async def launch_mcp_agent():
    # Load LLM configuration from the OpenAI config list file
    llm_config = LLMConfig.from_json(path="OAI_CONFIG_LIST")

    # Instructions to connect to a local Web MCP instance
    server_params = StdioServerParameters(
        command="npx",
        args=["-y", "@brightdata/mcp"],
        env={
            "API_TOKEN": BRIGHT_DATA_API_KEY,
            "PRO_MODE": "true" # Optional
        },
    )

    async with stdio_client(server_params) as (read, write), ClientSession(read, write) as session:
        # Create an MCP connection session and retrieve the tools
        await session.initialize()
        web_mcp_toolkit = await create_toolkit(session, use_mcp_resources=False)

        # Define an agent capable of searching and retrieving web data
        assistant_agent = AssistantAgent(
            name="assistant",
            code_execution_config=False,
            llm_config=llm_config,
            system_message="""
            You have access to all tools exposed by the Web MCP, including:
            - Web search
            - Web scraping and page fetching
            - Web data feeds
            - Browser-based user simulation

            Use these tools when required.
            """
        )
        # Register the Web MCP tools with the agent
        web_mcp_toolkit.register_for_llm(assistant_agent)

        # The prompt to pass to the agent
        prompt = """
        Retrieve data from the following Amazon product and produce a quick summary with the main info:
        https://www.amazon.com/Muddy-Mats-Premium-Absorbent-Chenille/dp/B08N6VLJKV/
        """

        # Run the Web MCP-extended agent asynchronously
        result = await assistant_agent.a_run(
                message=prompt,
                tools=web_mcp_toolkit.tools,
                user_input=False,
        )
        await result.process()

asyncio.run(launch_mcp_agent())
执行该脚本后,你将看到类似如下的输出:
“
你会注意到生成的报告包含目标 Amazon 商品页面的所有关键信息: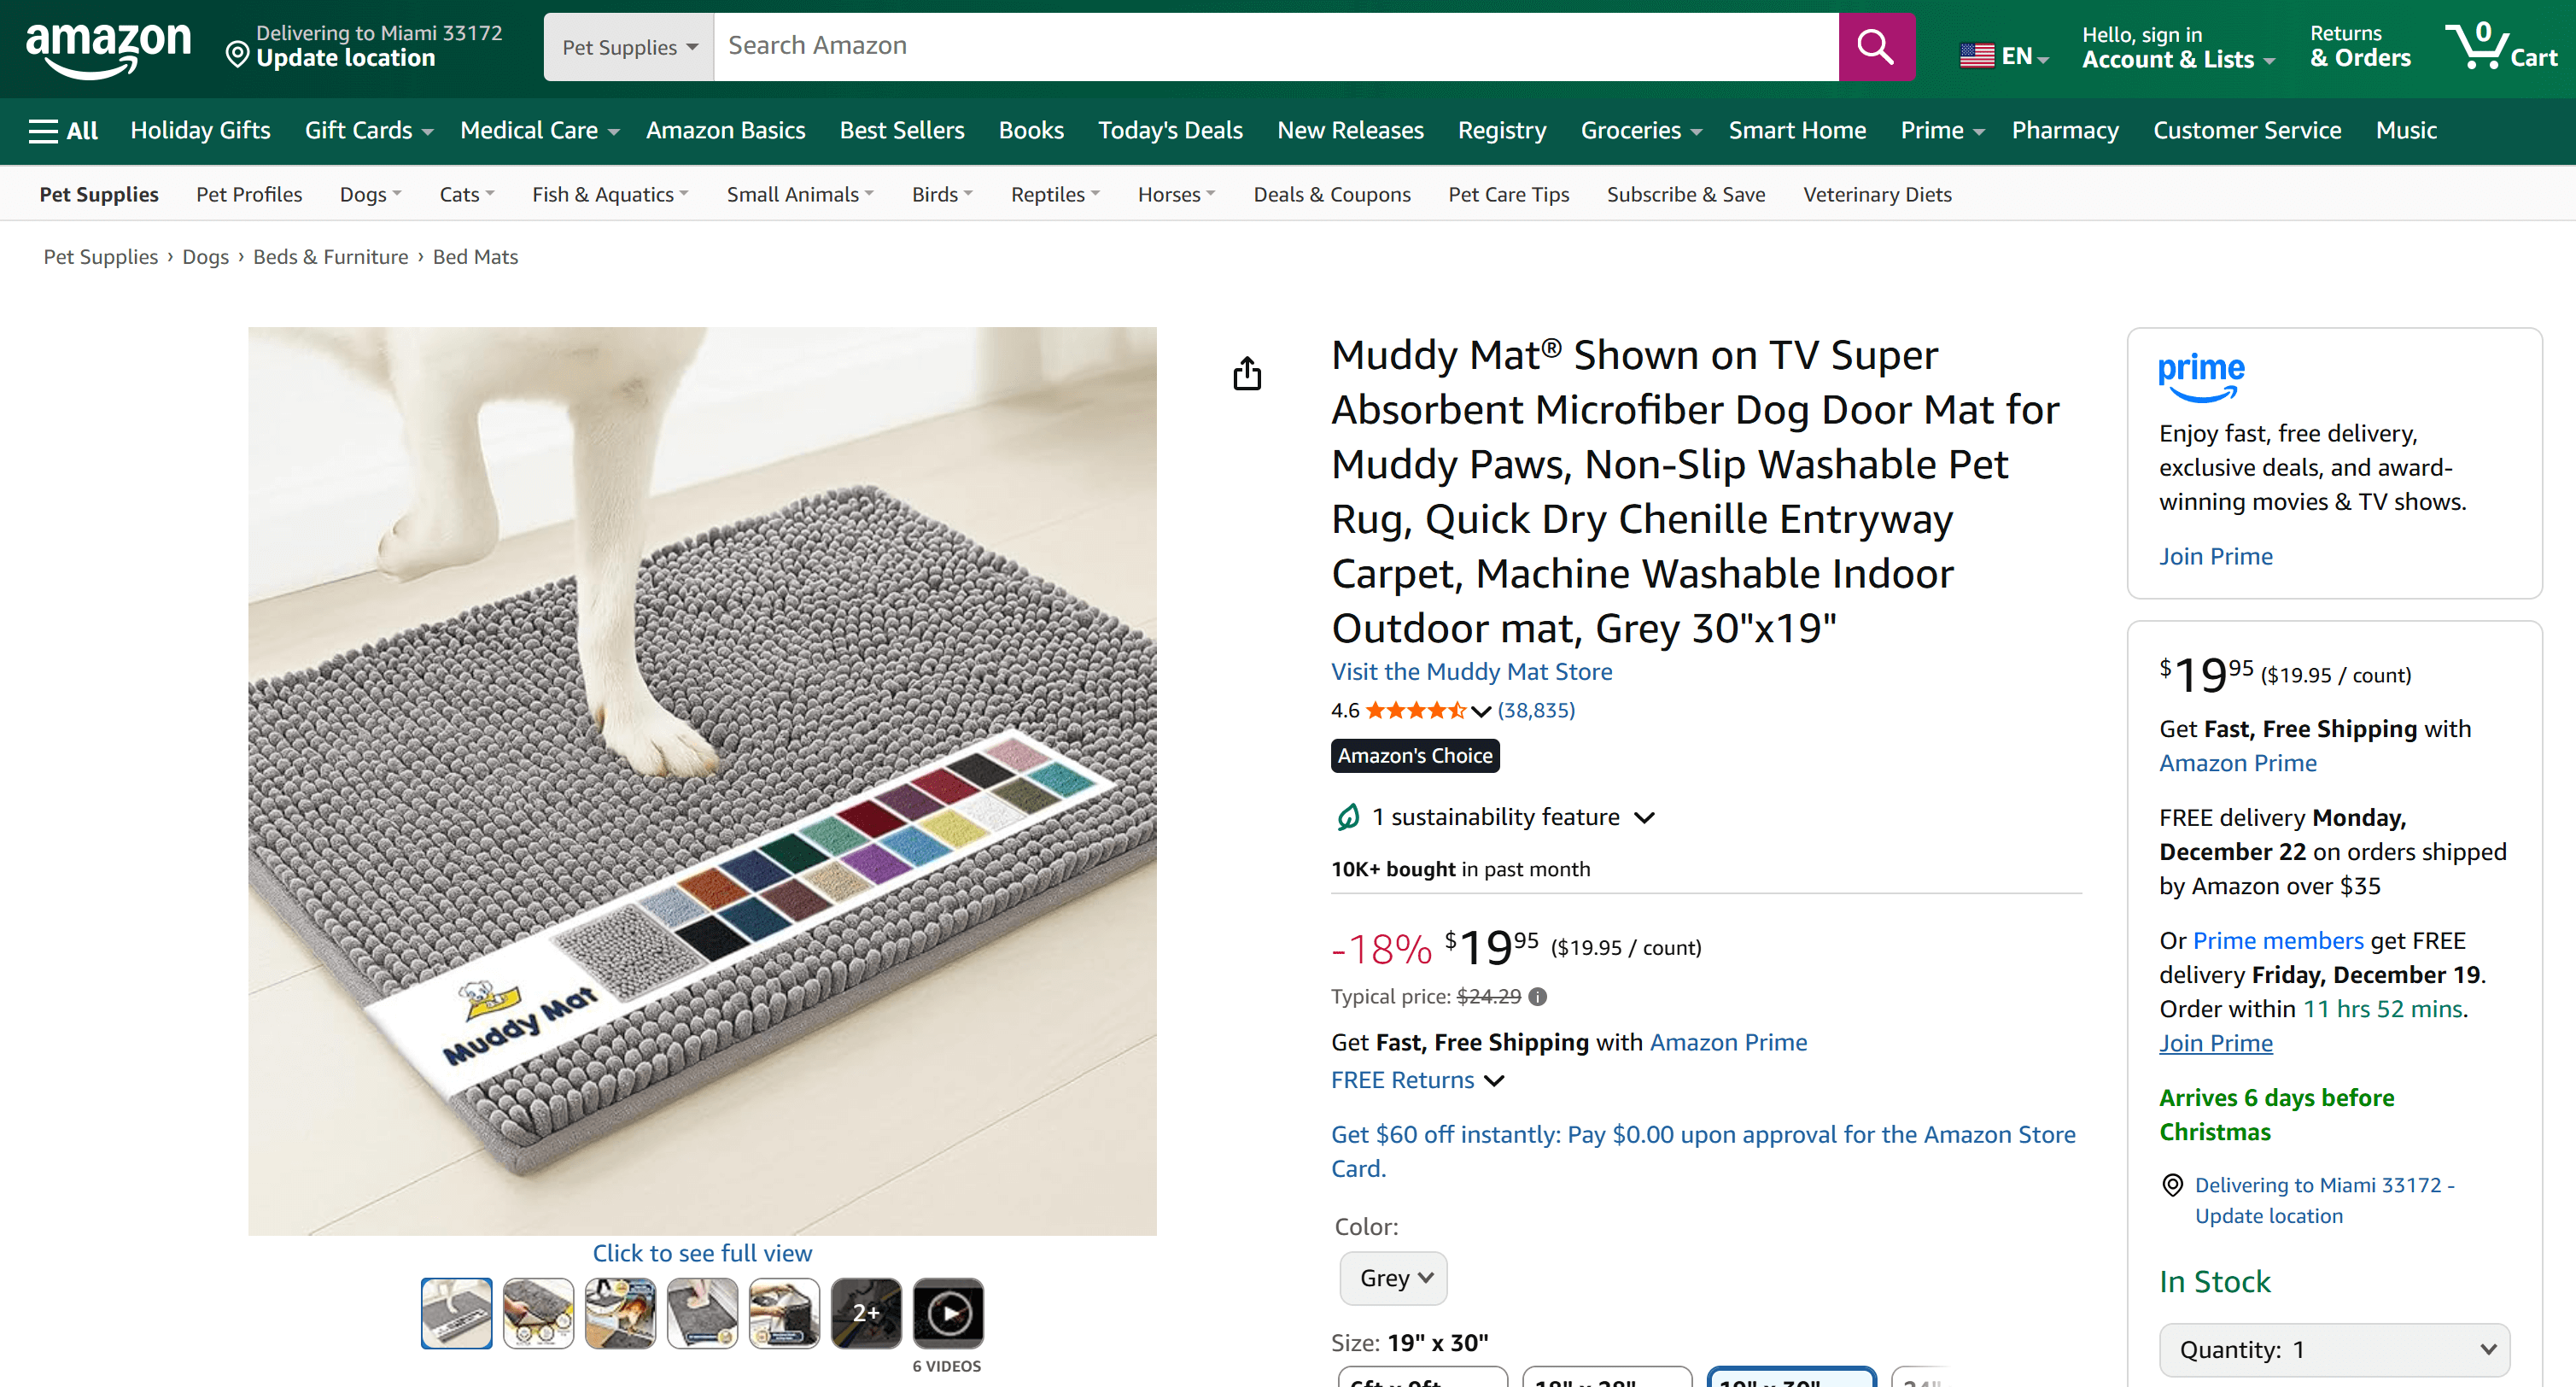
如果你曾尝试在 Python 中抓取 Amazon 商品数据,就会知道这并不容易——Amazon 部署了极具挑战性的验证码机制以及其他反爬措施,而且商品页面结构常变且多样。
Bright Data 的 Web MCP 为你封装了这些复杂性。在免费套餐下,它在后台调用 scrape_as_markdown 工具,通过 Web Unlocker 获取并转换页面为干净的 Markdown;在 Pro 模式下,则会利用 web_data_amazon_product 产品,通过 Bright Data Amazon Scraper 返回高度结构化的商品数据。
到这里为止,你已经掌握了如何使用 Bright Data Web MCP 扩展 AG2 的能力。
总结
本教程介绍了如何通过自定义函数或 Web MCP 将 Bright Data 集成到 AG2 中。
通过这两种方式,AG2 智能体可以执行网页搜索、抽取结构化数据、访问实时 Web 数据源,以及自动化网页交互,而这一切都由 Bright Data 专为 AI 提供的网页数据服务套件驱动。
立即免费创建 Bright Data 账号,开始探索我们面向 AI 的网页数据工具吧!


技术写作
 5.5 years experience
Antonello是一名软件工程师,但他更喜欢称自己为技术传教士。通过写作传播知识是他的使命。