在本教程中,你将学习:
- 什么是 MLflow 以及它提供的跟踪能力。
- 为什么围绕网页抓取数据集构建 ML/AI 实验是一种“稳赢”的方法。
- 如何使用 MLflow 基于抓取数据集进行实验跟踪。
让我们开始吧!
什么是 MLflow?
MLflow 是一个用于管理整个机器学习生命周期的开源平台。它提供了丰富的功能和 API,可高效地跟踪、复现并部署模型。
MLflow 同时支持传统机器学习与深度学习工作流,提供实验、版本管理、评估与部署等工具,并以可复现、可协作的方式完成这一切。
MLflow 与语言无关,可跨 Python、R 和 Java 使用,并支持本地、云端与托管环境。这使其具备厂商中立性和高度灵活性。同时它也保持开源属性,其 GitHub 仓库已超过 24k stars。
MLflow 的主要功能包括:
- Tracking(跟踪):记录实验、跟踪参数、指标、代码版本与工件(artifacts)。
- Models(模型):标准化模型打包,以便在不同平台上部署。
- Model registry(模型注册表):用于模型版本管理、阶段流转与注释的集中式仓库。
- Projects(项目):打包可复用的数据科学代码,确保一致性与可复现性。
- AI/LLM evaluation(AI/LLM 评估):追踪、对比并评估生成式 AI 或 LLM 的输出。
- Integration and autologging(集成与自动日志):可与 scikit-learn、TensorFlow、PyTorch、OpenAI 等集成,自动完成日志记录。
更多信息请参考 官方文档。
为什么包含抓取网页数据的数据集非常适合用来做 MLflow 实验
在构建 ML/AI 流水线时,数据集的质量与多样性往往决定实验成败。网页抓取数据天然具备多样性与规模化——这两点正是进行有意义实验的关键要素。
与小规模或合成数据集不同,来源于网页的数据集能够反映真实世界的数据分布、边缘情况以及自然波动。这些因素会让模型更稳健、MLflow 的实验更具信息量。这也是为什么网页数据通常被认为是最佳数据来源之一。
Bright Data 作为最佳数据集提供商脱颖而出。其数据集市场提供可直接用于 ML 与 AI 的结构化数据集,覆盖 150+ 个领域,从电商与零售到社交媒体与旅行等。每个数据集都包含数百万条记录,兼具广度与深度。
这些数据集会定期更新,以反映网络的动态变化,因此你的 ML/AI 工作流可以基于最新信息进行训练与评估。规模、时效性与 ML 就绪格式三者的结合,使 Bright Data 数据集非常适合用 MLflow 进行扎实、可复现且高影响力的实验。去市场探索可用数据集!
如何使用 MLflow 与 Bright Data 数据集进行实验跟踪
在这一指导章节中,你将学习如何进行 MLflow 实验跟踪。具体来说,你将使用 Bright Data 的 Amazon Best Product Seller 数据集构建一个机器学习流水线。
该流水线的目标是训练一个模型,基于产品评分、评论数量和品牌来预测产品的最终价格。其基本假设是这些特征包含与产品定价相关的预测信号。
该流水线将预处理与随机森林模型结合并评估其性能。在整个过程中,MLflow 将跟踪指标、工件、数据集以及系统资源使用情况。
请按照以下步骤操作!
先决条件
要跟随本教程,你需要:
- 在本地安装 Python 3.10 或更高版本。
- 一个 Bright Data 账号,用于访问抓取数据集。
- 具备使用 scikit-learn 训练预测型 ML 模型 的基础知识。
步骤 #1:项目初始化
首先打开终端,为你的 MLflow 实验项目创建一个新文件夹:
mkdir mlflow-experiment-tracking接着进入项目目录,并在其中创建一个 Python 虚拟环境:
cd mlflow-experiment-tracking
python -m venv .venv
现在,用你喜欢的 Python IDE 打开项目文件夹。我们推荐 安装 Python 扩展的 Visual Studio Code 或 PyCharm Community Edition。
在项目根目录创建一个名为 experiment.py 的新文件。项目结构应如下所示:
mlflow-experiment-tracking/
├── .venv/
└── experiment.py
在终端中激活虚拟环境。Linux 或 macOS 上执行:
source venv/bin/activate相应地,在 Windows 上运行:
venv/Scripts/activate激活虚拟环境后,安装项目依赖:
pip install mlflow pandas scikit-learn psutil nvidia-ml-py所需库包括:
mlflow:用于端到端实验跟踪、可观测性,以及记录 ML 模型与指标。pandas:从 JSON/CSV 加载、清洗与处理表格数据,用于模型训练。scikit-learn:构建 ML 流水线、进行预处理、训练模型并计算评估指标。psutil, nvidia-ml-py:MLflow 用于在实验过程中监控 CPU/GPU 资源及其他系统指标所需。
接下来,在 experiment.py 中导入所有所需库:
import json
import mlflow
import pandas as pd
import mlflow.sklearn
from mlflow.data.code_dataset_source import CodeDatasetSource
from sklearn.model_selection import train_test_split
from sklearn.preprocessing import OneHotEncoder
from sklearn.compose import ColumnTransformer
from sklearn.pipeline import Pipeline
from sklearn.ensemble import RandomForestRegressor
from sklearn.metrics import root_mean_squared_error, r2_score
from sklearn.impute import SimpleImputer
做得好!你的 Python 开发环境已经准备好在 MLflow 中跟踪 ML 与 AI 实验。
步骤 #2:熟悉 MLflow UI
为验证 MLflow 是否正常工作,打开一个已激活虚拟环境的终端并启动 MLflow UI:
mlflow ui首次启动时,MLflow 会初始化一个本地 SQLite 数据库来存储实验数据。你会注意到项目文件夹中出现了一个 mlflow.db 文件,这就是 SQLite 使用的本地数据库。
在终端中,你会看到类似这样的日志:
INFO: Uvicorn running on http://127.0.0.1:5000 (Press CTRL+C to quit)这表示 UI 已在运行。打开浏览器访问 http://127.0.0.1:5000/。你应该会看到:
这就是 MLflow UI,你可以在其中观察并跟踪实验。花几分钟熟悉一下界面,探索菜单链接与可用功能。在这里,你将能够在 ML 项目期间有效监控指标、日志和工件。很好!
步骤 #3:启用 MLflow 自动日志与系统追踪能力
在你的 experiment.ml 文件中,启用 MLflow 系统指标日志记录,以便在训练期间跟踪 CPU 使用率、磁盘使用率、内存使用率以及其他系统级指标。
# Enable automatic system metrics logging (CPU, memory, etc.)
mlflow.enable_system_metrics_logging()

# Automatically log events for sklearn
mlflow.sklearn.autolog()

# Configure how frequently system metrics are sampled and logged
mlflow.set_system_metrics_sampling_interval(1)
mlflow.set_system_metrics_samples_before_logging(1)
这段代码还会激活 autologging,使 MLflow 自动记录 scikit-learn 事件。随后将系统指标采样间隔设置为 1 秒,以确保监控足够详细且频繁。
太棒了!你的 MLflow 应用现在会跟踪机器学习模型训练实验中的关键信息。
步骤 #4:从 Bright Data 获取包含抓取数据的源数据集
现在你已经完成 MLflow 的基础设置,可以开始进行 ML/AI 实验。缺少的部分是用于训练模型的数据源。如前所述,我们将使用 Bright Data 的亚马逊 Best Sellers 数据集,并基于随机森林流水线构建一个价格预测模型。
首先,你需要获取源数据集。在本例中,该数据集包含 45+ 个字段,并覆盖超过 1.71 亿个亚马逊畅销产品。
如果你还没有 Bright Data 账号,请创建一个。否则请登录。在 Bright Data 控制面板中,选择“Web Datasets”菜单项,然后进入“Dataset Marketplace”标签页: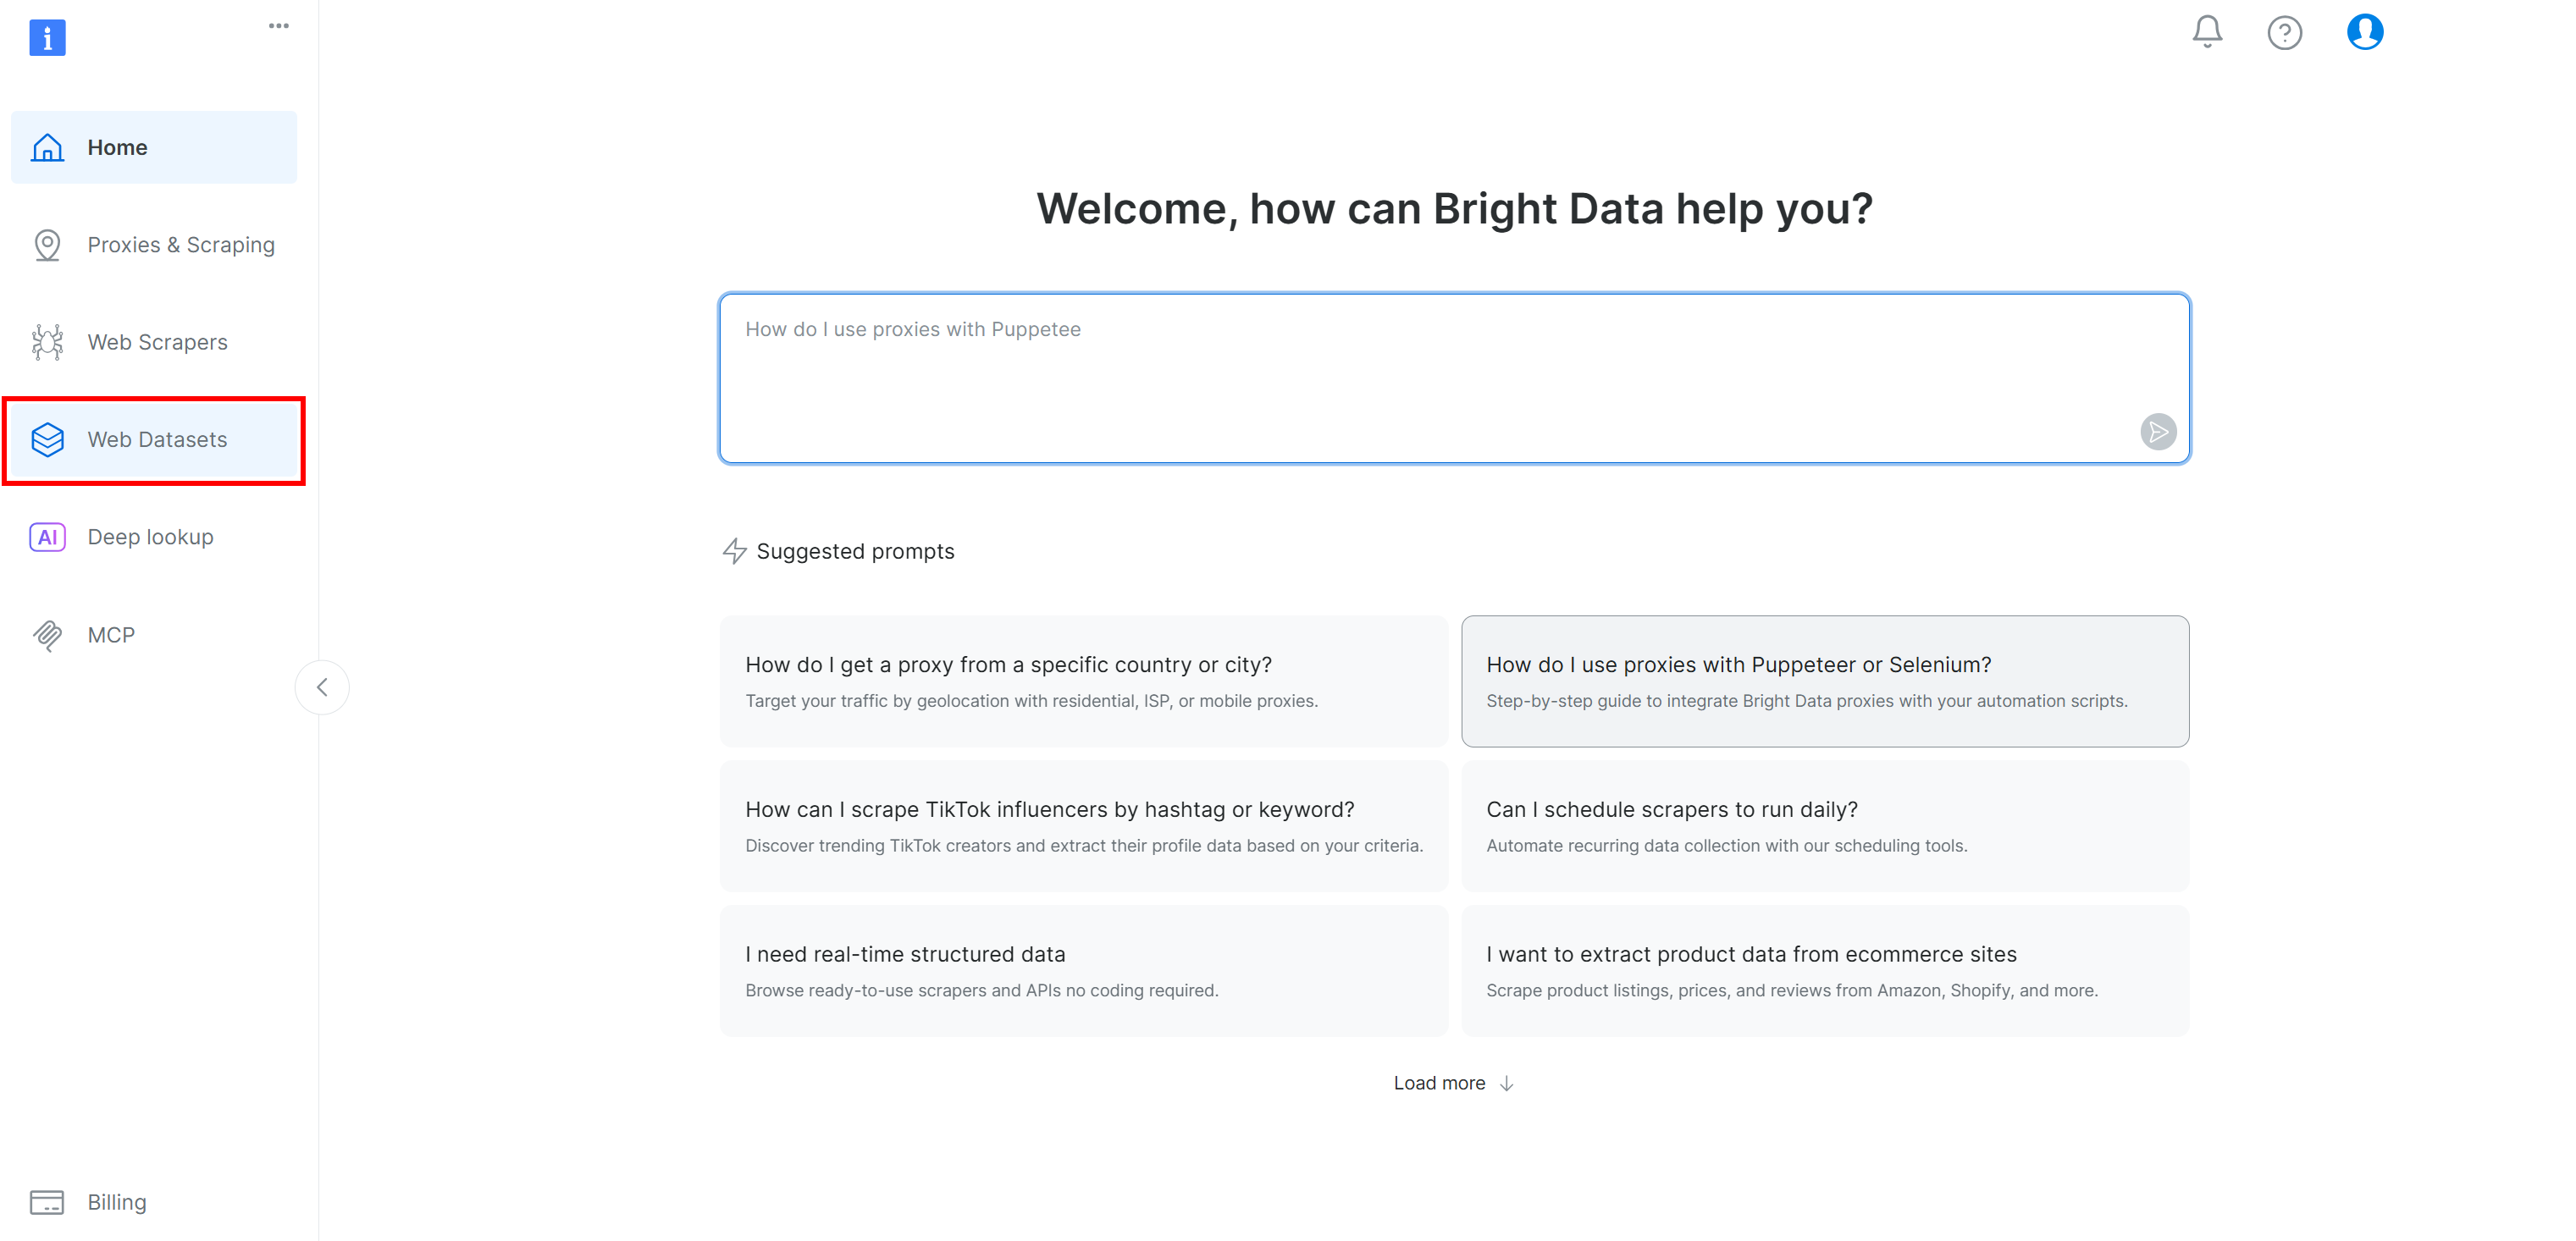
切换到“Dataset marketplace”标签页: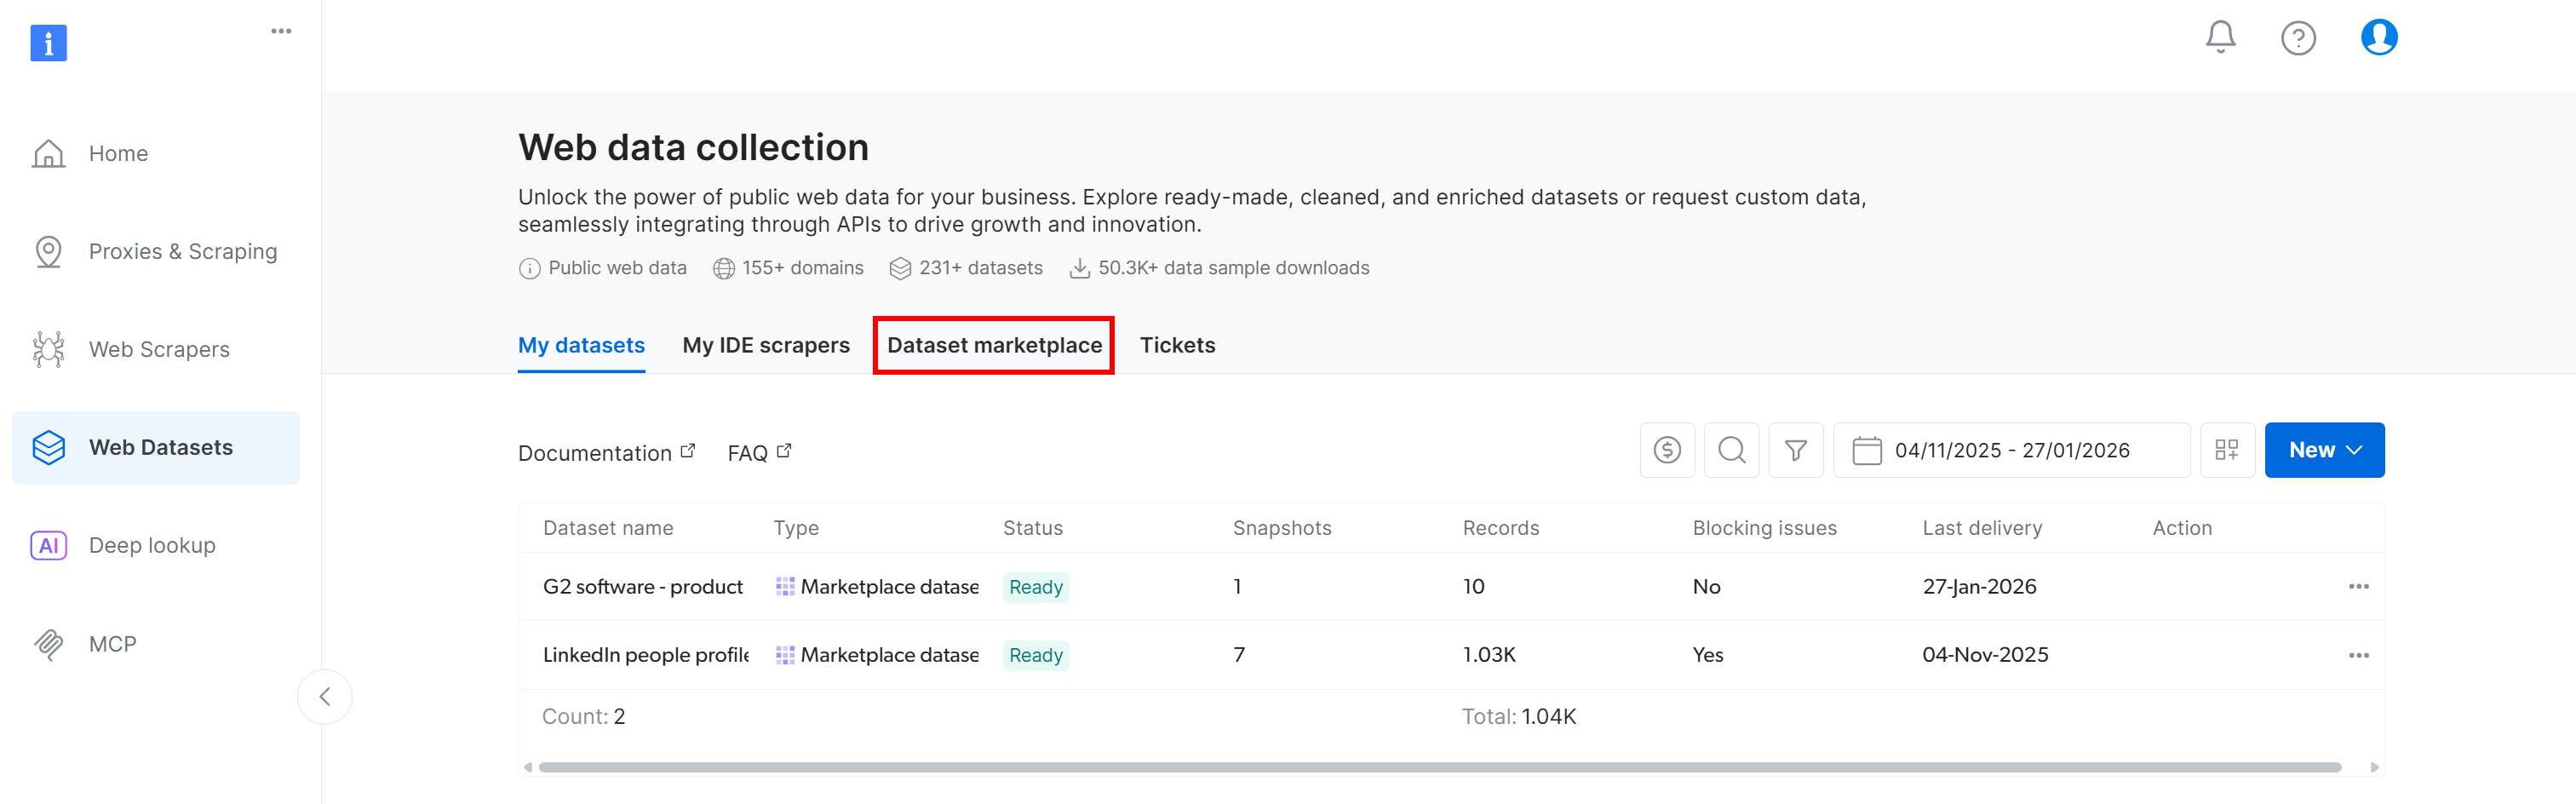
你会进入“Dataset marketplace”页面: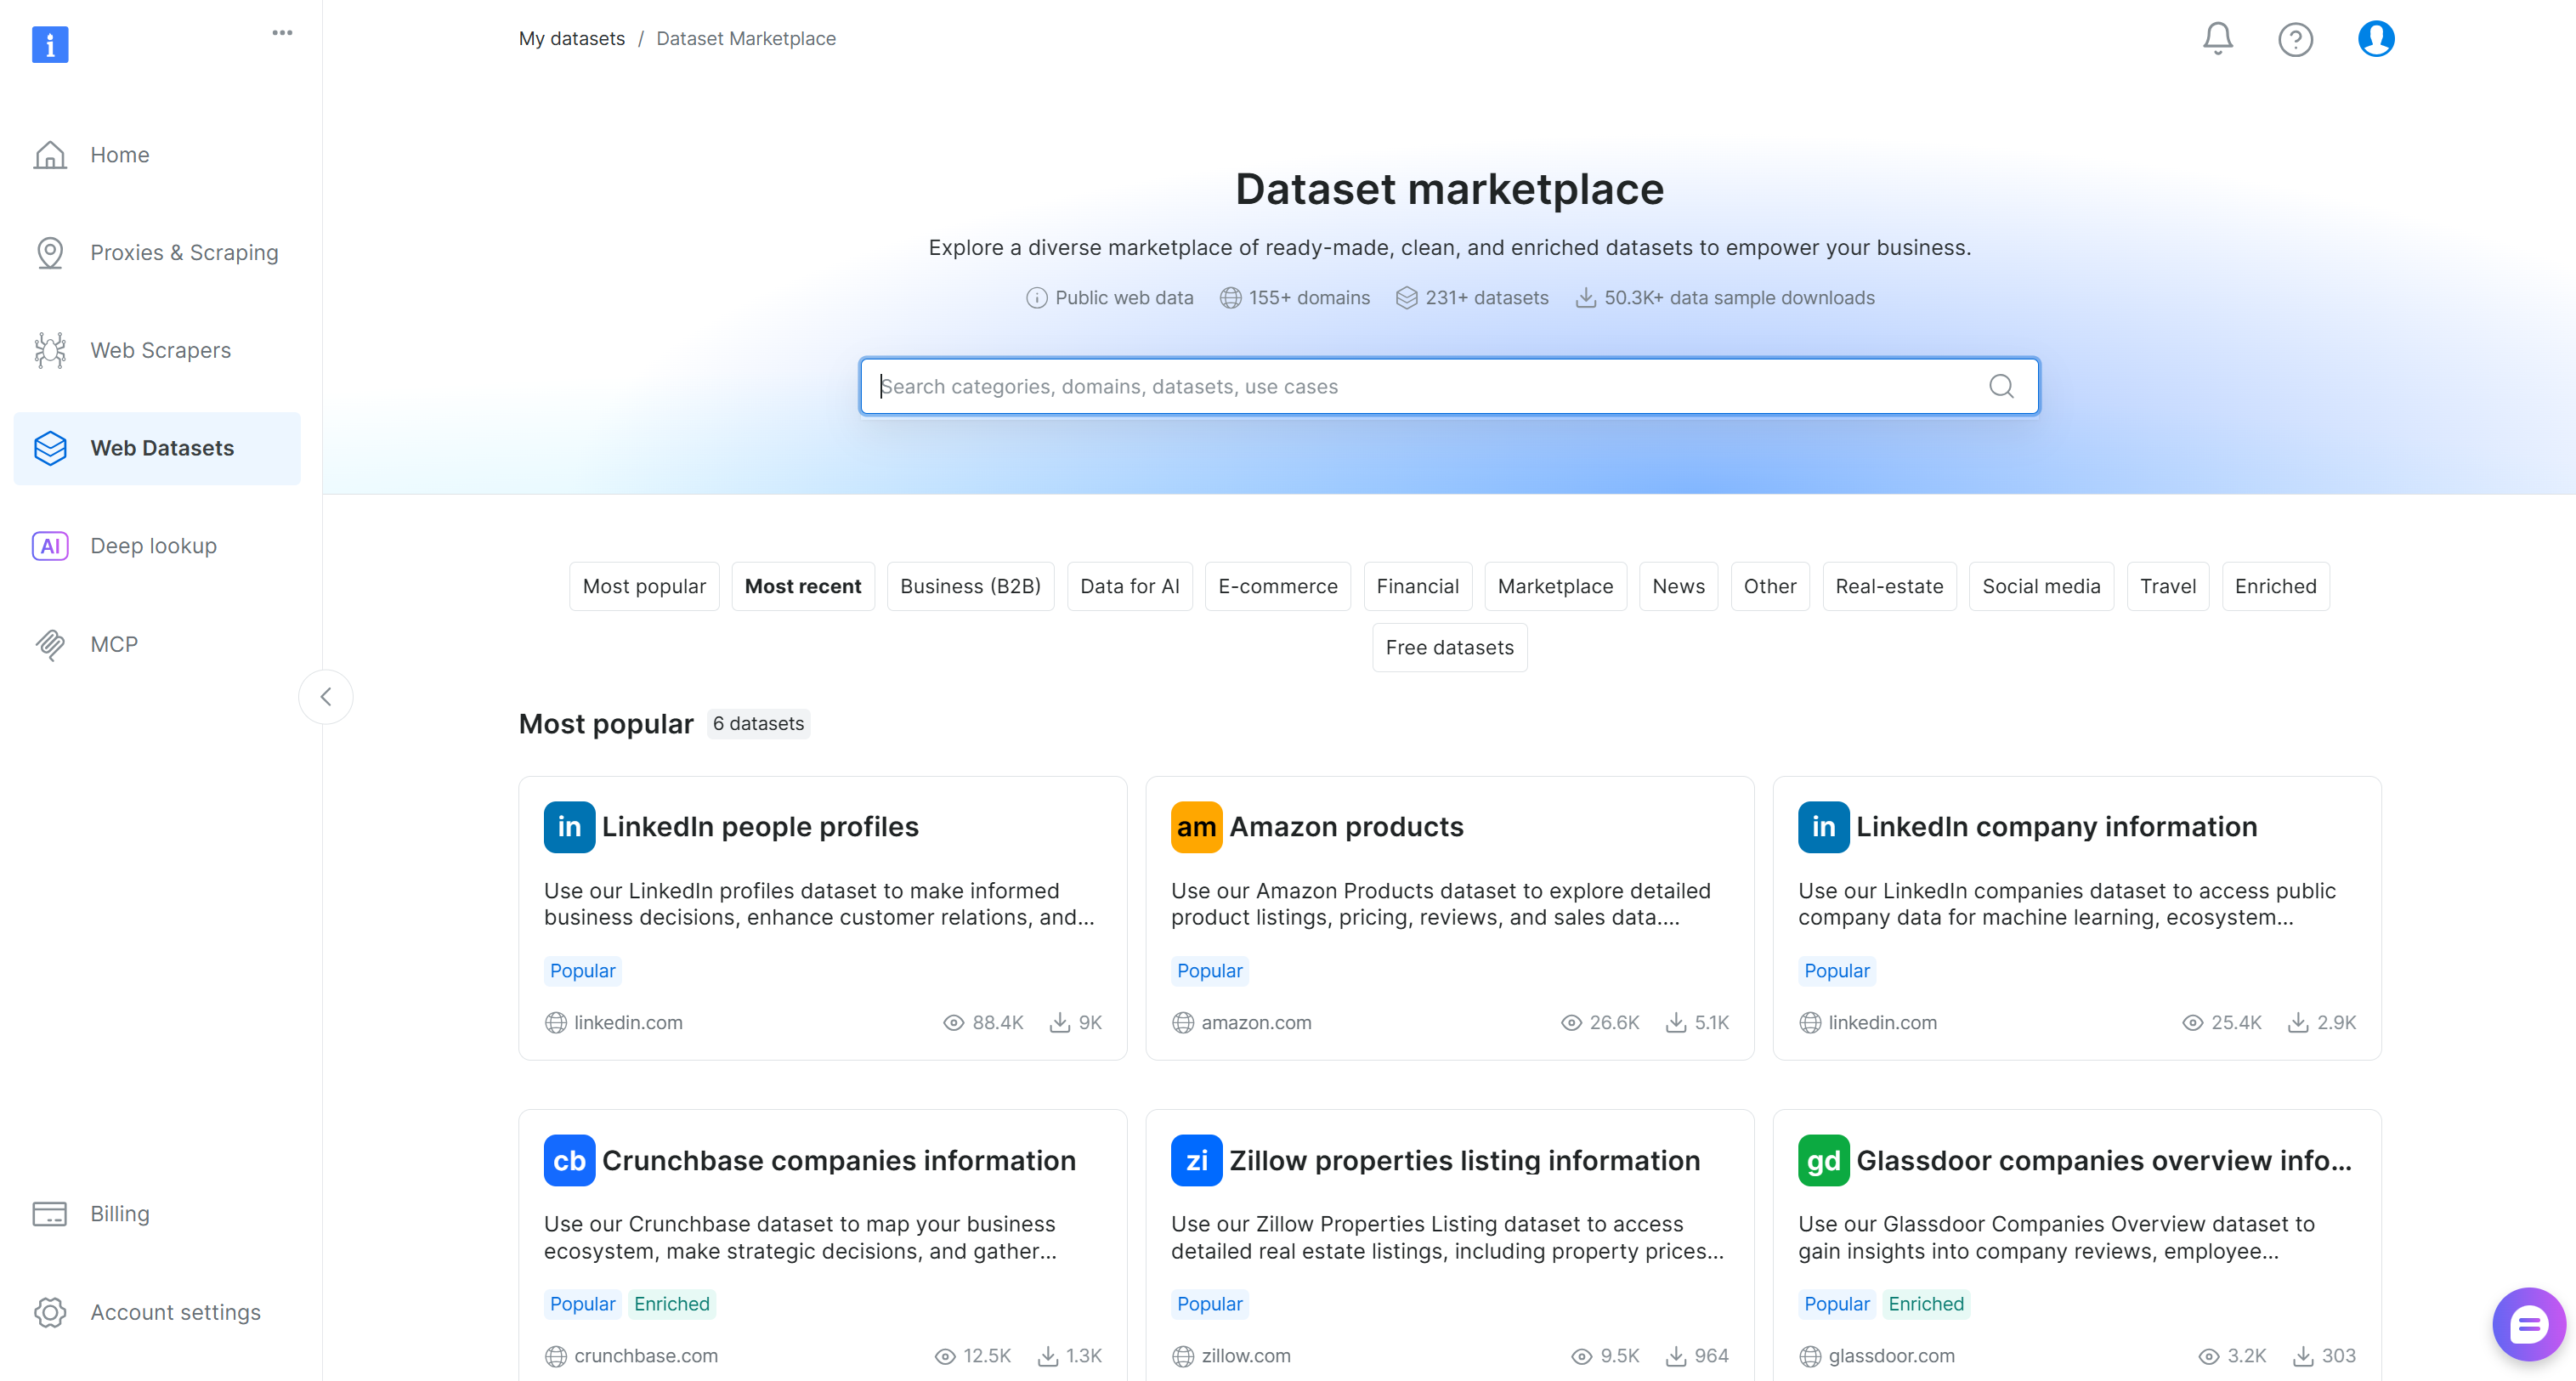
在这里,你可以浏览来自 155+ 个领域的 200+ 个抓取数据集,涵盖数十亿条记录。
搜索 “Amazon best seller products” 并选择它,这将带你进入该数据集页面: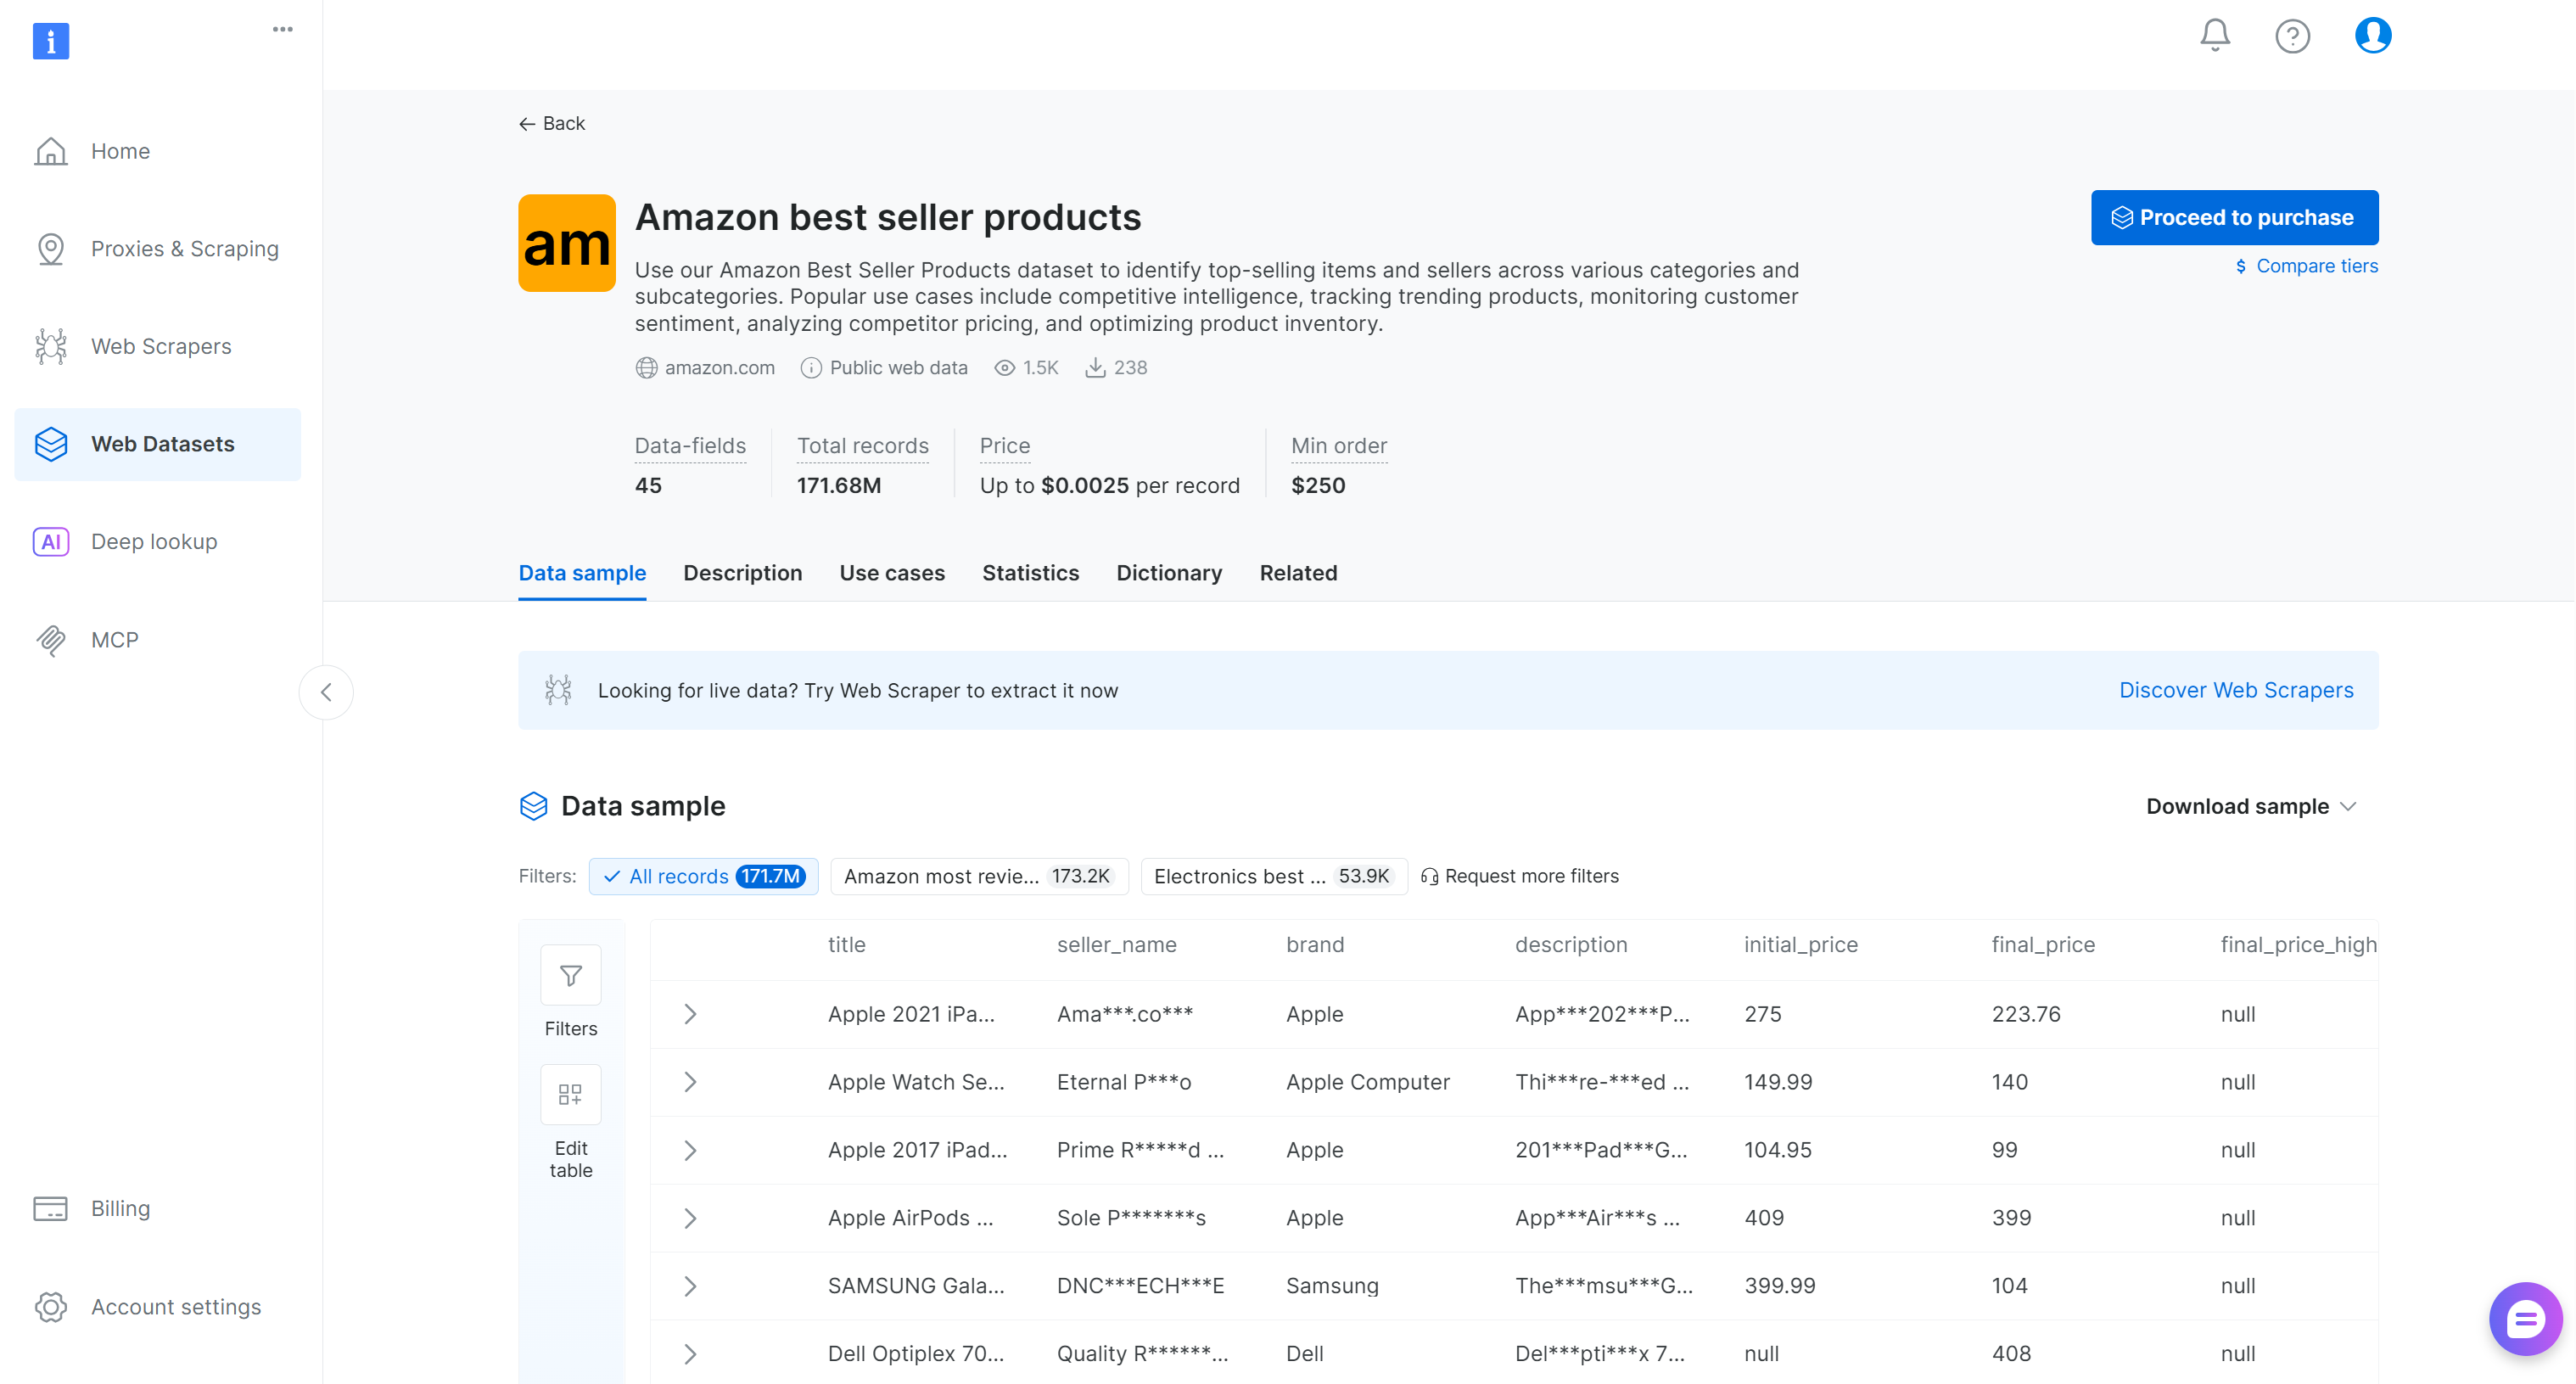
你可以购买筛选后的记录子集,或下载免费样本。由于这里只是示例,我们将使用免费样本。
点击 “Download sample” 下拉菜单并选择 “Download as JSON” 选项: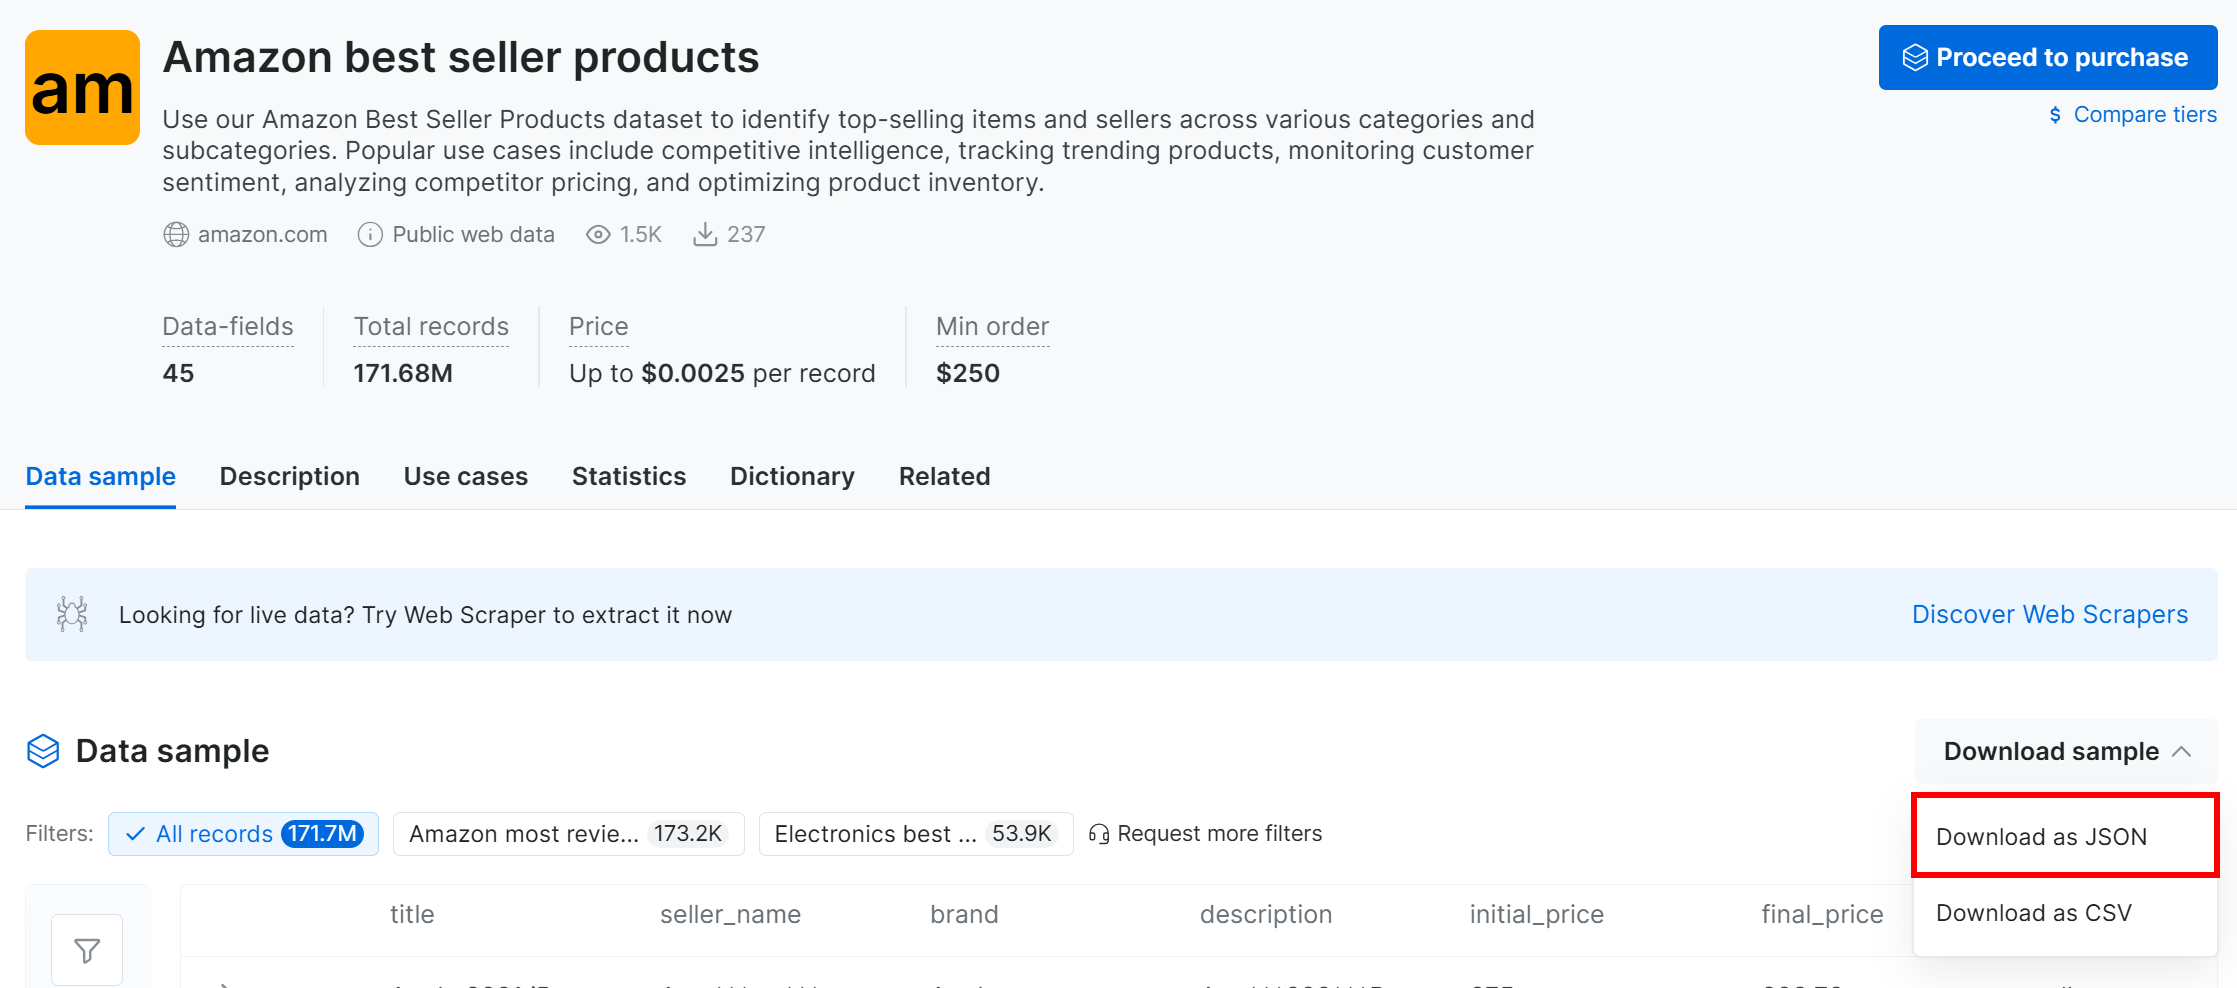
你将获得一个包含 1,000 条亚马逊畅销产品记录的样本数据集。出于隐私原因,部分字段会被“***”部分遮蔽,但完成付费后可获取完整数据集。即便如此,该样本已足以用于简单的 MLflow 实验。
或者,你也可以从一个专门的 GitHub 仓库下载类似的样本数据集。
将下载的数据集文件重命名为 products.json 并放到项目文件夹中:
mlflow-experiment-tracking/
├── .venv/
├── experiment.py
├── mlflow.db
└── products.json # <--------
打开该文件,你会看到: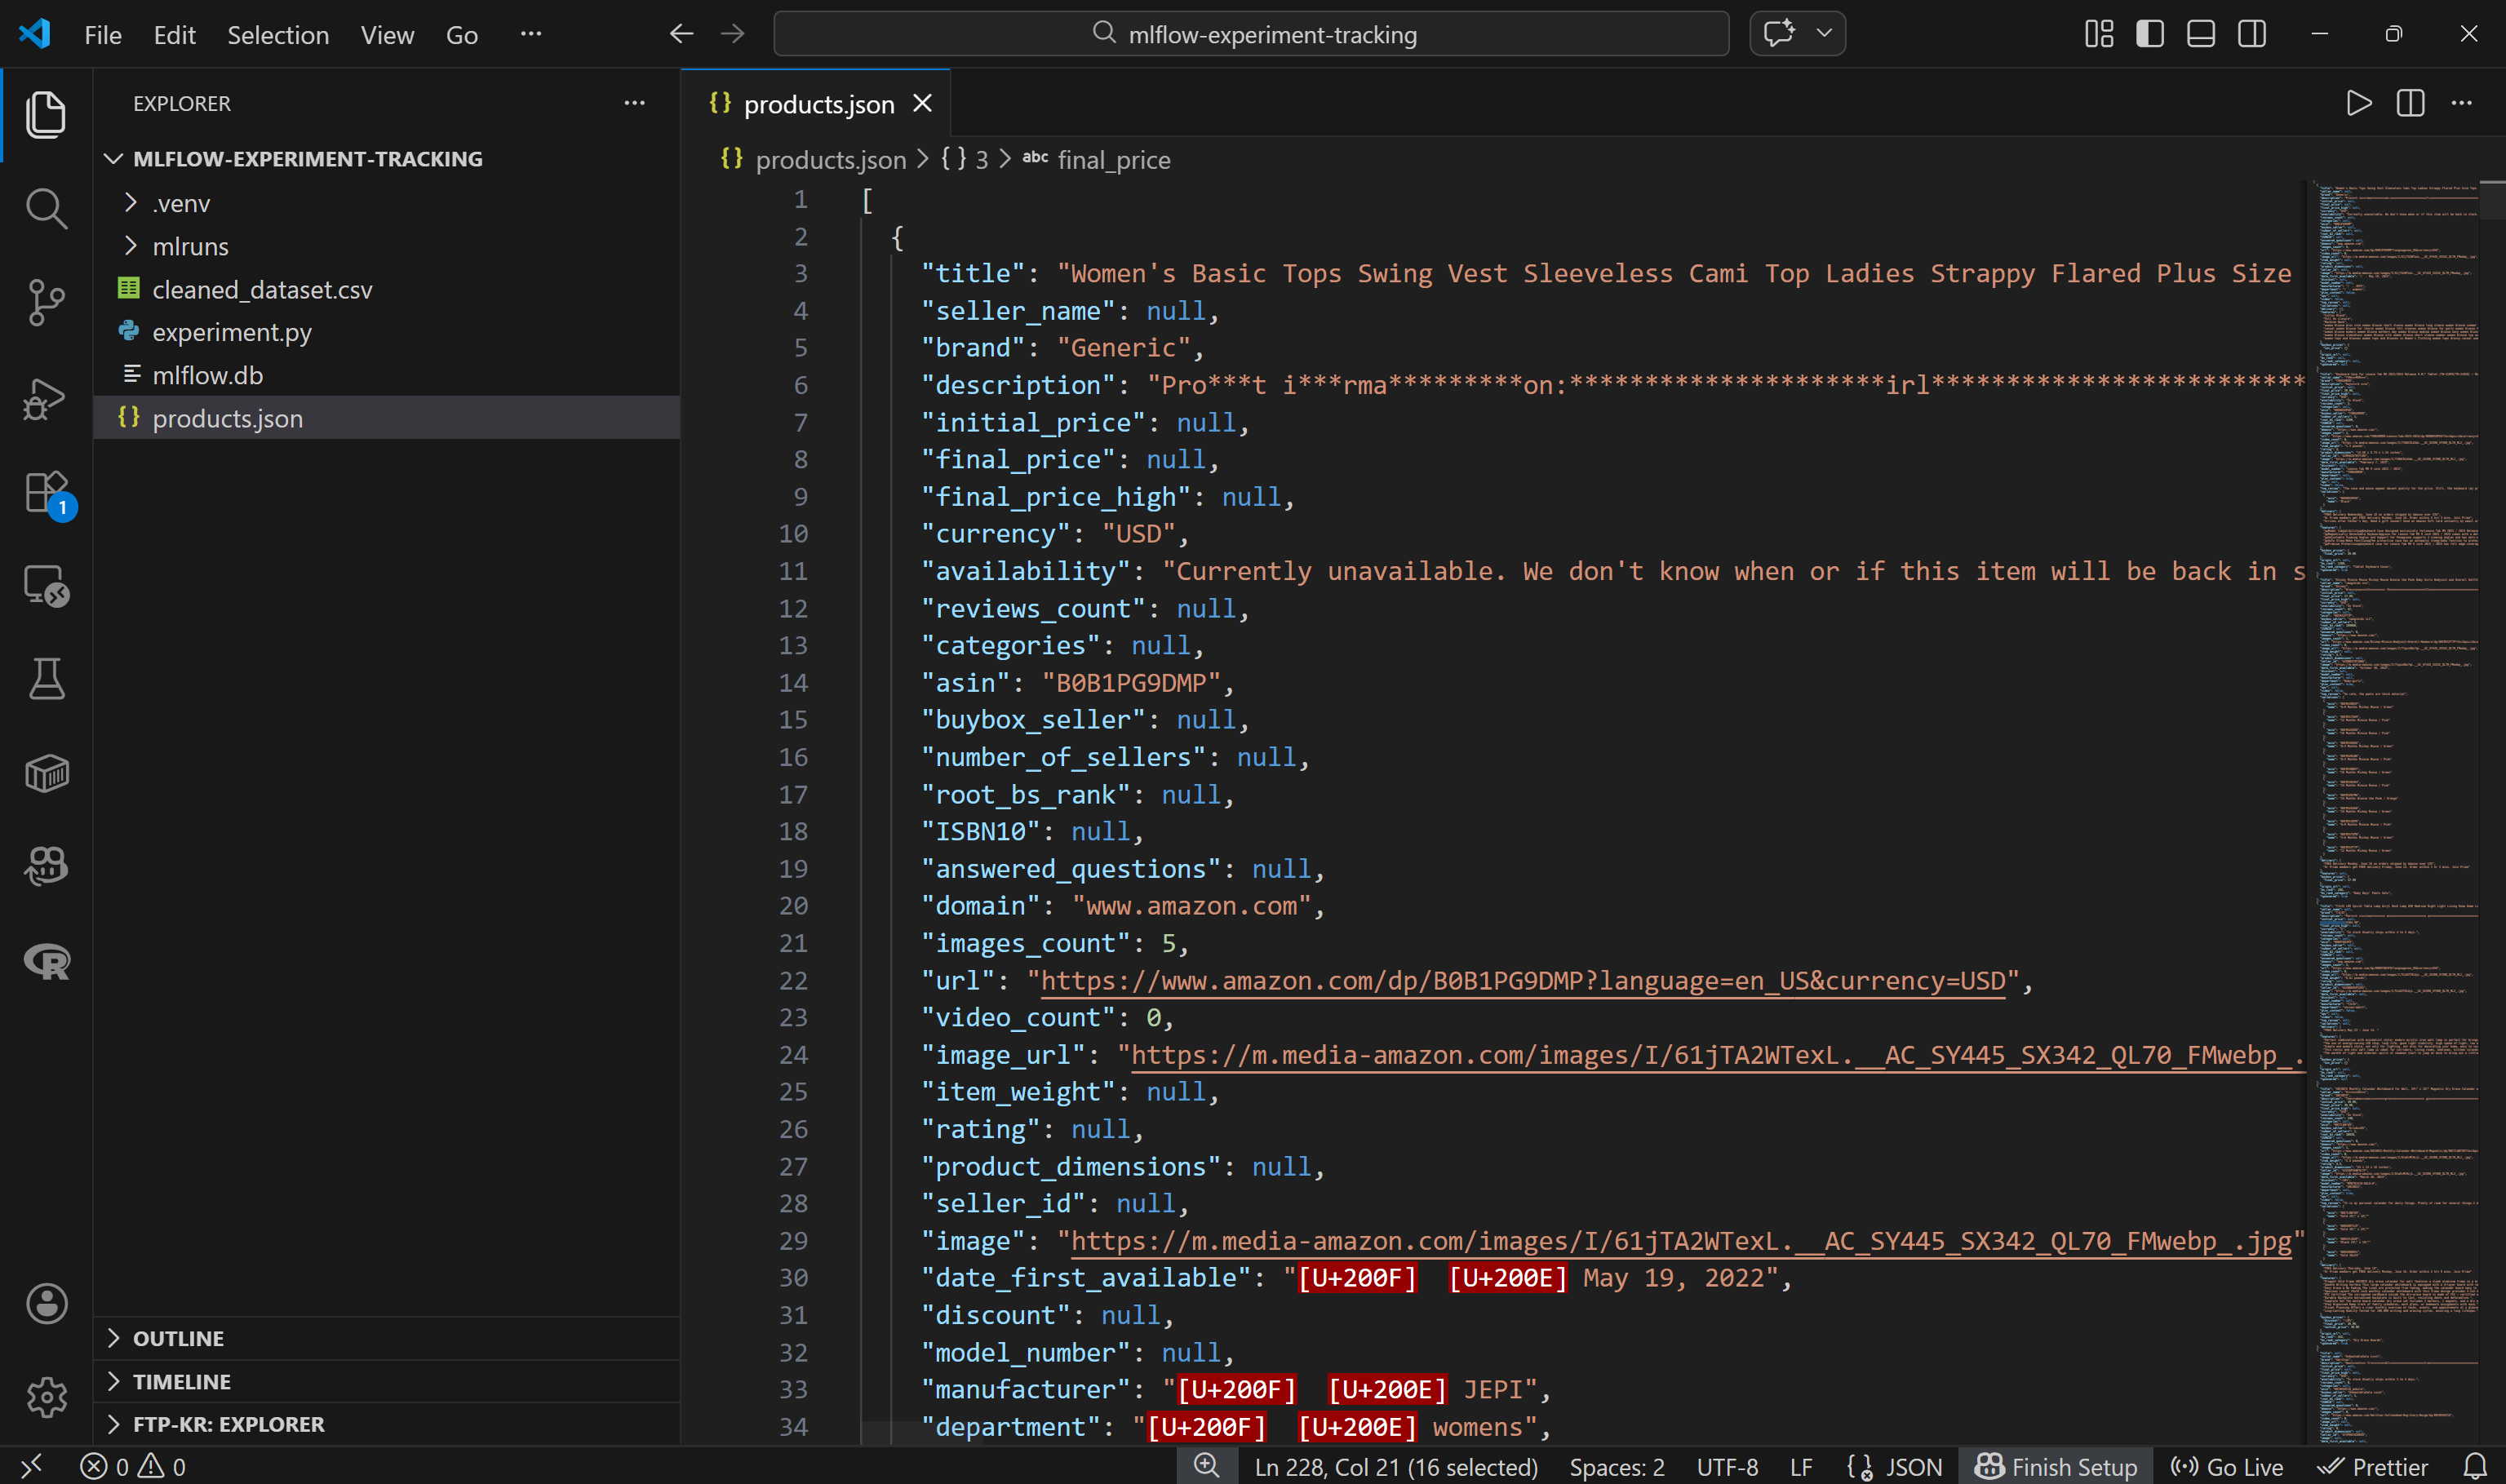
注意:每个亚马逊产品都以一个 JSON 对象表示,包含约 45 个字段。这为实验提供了丰富的基础。
很好!你现在可以把这个数据集加载到代码中并开始处理。
步骤 #5:加载并预处理数据集
在将数据集加载到代码之前,先花点时间探索可用列。进入 “Dictionary” 标签页查看每个列的详细信息,包括描述与出现比例: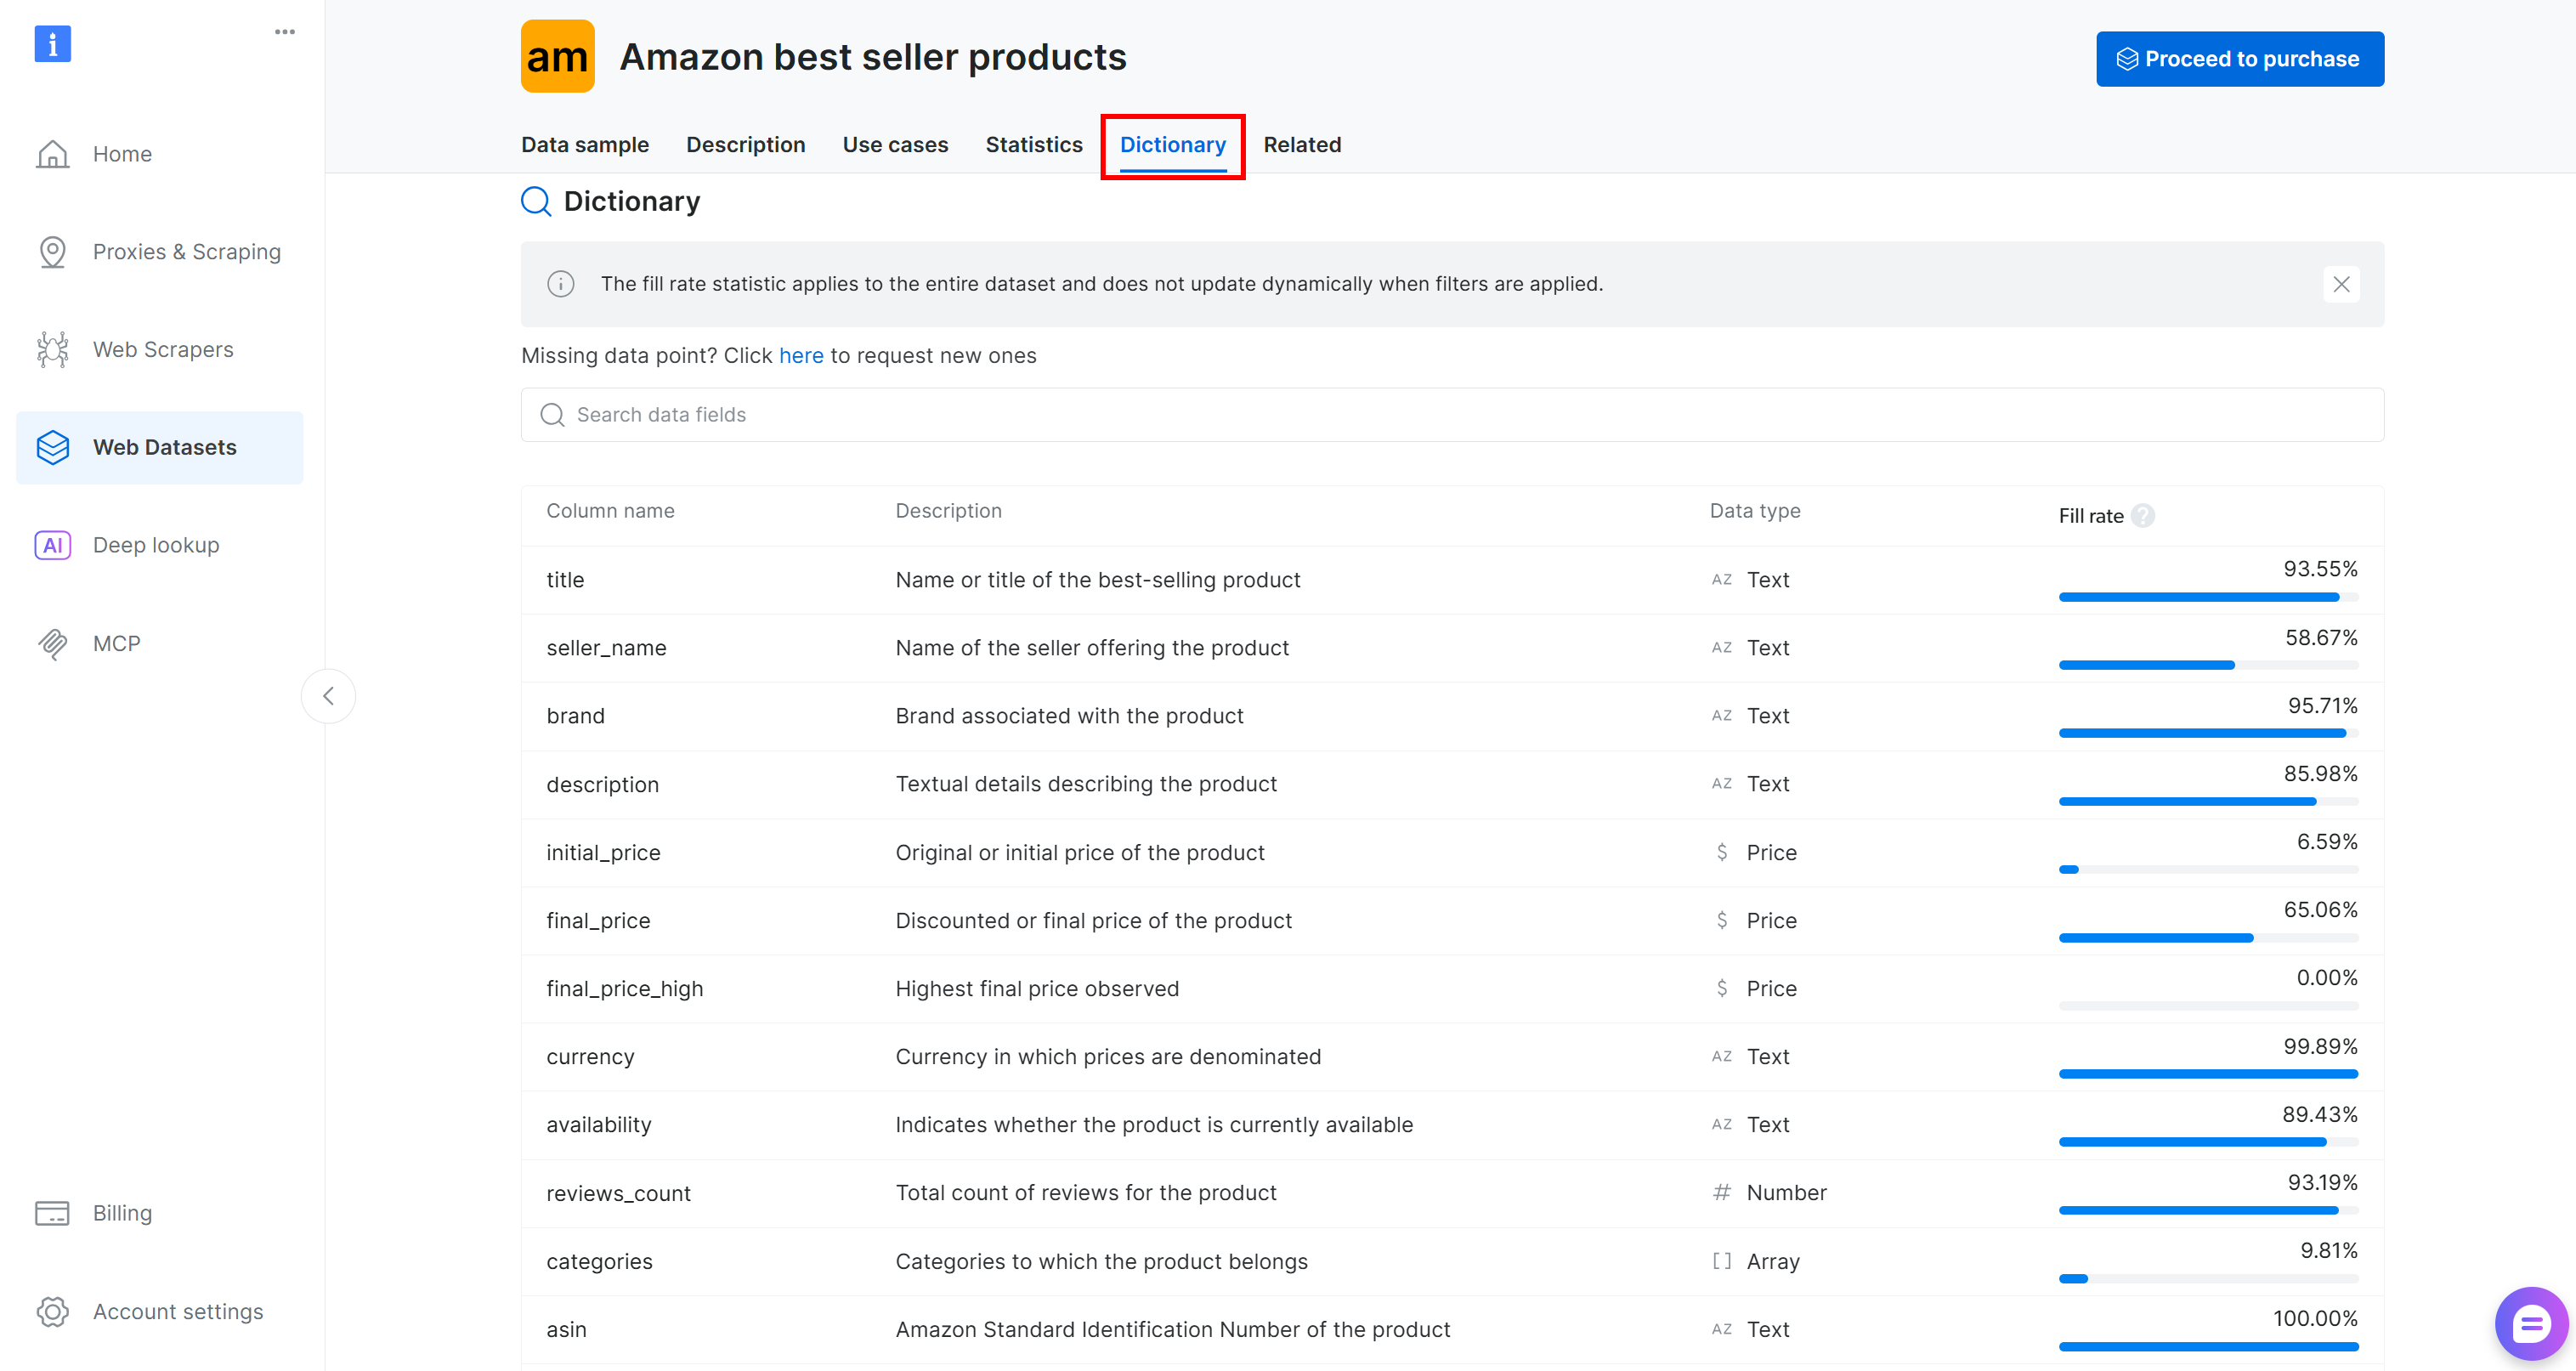
在本例中,我们关注的列是:
brand(文本):与产品关联的品牌。final_price(价格):产品折后价或最终价格。reviews_count(数字):评论总数。rating(数字):产品平均评分。
现在,加载 JSON 文件:
with open("products.json", "r", encoding="utf-8") as f:
    data = json.load(f)
然后将其转换为 pandas DataFrame:
df = pd.DataFrame(data)如果你检查 final_price 列,会注意到有时它只包含数值(例如 1500),有时则包含格式化字符串(例如 $1,500)。
为保证处理一致性,将所有价格转换为数值格式,并删除 final_price 为 null 的行:
df["final_price"] = pd.to_numeric(
    df["final_price"].astype(str).str.replace(r"[$,]", "", regex=True),
    errors="coerce"
)
df = df.dropna(subset=["final_price"])
最后,在 MLflow 中注册该数据集:
# Define feature columns and target column
FEATURES = ["rating", "reviews_count", "brand"]
TARGET = "final_price"

# Explicitly define the dataset source
dataset_source = CodeDatasetSource(tags="v1")

# Register dataset in MLflow with some metadata
mlflow_dataset = mlflow.data.from_pandas(
    df[FEATURES + [TARGET]],
    source=dataset_source,
    name="brightdata_products",
    targets=TARGET
)
这段代码定义了 ML 流水线的输入特征(rating、reviews_count、brand)与目标变量(final_price)。随后创建一个 CodeDatasetSource 对象,并在 MLflow 中注册选定的 DataFrame,同时附带元数据以确保可追踪性与可复现性。
太棒了!你现在可以在模型训练流水线中使用这些数据了。
步骤 #6:定义预测模型流水线
使用以下逻辑准备数据以进行 ML 模型训练:
# Separate features and target
X = df[FEATURES]
y = df[TARGET]

# Preprocessing pipeline:
# - Median imputation for numeric columns
# - Constant fill + one-hot encoding for categorical column
preprocessor = ColumnTransformer(
    transformers=[
        ("num", SimpleImputer(strategy="median"), ["rating", "reviews_count"]),
        ("cat", Pipeline([
            ("imputer", SimpleImputer(strategy="constant", fill_value="unknown")),
            ("onehot", OneHotEncoder(handle_unknown="ignore"))
        ]), ["brand"]),
    ]
)

# Full ML pipeline: preprocessing + RandomForest model
pipeline = Pipeline(steps=[
    ("preprocessor", preprocessor),
    ("model", RandomForestRegressor(n_estimators=200, max_depth=None, random_state=42))
])

# Split the dataset into training and testing sets
X_train, X_test, y_train, y_test = train_test_split(
    X, y, test_size=0.2, random_state=42
)
这段代码通过以下方式完成数据准备并构建完整 ML 流水线:
- 将输入特征(
rating、reviews_count、brand)与目标(final_price)分离。 - 对缺失值进行处理:数值特征使用中位数填补;类别特征使用常量填充,然后对
brand文本字段做 one-hot 编码转换为数值格式,从而保证模型输入是干净且数值化的。 - 将预处理与随机森林模型组合,并将数据切分为训练集与测试集用于评估。
不错!现在可以在 Bright Data 抓取数据集上运行你的 MLflow 实验了。
步骤 #7:运行 MLflow 实验
你已经具备运行 MLflow 实验的全部组件。执行如下代码即可运行:
# Start the MLflow run and enable system metrics tracking
with mlflow.start_run(log_system_metrics=True) as run:
    # Log dataset as an input to the run
    mlflow.log_input(mlflow_dataset, context="training")

    # Train the model pipeline
    pipeline.fit(X_train, y_train)

    # Generate the predictions on the test set
    predictions = pipeline.predict(X_test)

    # Log the evaluation metrics (RMSE and R2)
    mlflow.log_metric("val_rmse", root_mean_squared_error(y_test, predictions))
    mlflow.log_metric("r2_score", r2_score(y_test, predictions))

    # Log the output dataset CSV to a local file and then as an artifact in MLflow
    csv_path = "cleaned_dataset.csv"
    df.to_csv(csv_path, index=False, encoding="utf-8-sig", errors="replace")
    mlflow.log_artifact(csv_path)

    # Log the trained model with signature and example input
    mlflow.sklearn.log_model(
        sk_model=pipeline,
        name="model",
        signature=mlflow.models.infer_signature(X_train, predictions),
        input_example=X_train.iloc[:3],
    )

print(f"Run complete. Check the 'System Metrics' tab in the MLflow UI for Run ID: {run.info.run_id}")
上述代码的作用是:
- 启动一个 MLflow run,并开启系统指标跟踪。
- 将
mlflow_dataset注册为实验输入,以保证可追溯性与可复现性。 - 训练模型:在训练数据上拟合完整流水线(预处理 + 随机森林)。
- 生成预测:使用训练好的模型在测试集上预测目标值。
- 将 RMSE 与 R2 记录到 MLflow 以评估模型性能。
- 将清洗后的数据集作为 artifact 记录,便于在 MLflow 中查看与留档。
- 在 MLflow 中注册训练好的流水线模型,包含输入签名与示例输入以支持复现。
很好!剩下的就是查看最终代码并运行你的 MLflow 实验。
步骤 #8:整合并运行实验
你的 experiment.py 文件应包含:
import json
import mlflow
import pandas as pd
import mlflow.sklearn
from mlflow.data.code_dataset_source import CodeDatasetSource
from sklearn.model_selection import train_test_split
from sklearn.preprocessing import OneHotEncoder
from sklearn.compose import ColumnTransformer
from sklearn.pipeline import Pipeline
from sklearn.ensemble import RandomForestRegressor
from sklearn.metrics import root_mean_squared_error, r2_score
from sklearn.impute import SimpleImputer


# Enable automatic system metrics logging (CPU, memory, etc.)
mlflow.enable_system_metrics_logging()

# Automatically log events for sklearn
mlflow.sklearn.autolog()

# Configure how frequently system metrics are sampled and logged (1 second)
mlflow.set_system_metrics_sampling_interval(1)
mlflow.set_system_metrics_samples_before_logging(1)

# Load scraped product data from the input Bright Data dataset file
# (download from: /cp/datasets/browse/gd_l1vijixj9g2vp7563)
with open("products.json", "r", encoding="utf-8") as f:
    data = json.load(f)

# Convert JSON to a pandas DataFrame
df = pd.DataFrame(data)

# Clean the target "final_price" column:
# - Remove dollar signs and commas
# - Convert to numeric
# - Invalid values become NaN
df["final_price"] = pd.to_numeric(
    df["final_price"].astype(str).str.replace(r"[$,]", "", regex=True),
    errors="coerce"
)

# Drop rows where the target value is missing
df = df.dropna(subset=["final_price"])

# Define feature columns and target column
FEATURES = ["rating", "reviews_count", "brand"]
TARGET = "final_price"

# Explicitly define the dataset source
dataset_source = CodeDatasetSource(tags="v1")

# Register dataset in MLflow with some metadata
mlflow_dataset = mlflow.data.from_pandas(
    df[FEATURES + [TARGET]],
    source=dataset_source,
    name="brightdata_products",
    targets=TARGET
)

# Separate features and target
X = df[FEATURES]
y = df[TARGET]

# Preprocessing pipeline:
# - Median imputation for numeric columns
# - Constant fill + one-hot encoding for categorical column
preprocessor = ColumnTransformer(
    transformers=[
        ("num", SimpleImputer(strategy="median"), ["rating", "reviews_count"]),
        ("cat", Pipeline([
            ("imputer", SimpleImputer(strategy="constant", fill_value="unknown")),
            ("onehot", OneHotEncoder(handle_unknown="ignore"))
        ]), ["brand"]),
    ]
)

# Full ML pipeline: preprocessing + RandomForest model
pipeline = Pipeline(steps=[
    ("preprocessor", preprocessor),
    ("model", RandomForestRegressor(n_estimators=200, max_depth=None, random_state=42))
])

# Split the dataset into training and testing sets
X_train, X_test, y_train, y_test = train_test_split(
    X, y, test_size=0.2, random_state=42
)

# Set the MLflow experiment
mlflow.set_experiment("brightdata_product_price_prediction")

# Start the MLflow run and enable system metrics tracking
with mlflow.start_run(log_system_metrics=True) as run:
    # Log dataset as an input to the run
    mlflow.log_input(mlflow_dataset, context="training")

    # Train the model pipeline
    pipeline.fit(X_train, y_train)

    # Generate the predictions on the test set
    predictions = pipeline.predict(X_test)

    # Log the evaluation metrics (RMSE and R2)
    mlflow.log_metric("val_rmse", root_mean_squared_error(y_test, predictions))
    mlflow.log_metric("r2_score", r2_score(y_test, predictions))

    # Log the output dataset CSV to a local file and then as an artifact in MLflow
    csv_path = "cleaned_dataset.csv"
    df.to_csv(csv_path, index=False, encoding="utf-8-sig", errors="replace")
    mlflow.log_artifact(csv_path)

    # Log the trained model with signature and example input
    mlflow.sklearn.log_model(
        sk_model=pipeline,
        name="model",
        signature=mlflow.models.infer_signature(X_train, predictions),
        input_example=X_train.iloc[:3],
    )

print(f"Run complete. Check the 'System Metrics' tab in the MLflow UI for Run ID: {run.info.run_id}")
在已激活 Python 环境的情况下,运行你的 MLflow 实验:
python experiment.py执行大约需要几秒钟,请耐心等待。
任务完成!你刚刚实现了一个使用 Bright Data 抓取数据集的 MLflow 实验跟踪流水线。
步骤 #9:查看 MLflow 跟踪结果
访问 MLflow UI:http://127.0.0.1:5000/。你应该会看到一个名为 brightdata_product_price_prediction experiment 的条目(这是代码中为 MLflow 实验设置的名称)。点击它: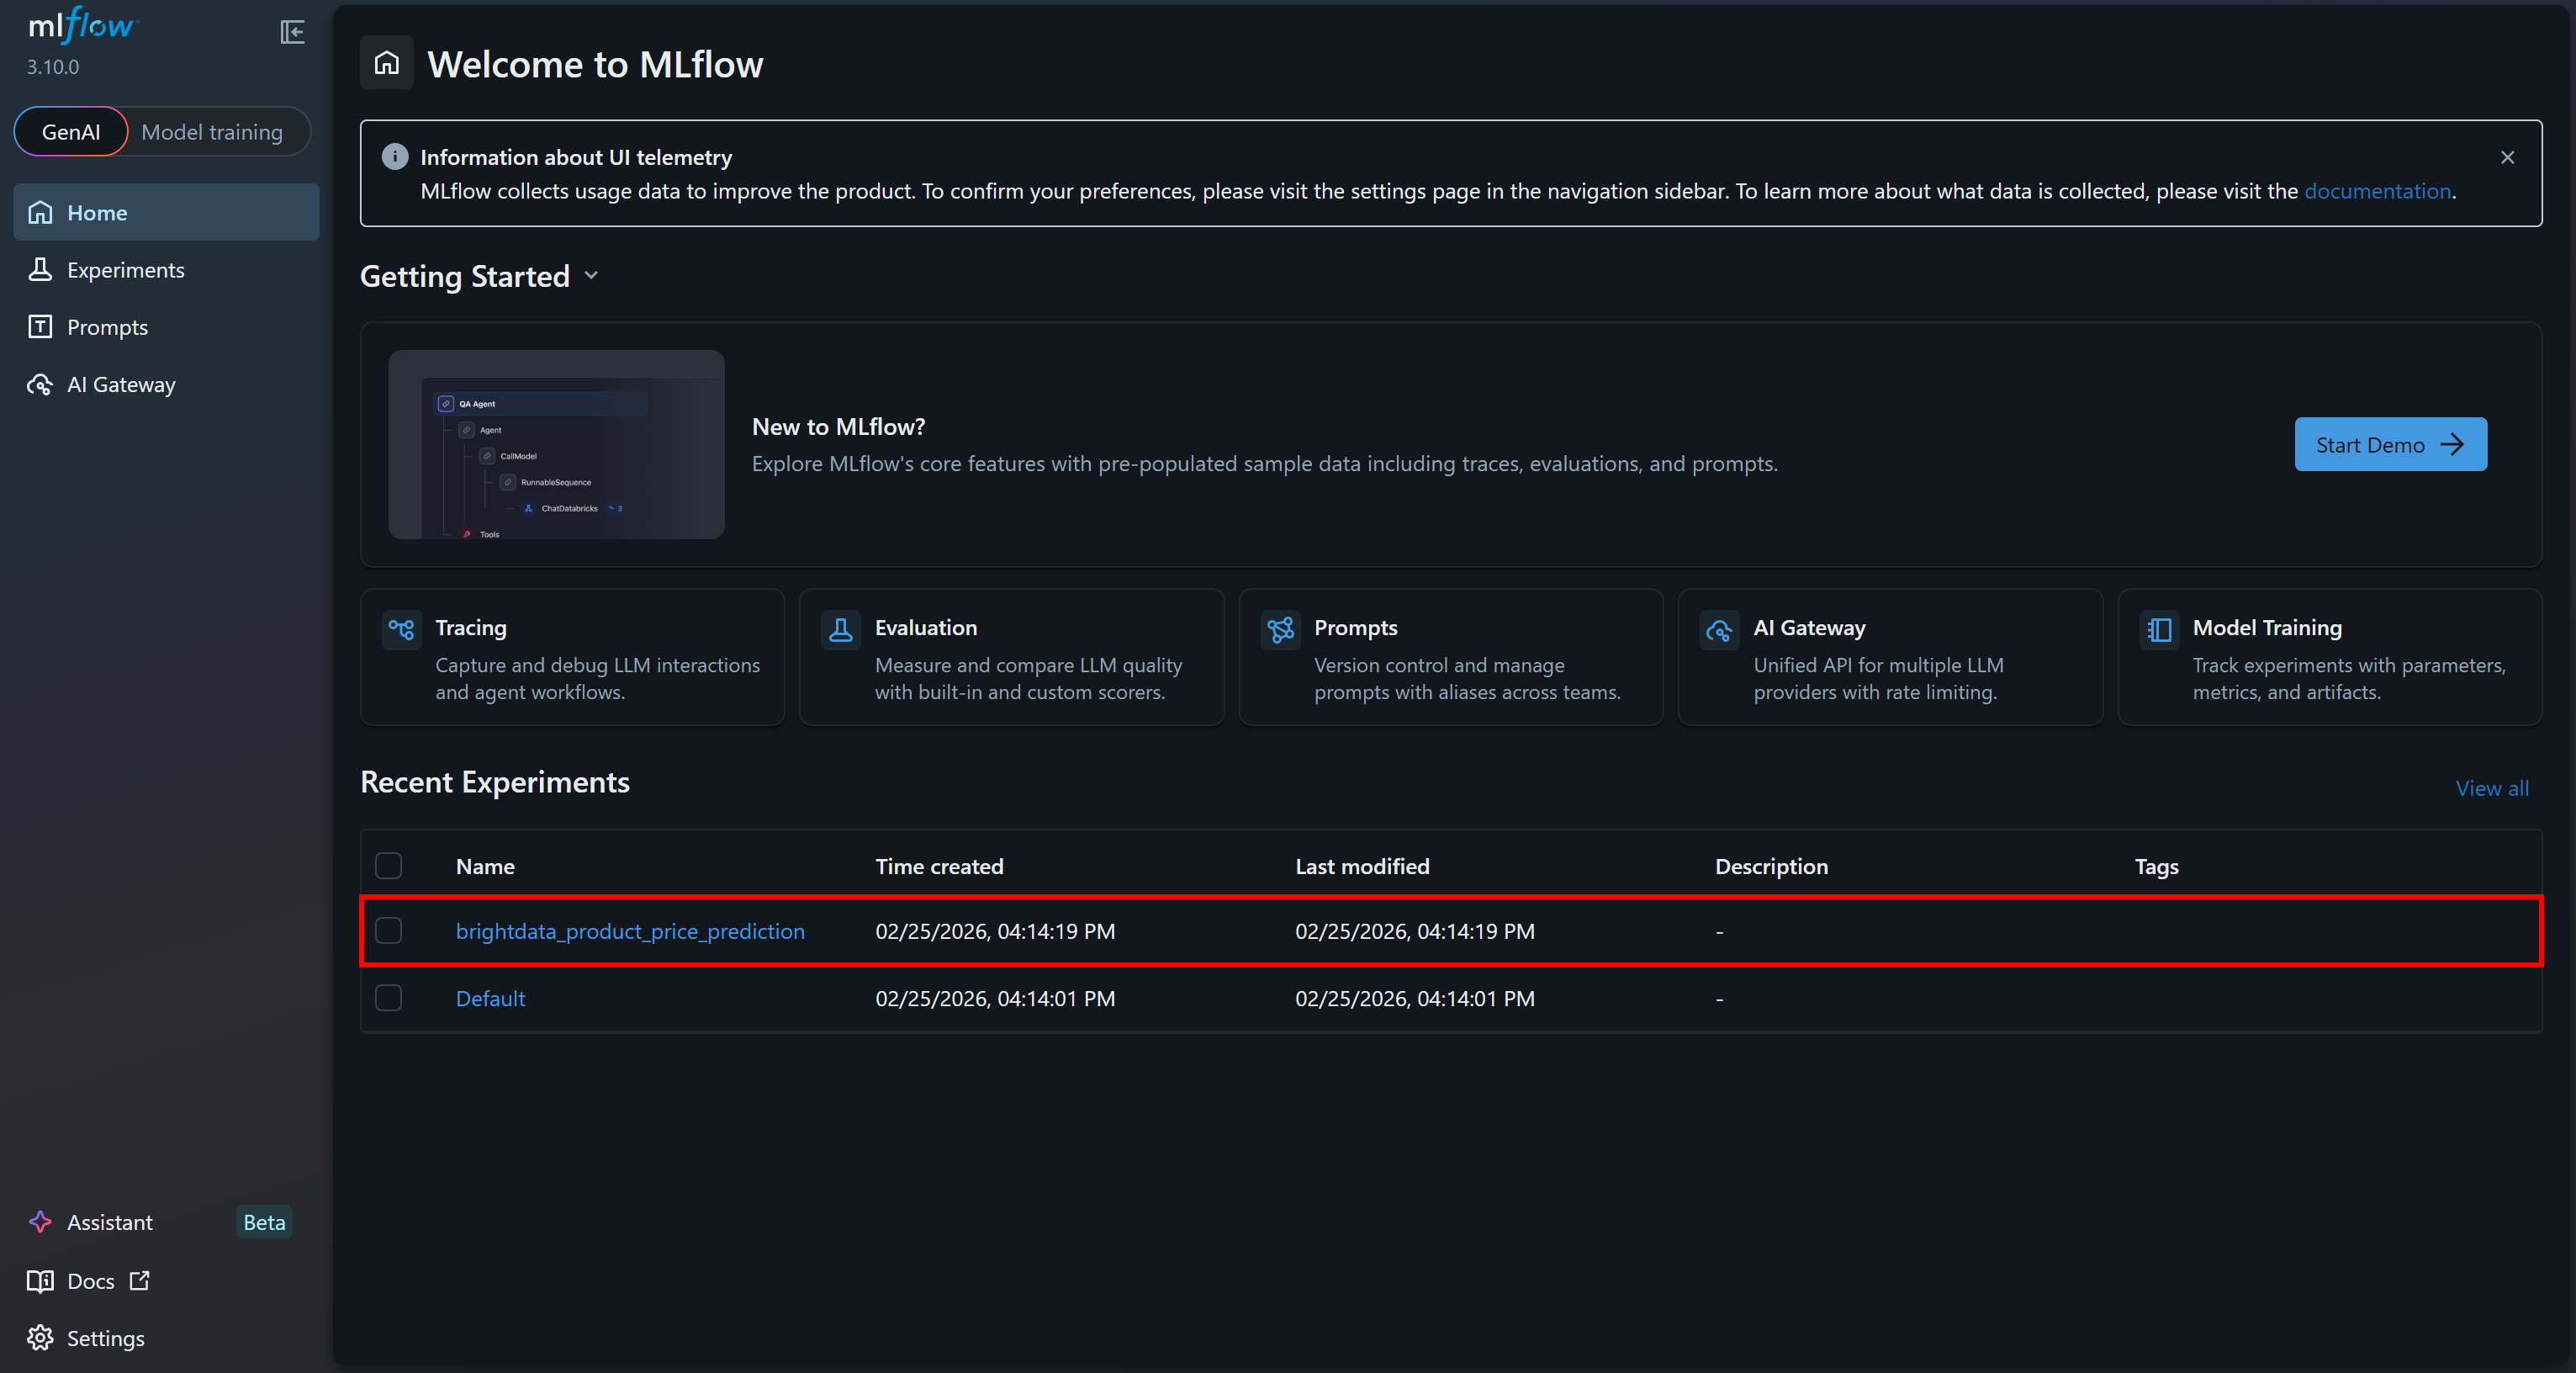
进入 “Training runs” 区域查看更多细节: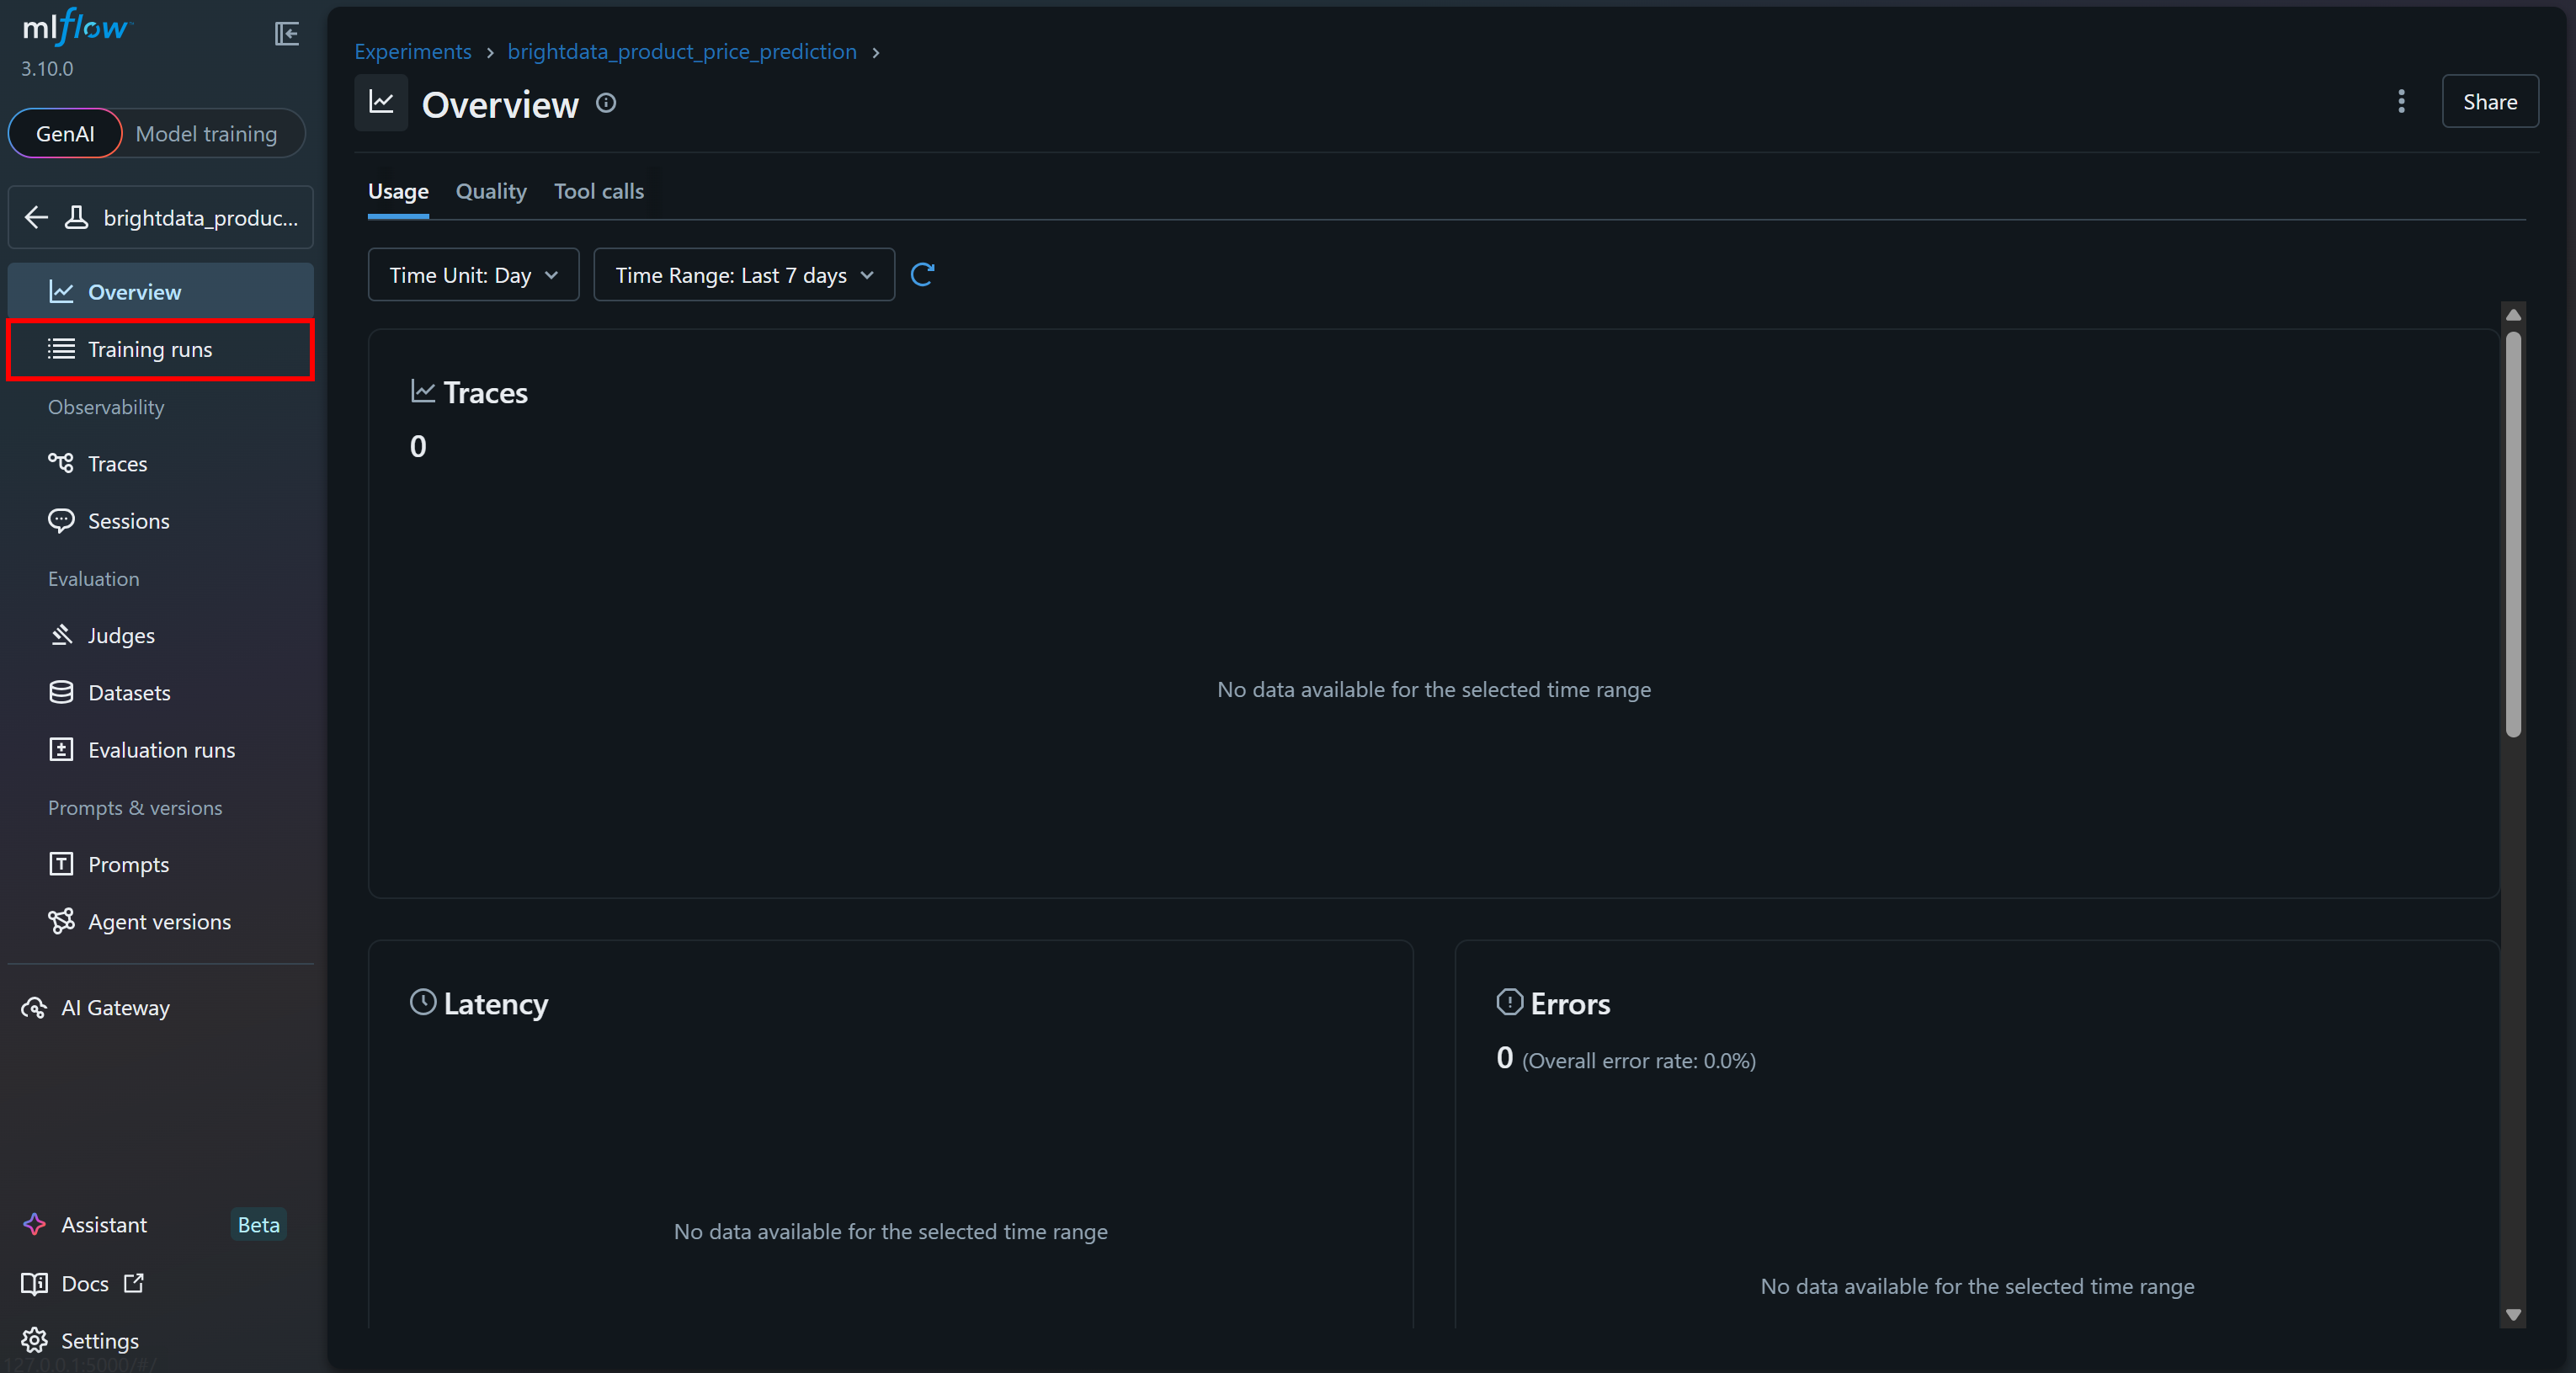
你应该会看到你刚执行的最后一次 run:
点击它即可立即访问 15+ 个指标: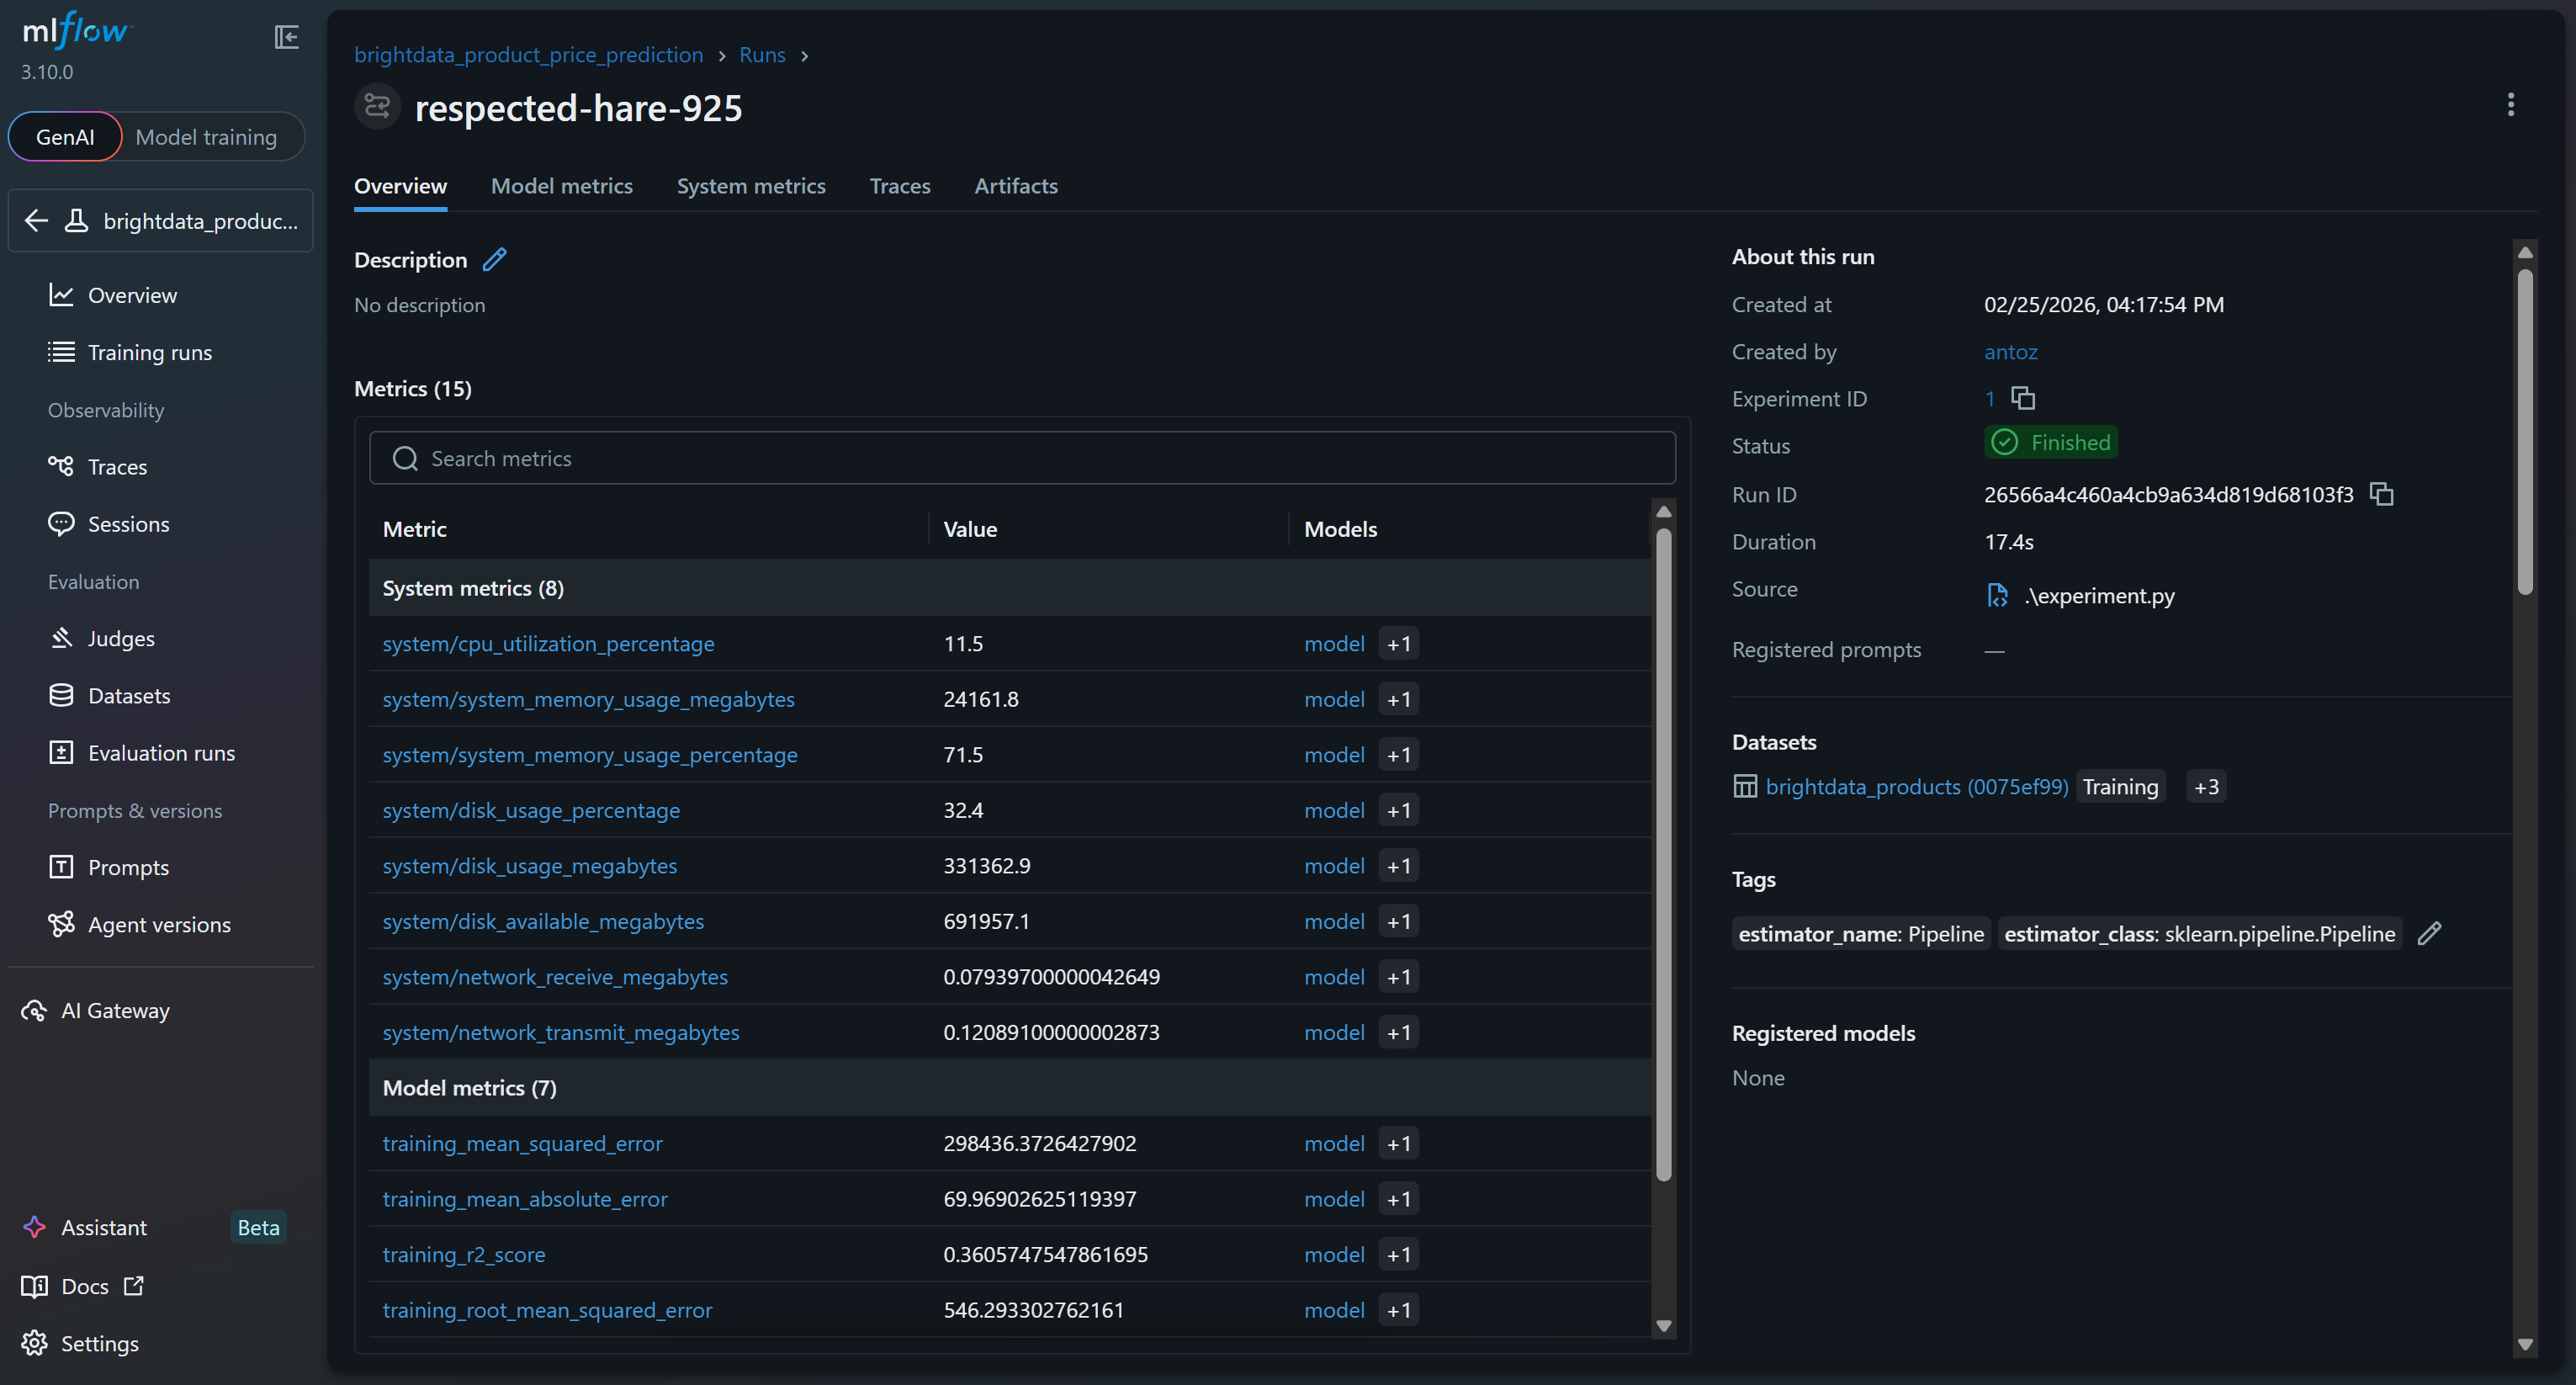
这些指标包括 MLflow 追踪功能自动采集的系统与模型指标,以及你在 run 中记录的模型指标(例如 val_rmse、r2_score)。
要查看模型指标,请进入对应标签页: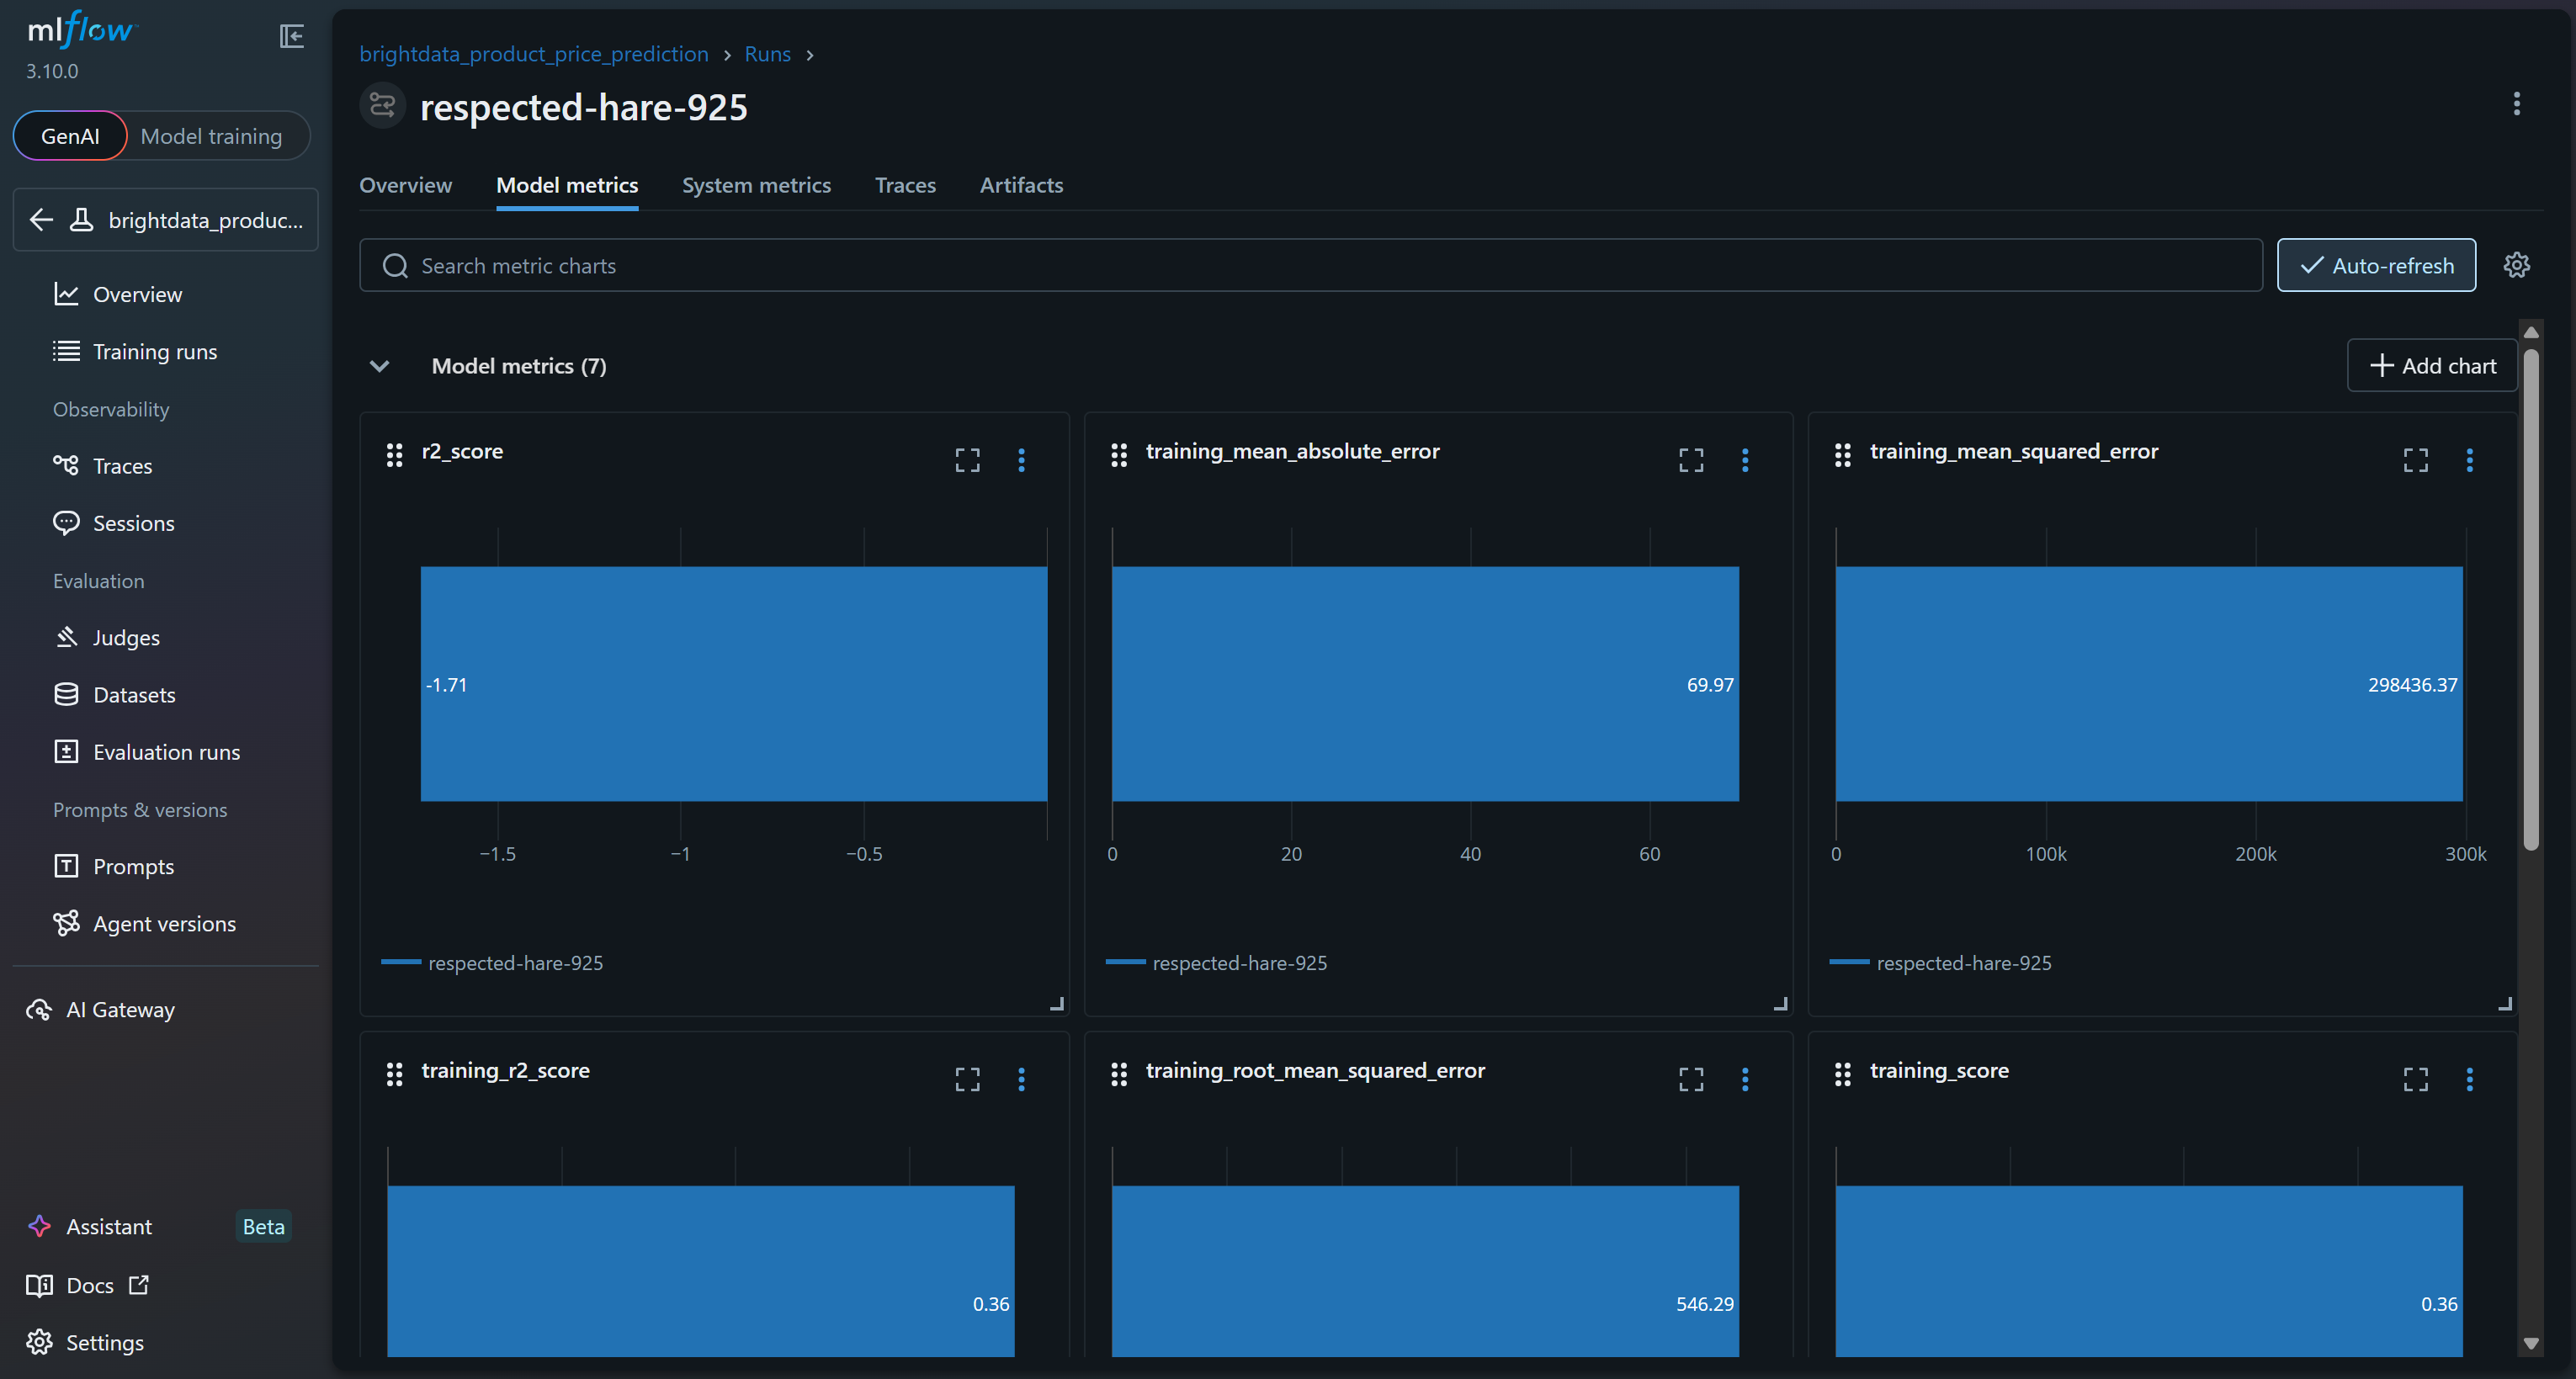
或在 “System metrics” 标签页查看系统指标图表: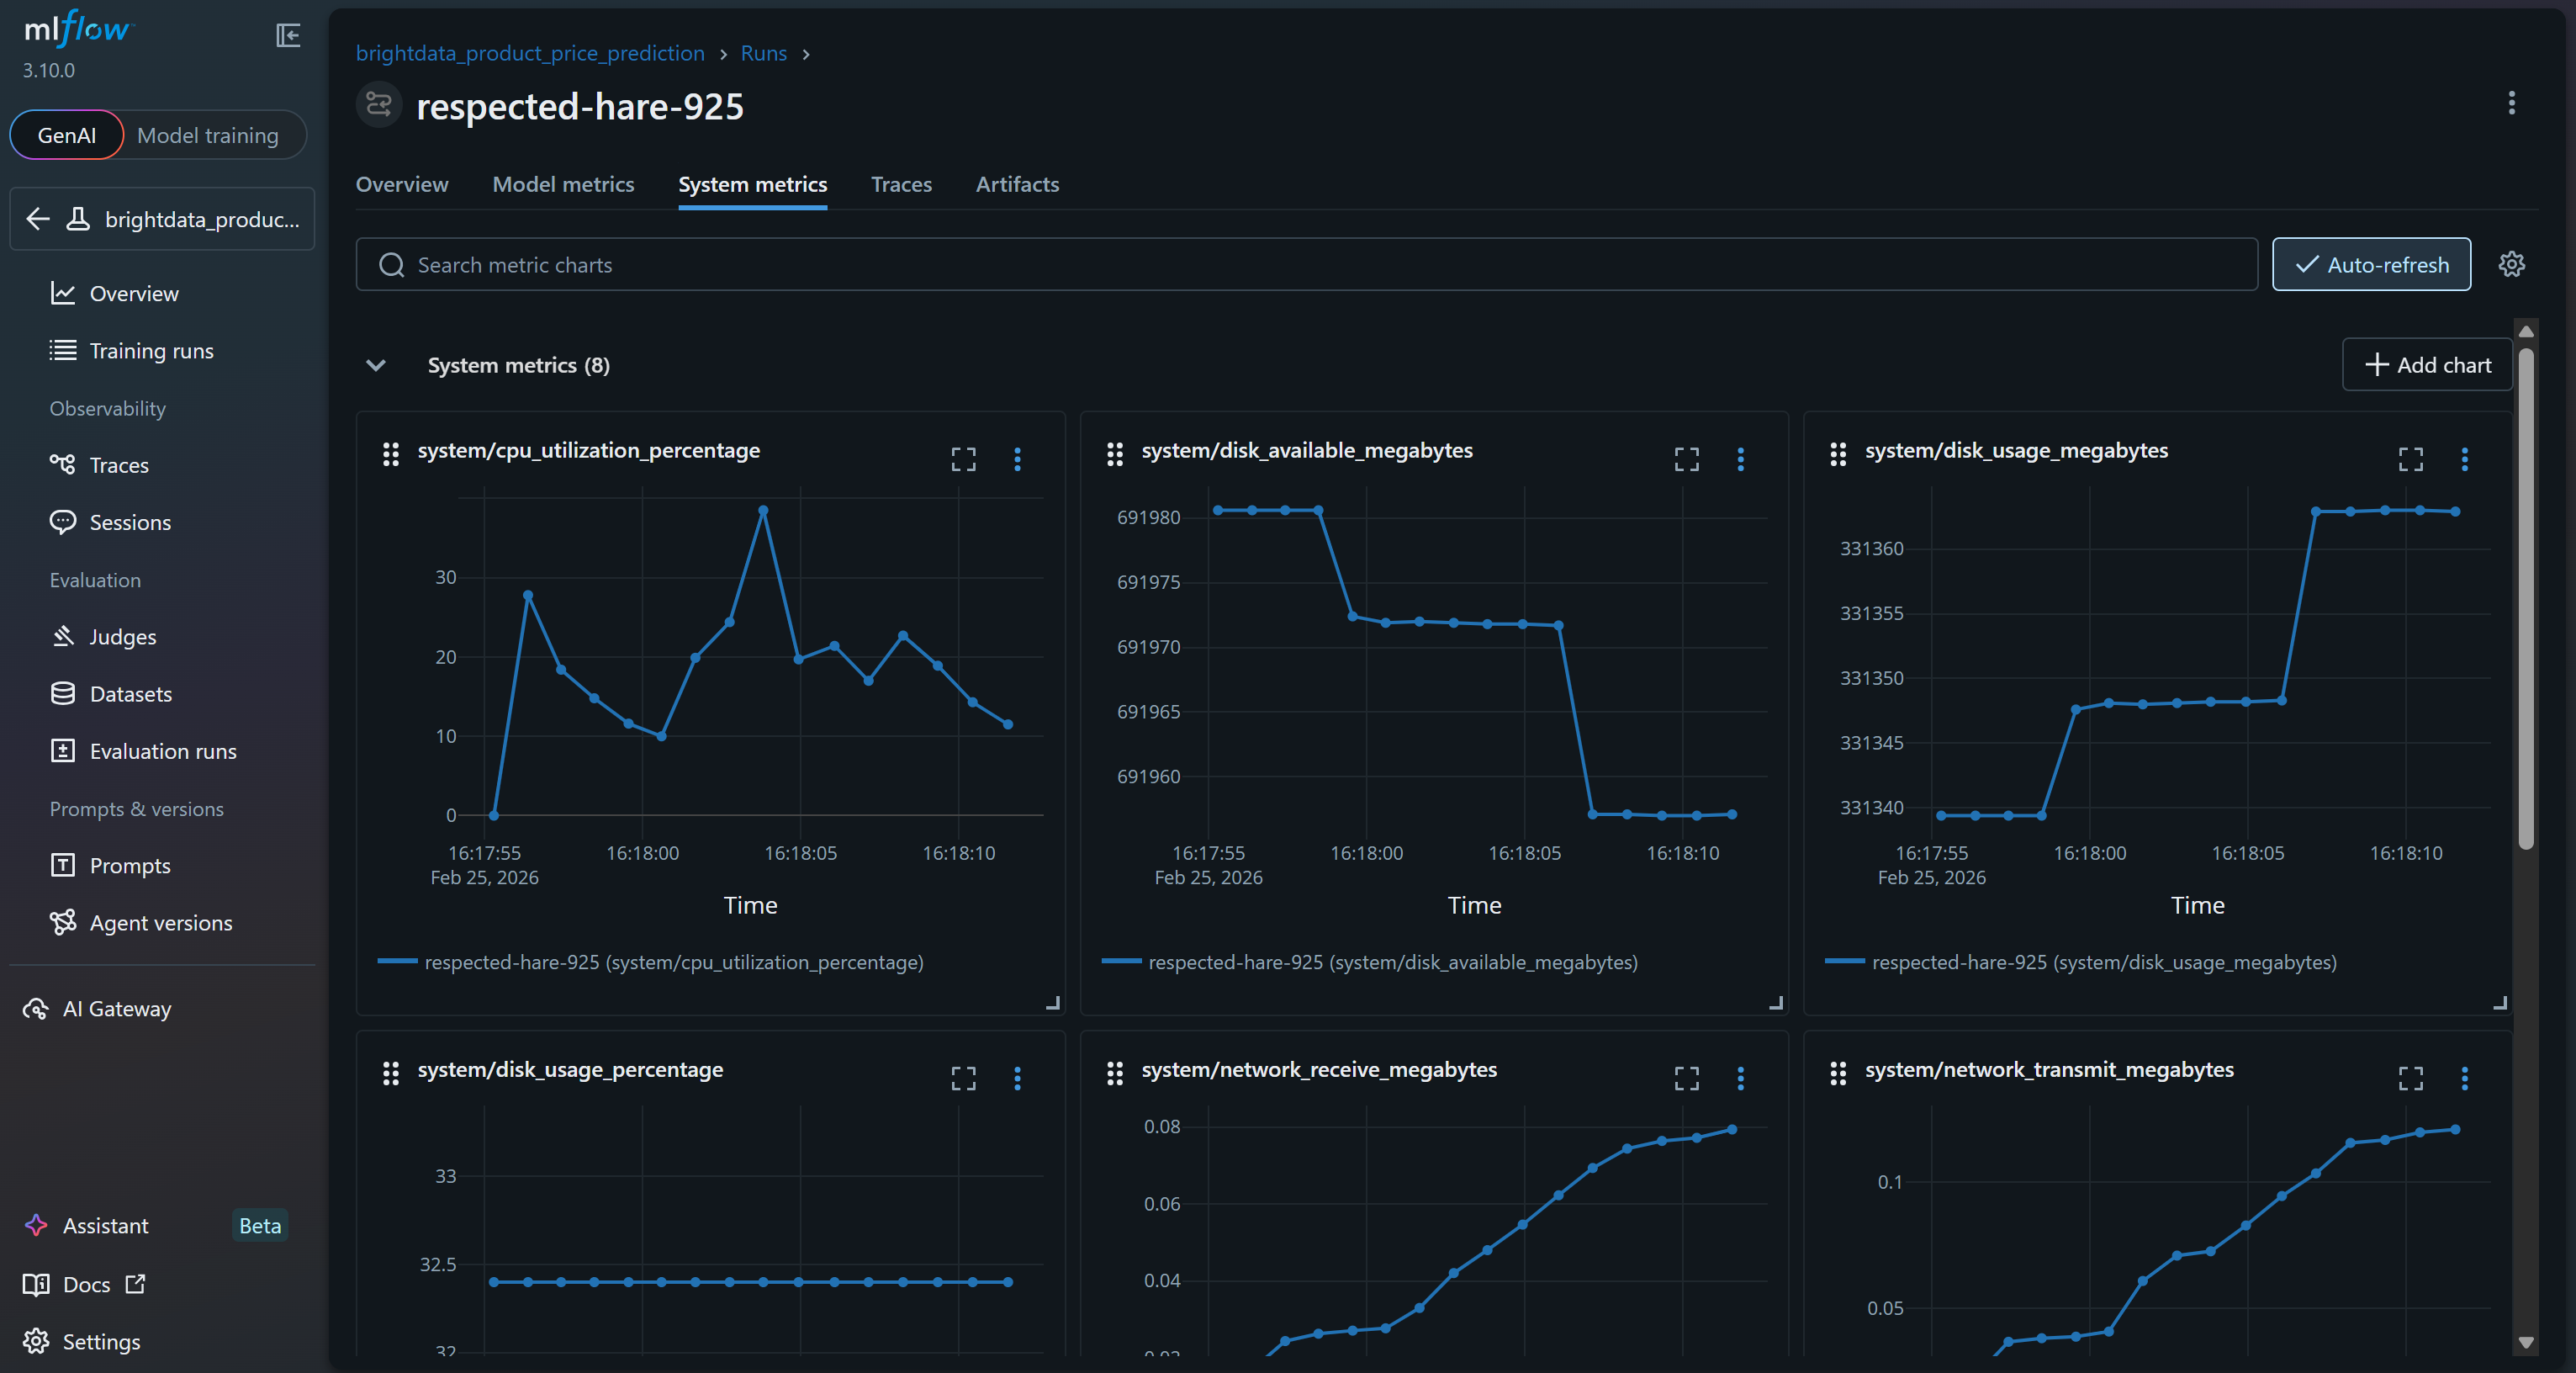
此外,“Artifacts” 区域会显示输出文件(例如你代码中记录的 cleaned_dataset.csv):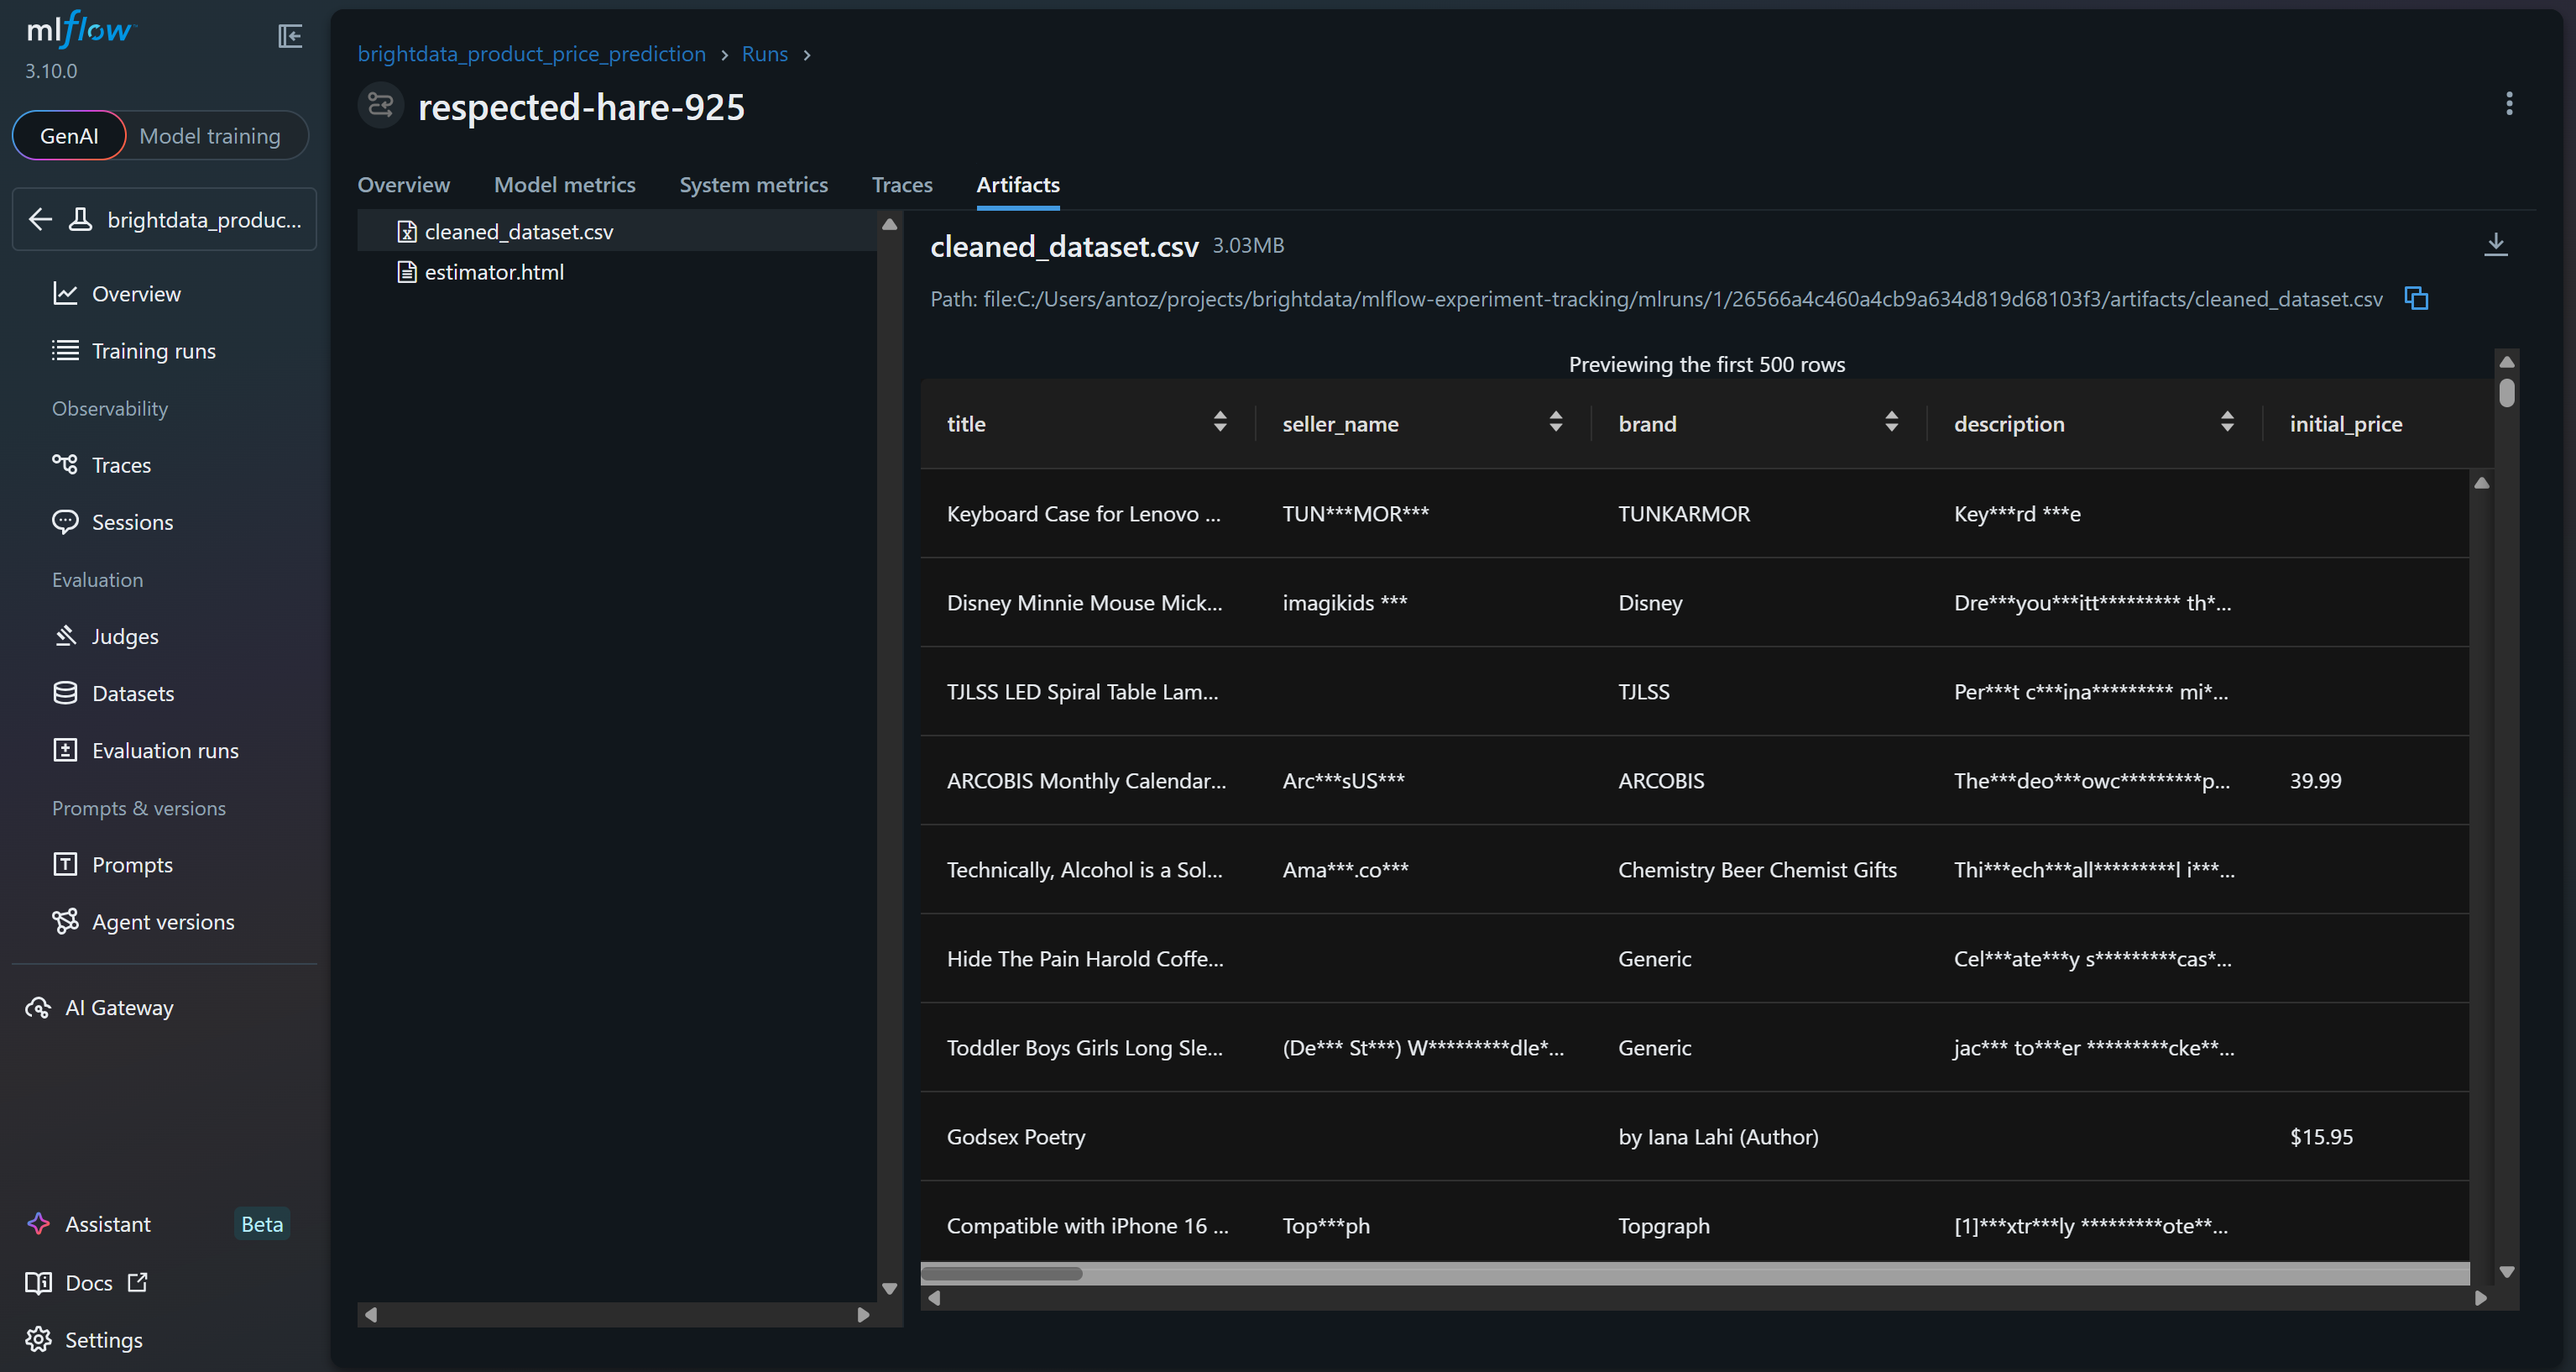
这些只是你通过基于 Bright Data 抓取数据集构建的 MLflow 实验所能跟踪的部分指标与输出!
步骤 #10:结果点评
为验证模型训练过程是否正常工作,请重点关注模型指标: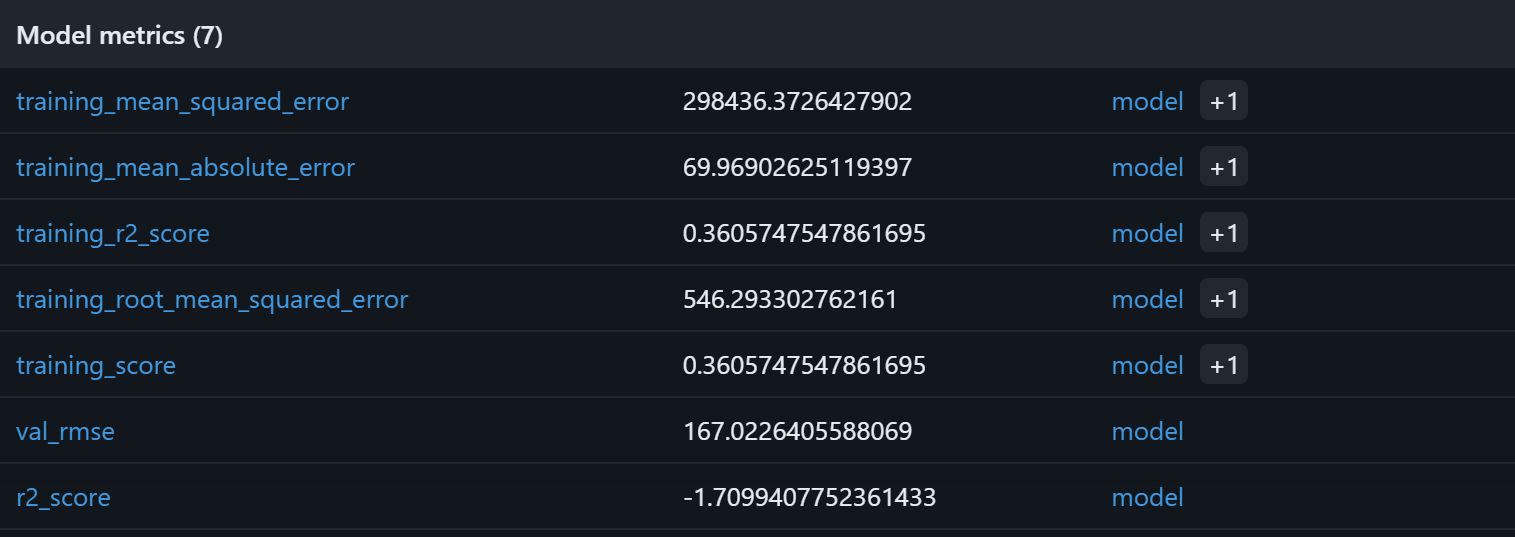
基于这些模型指标,当前流水线很可能会在验证集上产生没有意义的预测。训练集 R2 为 0.36,表示模型只能解释训练数据中约 36% 的方差,表现一般。训练 RMSE(546)与 MAE(约 70)表明相对于常见商品价格而言误差偏大,这可能是由于数据噪声较多或特征与目标之间相关性较弱。
更值得担心的是验证集表现:R2 为负(-1.71),且验证 RMSE(167)仍然显著。R2 为负意味着模型甚至不如对所有样本直接预测均值价格。也就是说,rating、reviews_count、brand 与 final_price 之间的假设关系可能并不强,或者不够让随机森林有效捕捉。
潜在改进方向包括:扩展特征集合、进行特征工程(例如对评论数做 log 变换、对品牌热度编码)、尝试梯度提升或 XGBoost 等替代模型,并将数据规模从 1,000 条样本扩展到更大的数据集。使用更大的 Bright Data 数据集,你将拥有更多数据与多样性,从而能开展更深入、更有价值的实验。
总之,当前流水线在技术上可运行,但未能充分捕捉潜在的价格规律。借助 MLflow 的实验跟踪,你能够识别出这一机器学习流水线背后的假设可能存在问题。
下一步
如果你希望使用 MLflow 来追踪使用 Bright Data 数据集进行微调或 RAG 的 AI 流水线,请记住 MLflow tracing 与 OpenTelemetry 完全兼容。具体来说,MLflow 提供 LLM 可观测性方案,可捕获请求每个中间步骤的输入、输出与元数据。
在与 OpenAI 集成时,你可以用以下方式轻松启用:
import mlflow

mlflow.openai.autolog()
更多细节请参考 MLflow 官方文档。
结论
在本教程中,你了解了 MLflow 在构建与跟踪机器学习和 AI 流水线方面的价值,并理解了为什么抓取数据集非常适合用于训练或微调模型。
如示例所示,Bright Data 提供丰富的数据集市场,覆盖数百个领域与数十亿条网页数据记录。这些数据集通过网页抓取持续更新,以支持机器学习与 AI 工作流。并且,如本文所示,它们与 MLflow 跟踪机制完全兼容。
创建一个免费的 Bright Data 账号,立即开始探索我们的网页数据解决方案!


技术写作
 5.5 years experience
Antonello是一名软件工程师,但他更喜欢称自己为技术传教士。通过写作传播知识是他的使命。