在本教程中,你将学习:
- 为什么首先需要一个自定义的品牌监测解决方案。
- 如何使用 Bright Data SDK、OpenAI 和 SendGrid 构建该解决方案。
- 如何用 Python 实现品牌声誉监测的 AI 工作流。
你可以查看项目的所有文件:GitHub 仓库。现在,让我们开始!
为什么要构建自定义品牌监测解决方案?
品牌监测是营销中最重要的任务之一,市面上也有多种在线服务可用于此目的。问题在于,这些解决方案往往价格昂贵,且未必能贴合你的具体需求。
这正是构建自定义品牌声誉监测解决方案的意义所在。起初这可能听起来有些吓人,看起来目标复杂。但使用合适的工具(接下来你会看到),完全可以做到。
品牌声誉 AI 工作流解析
首先,如果没有关于你品牌的可靠外部信息,就无法构建有效的品牌监测工具。一个极佳的数据源是 Google 新闻。通过了解每日新闻文章对你品牌的报道内容及其背后的情感倾向,你可以做出更明智的决策。最终目标是对品牌进行回应、保护或推广。
难点在于,抓取新闻文章并不容易。尤其是 Google 新闻,部署了多重反爬措施。此外,每个新闻来源都有自己的网站和独特的防护机制,导致以编程方式持续稳定地收集新闻数据变得困难。
这正是 Bright Data 大显身手的地方。凭借其强大的网页搜索与抓取能力,它为你提供多种产品与集成,帮助以编程方式从任意网站获取可供 AI 使用的公共网络数据。
尤其是借助全新的 Bright Data SDK,你可以用少量 Python 代码,以简化方式调用最实用的 Bright Data 解决方案!
拿到新闻数据后,你可以依赖 AI 选出最相关的文章,并对其进行情感与品牌洞察分析。随后,使用像 Twilio SendGrid 这样的服务,将生成的报告发送给整个市场团队。概括来说,这就是一个自定义品牌声誉 AI 工作流所做的事情。
接下来,我们从技术角度更详细地看看如何实现!
技术步骤
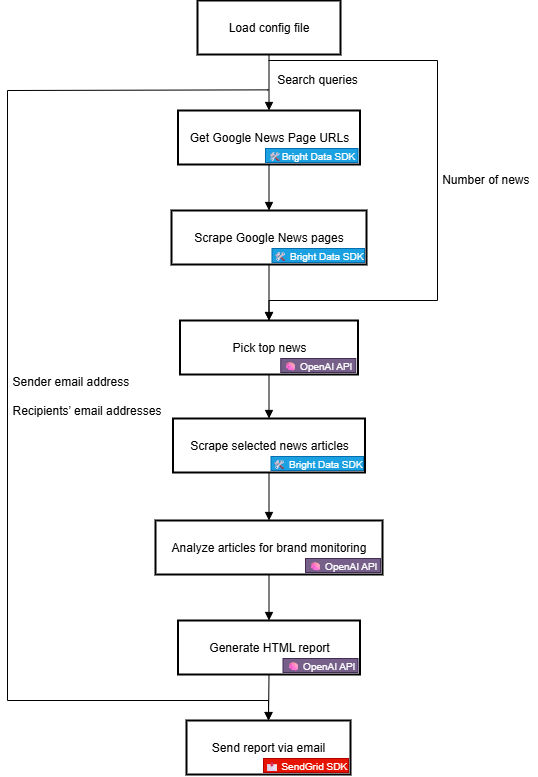
实现品牌声誉监测 AI 工作流的步骤如下:
- 加载环境变量:从环境变量中加载 Bright Data、OpenAI 和 SendGrid 的 API 密钥。这些密钥用于连接为该工作流提供支持的第三方服务。
- 加载配置文件:读取 JSON 配置文件(如
config.json),其中包含初始搜索查询、报告中要包含的新闻文章数量、发件人邮箱地址以及收件人邮箱地址。 - 获取 Google 新闻页面 URL:使用 Bright Data SDK 抓取为配置搜索词返回的搜索引擎结果页(SERP),并从中访问 Google 新闻页面的 URL。
- 抓取 Google 新闻页面:使用 Bright Data SDK 以 Markdown 格式抓取完整的 Google 新闻页面。每个页面包含多条新闻文章的 URL。
- 让 AI 识别头部新闻:将抓取到的 Google 新闻页面内容输入 OpenAI 模型,让其选出对品牌监测最相关的新闻文章。
- 抓取单篇新闻文章:使用 Bright Data SDK 获取 AI 返回的每条新闻文章的内容。
- 分析新闻文章的品牌声誉:将每篇新闻文章输入 AI,要求其提供摘要、情感分析指示以及有助于品牌声誉的关键洞察。
- 生成最终 HTML 报告:将新闻分析结果交给 AI,请其生成结构良好的 HTML 报告。
- 通过邮件发送报告:使用 SendGrid SDK 将 AI 生成的 HTML 报告发送给指定收件人,以提供品牌声誉的全面概览。
看看如何用 Python 实现这个 AI 工作流!
使用 Bright Data SDK 创建 AI 驱动的品牌声誉工作流
在本教程部分,你将学习如何构建一个用于监测品牌声誉的 AI 工作流。所需的品牌新闻数据来自 Bright Data,借助 Bright Data Python SDK 获取。AI 能力由 OpenAI 提供,邮件发送由 SendGrid 处理。
完成本教程后,你将拥有一个完整的 Python AI 工作流,能够将结果直接发送到你的收件箱。输出报告将识别你的品牌需要关注的关键新闻,帮助你快速响应并维持强劲的品牌形象。
让我们开始构建品牌声誉 AI 工作流吧!
先决条件
请确保你具备以下条件:
- 本地安装 Python 3.8+。
- 一个 Bright Data API 密钥。
- 一个 OpenAI API 密钥。
- 一个 Twilio SendGrid API 密钥。
如果你还没有 Bright Data API 令牌,请先注册 Bright Data 并按照设置指南操作。类似地,按照 OpenAI 官方说明获取你的 OpenAI API 密钥。
至于 SendGrid,请创建并验证账户,连接邮箱地址并验证你的域名。创建 API 密钥并确认你可以通过它以编程方式发送电子邮件。
步骤一:创建你的 Python 项目
打开终端,为品牌声誉监测 AI 工作流创建新目录:
mkdir brand-reputation-monitoring-workflowbrand-reputation-monitoring-workflow/ 文件夹将包含你的 AI 工作流的 Python 代码。
接下来进入项目目录并创建一个虚拟环境:
cd brand-reputation-monitoring-workflow
python -m venv .venv
现在,用你喜欢的 Python IDE 打开项目。我们推荐安装 Python 扩展的 Visual Studio Code或PyCharm 社区版。
在项目根目录中新建文件 workflow.py。你的项目结构应为:
brand-reputation-monitoring-workflow/
├── .venv/
└── workflow.py
workflow.py 将作为你的主 Python 文件。
激活虚拟环境。Linux 或 macOS 上运行:
source .venv/bin/activate在 Windows 上,执行:
.venv/Scripts/activate激活环境后,安装所需依赖:
pip install python-dotenv brightdata-sdk openai sendgrid pydantic你刚安装的库包括:
python-dotenv:从.env文件加载环境变量,便于安全管理 API 密钥。brightdata-sdk:在 Python 中访问 Bright Data 的抓取工具与解决方案。openai:与 OpenAI 语言模型交互。sendgrid:通过 Twilio SendGrid Web API v3 快速发送邮件。pydantic:为 AI 输出和你的配置定义模型。
完成!你的 Python 开发环境已就绪,可用于结合 OpenAI、Bright Data SDK 和 SendGrid 构建品牌声誉监测 AI 工作流。
步骤二:设置环境变量读取
将脚本配置为从环境变量读取密钥。在 workflow.py 文件中导入 python-dotenv 并调用 load_dotenv() 自动加载环境变量:
from dotenv import load_dotenv

load_dotenv()
你的脚本现在可以从本地 .env 文件读取变量了。因此,在项目根目录创建 .env 文件:
brand-reputation-monitoring-workflow/
├── .venv/
├── .env         # <-----------
└── workflow.py
打开 .env 文件,添加 OPENAI_API_KEY、BRIGHT_DATA_API_TOKEN 和 SENDGRID_API_KEY 环境变量:
OPENAI_API_KEY="<YOUR_OPENAI_API_KEY>"
BRIGHT_DATA_API_TOKEN="<YOUR_BRIGHT_DATA_API_TOKEN>"
SENDGRID_API_KEY="<YOUR_SENDGRID_API_TOKEN>"
将占位符替换为你的实际凭证:
<YOUR_OPENAI_API_KEY>→ 你的 OpenAI API 密钥。<YOUR_BRIGHT_DATA_API_TOKEN>→ 你的 Bright Data API 令牌。<YOUR_SENDGRID_API_KEY>→ 你的 SendGrid API 密钥。
很好!你已经使用环境变量安全地配置了第三方密钥。
步骤三:初始化各 SDK
先添加所需的导入:
from brightdata import bdclient
from openai import OpenAI
from sendgrid import SendGridAPIClient
然后初始化 SDK 客户端:
brightdata_client = bdclient()
openai_client = OpenAI()
sendgrid_client = SendGridAPIClient()
以上三行分别初始化:
- Bright Data Python SDK
- OpenAI Python SDK
- SendGrid Python SDK
注意,你无需在代码中手动加载 API 密钥并传入构造函数。因为 OpenAI SDK、Bright Data SDK 和 SendGrid SDK 会分别自动在环境中查找 OPENAI_API_KEY、BRIGHT_DATA_API_TOKEN 和 SENDGRID_API_KEY。也就是说,一旦这些环境变量写入 .env,SDK 会自动加载。
具体而言,这些 SDK 会使用已配置的 API 密钥,代表你的账户对它们的服务器进行 API 调用的身份验证。
重要:关于 Bright Data SDK 的工作原理以及如何将其连接到你 Bright Data 账户中的所需 zone,详见 官方 GitHub 页面或文档。
完美!用于构建品牌声誉监测 AI 工作流的基础组件现已就绪。
步骤四:获取 Google 新闻页面 URL
工作流逻辑的第一步是为你要监测的品牌相关搜索查询抓取 SERP。通过 Bright Data SDK 的 search() 方法完成,它在底层调用 SERP API。
然后,解析 search() 返回的 JSON 文本响应,获取 Google 新闻页面的 URL,它们大致如下:
https://www.google.com/search?sca_esv=7fb9df9863b39f3b&hl=en&q=nike&tbm=nws&source=lnms&fbs=AIIjpHxU7SXXniUZfeShr2fp4giZjSkgYzz5-5RrRWAIniWd7tzPwkE1KJWcRvaH01D-XIVr2cowAnfeRRP_dme4bG4a8V_AkFVl-SqROia4syDA2-hwysjgAT-v0BCNgzLBnrhEWcFR7F5dffabwXi9c9pDyztBxQc1yfKVagSlUz7tFb_e8cyIqHDK7O6ZomxoJkHRwfaIn-HHOcZcyM2n-MrnKKBHZg&sa=X&ved=2ahUKEwiX1vu4_KePAxVWm2oFHT6tKsAQ0pQJegQIPhAB使用以下函数完成上述步骤:
def get_google_news_page_urls(search_queries):
    # Retrieve SERPs for the given search queries
    serp_results = brightdata_client.search(
        search_queries,
        search_engine="google",
        parse=True # To get the SERP result as a parsed JSON string
    )

    news_page_urls = []
    for serp_result in serp_results:
        # Loading the JSON string into a dictionary
        serp_data = json.loads(serp_result)
        # Extract the Google News URL from each parsed SERP
        if serp_data.get("navigation"):
            for item in serp_data["navigation"]:
                if item["title"] == "News":
                    news_url = item["href"]
                    news_page_urls.append(news_url)

    return news_page_urls
当你向 search() 传入一个查询数组(本例如此)时,该方法会返回与每个查询一一对应的 SERP 数组。由于 parse 设置为 True,每条结果都会以 JSON 字符串返回,你需要使用 Python 内置的 json 模块进行解析。
别忘了导入 Python 标准库中的 json:
import json很好!你现在可以以编程方式获取与你品牌相关的 Google 新闻页面 URL 列表了。
步骤五:抓取 Google 新闻页面并获取最佳新闻 URL
请记住,单个 Google 新闻页面通常包含多条新闻:
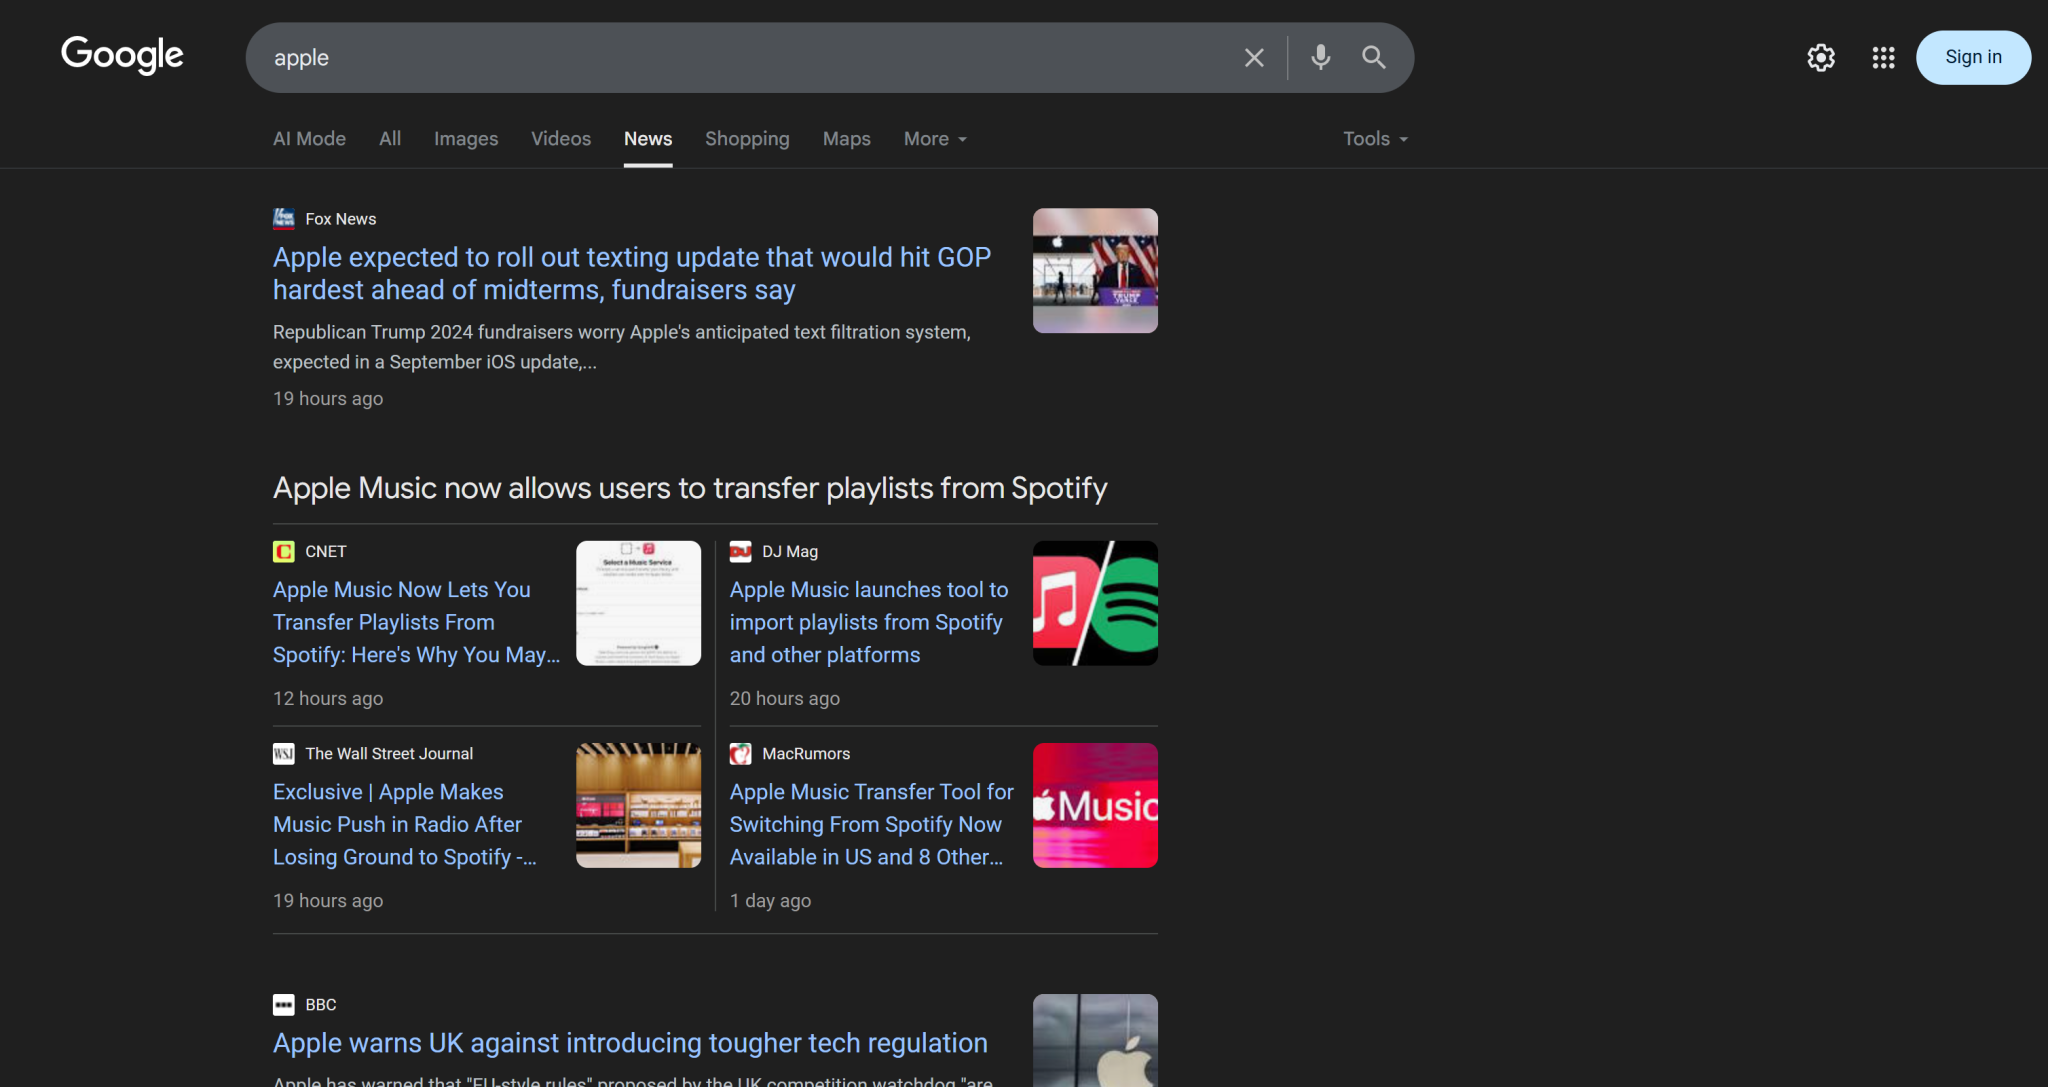
因此思路是:
- 抓取 Google 新闻页面内容,并以 Markdown 格式获取结果。
- 将 Markdown 内容输入 AI(本例为 OpenAI 模型),让其选择 5 条最适合品牌声誉监测的新闻文章。
使用以下函数实现第一步:
def scrape_news_pages(news_page_urls):
    # Scrape each news page in parallel and return its content in Markdown
    return brightdata_client.scrape(
        url=news_page_urls,
        data_format="markdown"
    )
在底层,Bright Data SDK 的 scrape() 方法会调用 Web Unlocker API。当你传入一个 URL 数组时,scrape() 会并行执行抓取任务,同时获取所有页面。此处 API 被配置为以 Markdown 格式返回数据,这非常适合 LLM 摄入(参见我们在 Kaggle 上的数据格式基准测试)。
随后,用以下函数完成第二步:
def get_best_news_urls(news_pages, num_news):
    # Use GPT to extract the most relevant news URLs
    response = openai_client.responses.parse(
        model="gpt-5-mini",
        input=[
            {
                "role": "system",
                "content": f"Extract the {num_news} most relevant news for brand reputation monitoring from the text and return them as a list of URL strings."
            },
            {
                "role": "user",
                "content": "nn---------------nn".join(news_pages)
            },
        ],
        text_format=URLList,
    )

    return response.output_parsed.urls
该函数将前一步的 Markdown 文本拼接后传入 OpenAI 的 GPT-5-mini 模型,让其提取最相关的 URL。
输出将符合 URLList 模型,这是一个 Pydantic 模型:
class URLList(BaseModel):
    urls: List[str]
得益于 parse() 方法中的 text_format 选项,你可以指示 OpenAI API 将结果作为 URLList 实例返回。也就是获得一个字符串列表,其中每个字符串代表一个 URL。
从 pydantic 导入所需类:
from pydantic import BaseModel
from typing import List
太棒了!你现在拥有结构化的新闻 URL 列表,可用于抓取并进行品牌声誉分析。
步骤六:抓取新闻页面并进行品牌声誉分析
拿到最佳新闻 URL 列表后,再次使用 scrape() 以 Markdown 获取其内容:
def scrape_news_articles(news_urls):
    # Scrape each news URL and return a list of dicts with URL and content
    news_content_list = brightdata_client.scrape(
        url=news_urls,
        data_format="markdown"
    )

    news_list = []
    for url, content in zip(news_urls, news_content_list):
        news_list.append({
            "url": url,
            "content": content
        })

return news_list无论新闻文章托管在哪个域名,或使用何种反爬措施,Web Unlocker API 都会处理好,并返回每篇文章的 Markdown 内容。具体而言,这些新闻文章会被并行抓取。为了对应每个 URL 与 Markdown 输出的关系,使用 zip()。
接着,将每条 Markdown 新闻内容输入 OpenAI 进行品牌声誉分析。对每篇文章,提取:
- 标题
- URL
- 不超过 30 个词的简短摘要
- 简洁的情感标签(如“positive”“negative”或“neutral”)
- 3–5 条可执行、简短、易懂的洞察
使用下述函数实现:
def process_news_list(news_list):
    # Where to store the analyzed news articles
    news_analysis_list = []

    # Analyze each news article with GPT for brand reputation monitoring insights
    for news in news_list:
        response = openai_client.responses.parse(
            model="gpt-5-mini",
            input=[
                {
                    "role": "system",
                    "content": f"""
                        Given the news content:
                        1. Extract the title.
                        2. Extract the URL.
                        3. Write a summary in no more than 30 words.
                        4. Extract the sentiment of the news as one of the following: "positive", "negative", or "neutral".
                        5. Extract the top 3 to 5 actionable, short insights (no more than 10/12 words) about brand reputation from the news, presenting them in clear, concise, straightforward language.
                    """
                },
                {
                    "role": "user",
                    "content": f"NEWS URL: {news["url"]}nnNEWS CONTENT:{news["content"]}"
                },
            ],
            text_format=NewsAnalysis,
        )

        # Get the output analyzed news object and append it to the list
        news_analysis = response.output_parsed
        news_analysis_list.append(news_analysis)

return news_analysis_list这一次,text_format 指定的 Pydantic 模型为:
class NewsAnalysis(BaseModel):
    title: str
    url: str
    summary: str
    sentiment_analysis: str
insights: List[str]因此,process_news_list() 函数的结果将是一个 NewsAnalysis 对象列表。
很棒!AI 驱动的品牌声誉新闻处理已完成。
步骤七:生成邮件报告并发送
你是否想过邮件为何在客户端中能够结构化展示、视觉美观?这是因为大多数邮件正文其实就是结构化的 HTML 页面。毕竟,电子邮件协议支持发送 HTML 文档。
基于前面生成的新闻分析对象列表,将其转为 JSON,传给 AI,并让其生成可直接发送的 HTML 文档:
def create_html_email_body(news_analysis_list):
    # Generate a structured HTML email body from analyzed news
    response = openai_client.responses.create(
        model="gpt-5-mini",
        input=f"""
        Given the content below, generate a structured HTML email body that is well-formatted, responsive, and ready to send.
        Ensure proper use of headings, paragraphs, colored labels, and links where appropriate.
        Do not include a header or footer section, and include only this information—nothing else.

        CONTENT:
        {[json.dumps([item.model_dump() for item in news_analysis_list], indent=2)]}
        """
    )
    return response.output_text
最后,使用 Twilio SendGrid SDK 以编程方式发送邮件:
def send_email(sender, recipients, html_body):
    # Send the HTML email using SendGrid
    message = Mail(
        from_email=sender,
        to_emails=recipients,
        subject="Brand Monitoring Weekly Report",
        html_content=html_body
    )
    sendgrid_client.send(message)
需要如下导入:
from sendgrid.helpers.mail import Mail就是这样!实现该品牌声誉监测 AI 工作流的所有函数均已完成。
步骤八:加载你的偏好与配置
前面定义的一些函数需要特定参数(如 search_queries、num_news、sender、recipients)。这些值可能每次运行都会变化,因此不应在 Python 脚本中硬编码。
相反,从包含以下字段的 config.json 文件中读取:
search_queries:用于获取新闻的品牌声誉查询列表。num_news:最终报告中要展示的新闻文章数。sender:用于发送报告的、已在 SendGrid 批准的发件人邮箱地址。recipients:接收 HTML 报告的邮箱地址列表。
使用以下 Pydantic 类建模配置对象:
class Config(BaseModel):
    search_queries: List[str] = Field(..., min_items=1)
    num_news: int = Field(..., gt=0)
    sender: str = Field(..., min_length=1)
    recipients: List[str] = Field(..., min_items=1)
Field 的定义包含验证规则,以确保配置符合预期格式。导入方式如下:
from pydantic import Field接下来,从本地 config.json 文件读取工作流配置,并解析为 Config 对象:
with open("config.json", "r", encoding="utf-8") as f:
    raw_config = json.load(f)
    config = Config.model_validate(raw_config)
将 config.json 文件添加到你的项目目录:
brand-reputation-monitoring-workflow/
├── .venv/
├── .env
├── config.json         # <-----------
└── workflow.py
示例内容如下:
{
  "search_queries": ["apple", "iphone", "ipad"],
  "sender": "[email protected]",
  "recipients": ["[email protected]", "[email protected]", "[email protected]"],
  "num_news": 5
}
根据你的具体目标调整这些值。另外,请记住 sender 字段必须是你在 SendGrid 账户中验证过的邮箱地址。否则,send_email() 函数将报错 403 Forbidden。
干得好!再一步工作流就大功告成了。
步骤九:定义主函数
是时候把所有内容组合起来了。按正确顺序调用各个函数,并传入配置中的相应输入:
search_queries = config.search_queries
print(f"Retrieving Google News page URLs for the following search queries: {", ".join(search_queries)}")
google_news_page_urls = get_google_news_page_urls(search_queries)
print(f"{len(google_news_page_urls)} Google News page URL(s) retrieved!n")

print("Scraping content from each Google News page...")
scraped_news_pages = scrape_news_pages(google_news_page_urls)
print("Google News pages scraped!n")

print("Extracting the most relevant news URLs...")
news_urls = get_best_news_urls(scraped_news_pages, config.num_news)
print(f"{len(news_urls)} news articles found:n" + "n".join(f"- {news}" for news in news_urls) + "n")

print("Scraping the selected news articles...")
news_list = scrape_news_articles(news_urls)
print(f"{len(news_urls)} news articles scraped!")

print("Analyzing each news for brand reputation monitoring...")
news_analysis_list = process_news_list(news_list)
print("News analysis complete!n")

print("Generating HTML email body...")
html = create_html_email_body(news_analysis_list)
print("HTML email body generated!n")

print("Sending the email with the brand reputation monitoring HTML report...")
send_email(config.sender, config.recipients, html)
print("Email sent!")注意:该工作流可能需要一段时间才能完成,因此在终端中添加日志有助于跟踪进度。任务完成!
步骤十:整合所有内容
workflow.py 的最终代码如下:
from dotenv import load_dotenv
from brightdata import bdclient
from openai import OpenAI
from sendgrid import SendGridAPIClient
from pydantic import BaseModel, Field
from typing import List
import json
from sendgrid.helpers.mail import Mail

# Load environment variables from the .env file
load_dotenv()

# Initialize the Bright Data SDK client
brightdata_client = bdclient()
# Initialize the OpenAI SDK client
openai_client = OpenAI()
# Initialize the SendGrid SDK client
sendgrid_client = SendGridAPIClient()

# Pydantic models
class Config(BaseModel):
    search_queries: List[str] = Field(..., min_items=1)
    num_news: int = Field(..., gt=0)
    sender: str = Field(..., min_length=1)
    recipients: List[str] = Field(..., min_items=1)

class URLList(BaseModel):
    urls: List[str]

class NewsAnalysis(BaseModel):
    title: str
    url: str
    summary: str
    sentiment_analysis: str
    insights: List[str]

def get_google_news_page_urls(search_queries):
    # Retrieve SERPs for the given search queries
    serp_results = brightdata_client.search(
        search_queries,
        search_engine="google",
        parse=True # To get the SERP result as a parsed JSON string
    )

    news_page_urls = []
    for serp_result in serp_results:
        # Loading the JSON string into a dictionary
        serp_data = json.loads(serp_result)
        # Extract the Google News URL from each parsed SERP
        if serp_data.get("navigation"):
            for item in serp_data["navigation"]:
                if item["title"] == "News":
                    news_url = item["href"]
                    news_page_urls.append(news_url)

    return news_page_urls

def scrape_news_pages(news_page_urls):
    # Scrape each news page in parallel and return its content in Markdown
    return brightdata_client.scrape(
        url=news_page_urls,
        data_format="markdown"
    )

def get_best_news_urls(news_pages, num_news):
    # Use GPT to extract the most relevant news URLs
    response = openai_client.responses.parse(
        model="gpt-5-mini",
        input=[
            {
                "role": "system",
                "content": f"Extract the {num_news} most relevant news for brand reputation monitoring from the text and return them as a list of URL strings."
            },
            {
                "role": "user",
                "content": "nn---------------nn".join(news_pages)
            },
        ],
        text_format=URLList,
    )

    return response.output_parsed.urls

def scrape_news_articles(news_urls):
    # Scrape each news URL and return a list of dicts with URL and content
    news_content_list = brightdata_client.scrape(
        url=news_urls,
        data_format="markdown"
    )

    news_list = []
    for url, content in zip(news_urls, news_content_list):
        news_list.append({
            "url": url,
            "content": content
        })

    return news_list

def process_news_list(news_list):
    # Where to store the analyzed news articles
    news_analysis_list = []

    # Analyze each news article with GPT for brand reputation monitoring insights
    for news in news_list:
        response = openai_client.responses.parse(
            model="gpt-5-mini",
            input=[
                {
                    "role": "system",
                    "content": f"""
                        Given the news content:
                        1. Extract the title.
                        2. Extract the URL.
                        3. Write a summary in no more than 30 words.
                        4. Extract the sentiment of the news as one of the following: "positive", "negative", or "neutral".
                        5. Extract the top 3 to 5 actionable, short insights (no more than 10/12 words) about brand reputation from the news, presenting them in clear, concise, straightforward language.
                    """
                },
                {
                    "role": "user",
                    "content": f"NEWS URL: {news["url"]}nnNEWS CONTENT:{news["content"]}"
                },
            ],
            text_format=NewsAnalysis,
        )

        # Get the output analyzed news object and append it to the list
        news_analysis = response.output_parsed
        news_analysis_list.append(news_analysis)

    return news_analysis_list

def create_html_email_body(news_analysis_list):
    # Generate a structured HTML email body from analyzed news
    response = openai_client.responses.create(
        model="gpt-5-mini",
        input=f"""
        Given the content below, generate a structured HTML email body that is well-formatted, responsive, and ready to send.
        Ensure proper use of headings, paragraphs, colored labels, and links where appropriate.
        Do not include a header or footer section, and include only this information—nothing else.

        CONTENT:
        {[json.dumps([item.model_dump() for item in news_analysis_list], indent=2)]}
        """
    )
    return response.output_text

def send_email(sender, recipients, html_body):
    # Send the HTML email using SendGrid
    message = Mail(
        from_email=sender,
        to_emails=recipients,
        subject="Brand Monitoring Weekly Report",
        html_content=html_body
    )
    sendgrid_client.send(message)

def main():
    # Read the config file and validate it
    with open("config.json", "r", encoding="utf-8") as f:
        raw_config = json.load(f)
        config = Config.model_validate(raw_config)

    search_queries = config.search_queries
    print(f"Retrieving Google News page URLs for the following search queries: {", ".join(search_queries)}")
    google_news_page_urls = get_google_news_page_urls(search_queries)
    print(f"{len(google_news_page_urls)} Google News page URL(s) retrieved!n")

    print("Scraping content from each Google News page...")
    scraped_news_pages = scrape_news_pages(google_news_page_urls)
    print("Google News pages scraped!n")

    print("Extracting the most relevant news URLs...")
    news_urls = get_best_news_urls(scraped_news_pages, config.num_news)
    print(f"{len(news_urls)} news articles found:n" + "n".join(f"- {news}" for news in news_urls) + "n")

    print("Scraping the selected news articles...")
    news_list = scrape_news_articles(news_urls)
    print(f"{len(news_urls)} news articles scraped!")

    print("Analyzing each news for brand reputation monitoring...")
    news_analysis_list = process_news_list(news_list)
    print("News analysis complete!n")

    print("Generating HTML email body...")
    html = create_html_email_body(news_analysis_list)
    print("HTML email body generated!n")

    print("Sending the email with the brand reputation monitoring HTML report...")
    send_email(config.sender, config.recipients, html)
    print("Email sent!")

# Run the main function
if __name__ == "__main__":
    main()
大功告成!借助 Bright Data SDK、OpenAI API 和 Twilio SendGrid SDK,你已经在不到 200 行代码中构建了一个 AI 驱动的品牌声誉监测工作流。
步骤十一:测试工作流
假设你的 search_queries 为 "nike" 和 "nike shoes"。num_news 设置为 5,并将报告发送到你的个人邮箱(注意,sender 与 recipients 的第一个地址可以相同)。
在已激活的虚拟环境中运行你的工作流:
python workflow.py终端输出可能类似:
Retrieving Google News page URLs for the following search queries: nike, nike shoes
2 Google News page URL(s) retrieved!

Scraping content from each Google News page...
Google News pages scraped!

Extracting the most relevant news URLs...
5 news articles found:
- https://www.espn.com/wnba/story/_/id/46075454/caitlin-clark-becomes-nike-newest-signature-athlete
- https://wwd.com/footwear-news/sneaker-news/nike-acg-radical-airflow-ultrafly-release-dates-1238068936/
- https://www.runnersworld.com/news/a65881486/cooper-lutkenhaus-professional-contract-nike/
- https://hypebeast.com/2025/8/nike-kobe-3-protro-low-reveal-info
- https://wwd.com/footwear-news/sneaker-news/nike-air-diamond-turf-must-be-the-money-release-date-1238075256/

Scraping the selected news articles...
5 news articles scraped!

Analyzing each news article for brand reputation monitoring...
News analysis complete!

Generating HTML email body...
HTML email body generated!

Sending the email with the brand reputation monitoring HTML report...
Email sent!注意:结果会随可用新闻而变化,因此当你阅读本教程时,输出不一定与上方示例一致。
出现 “Email sent!” 消息后,你的收件箱中应能看到一封“品牌监测每周报告”邮件:

打开它,内容类似如下:
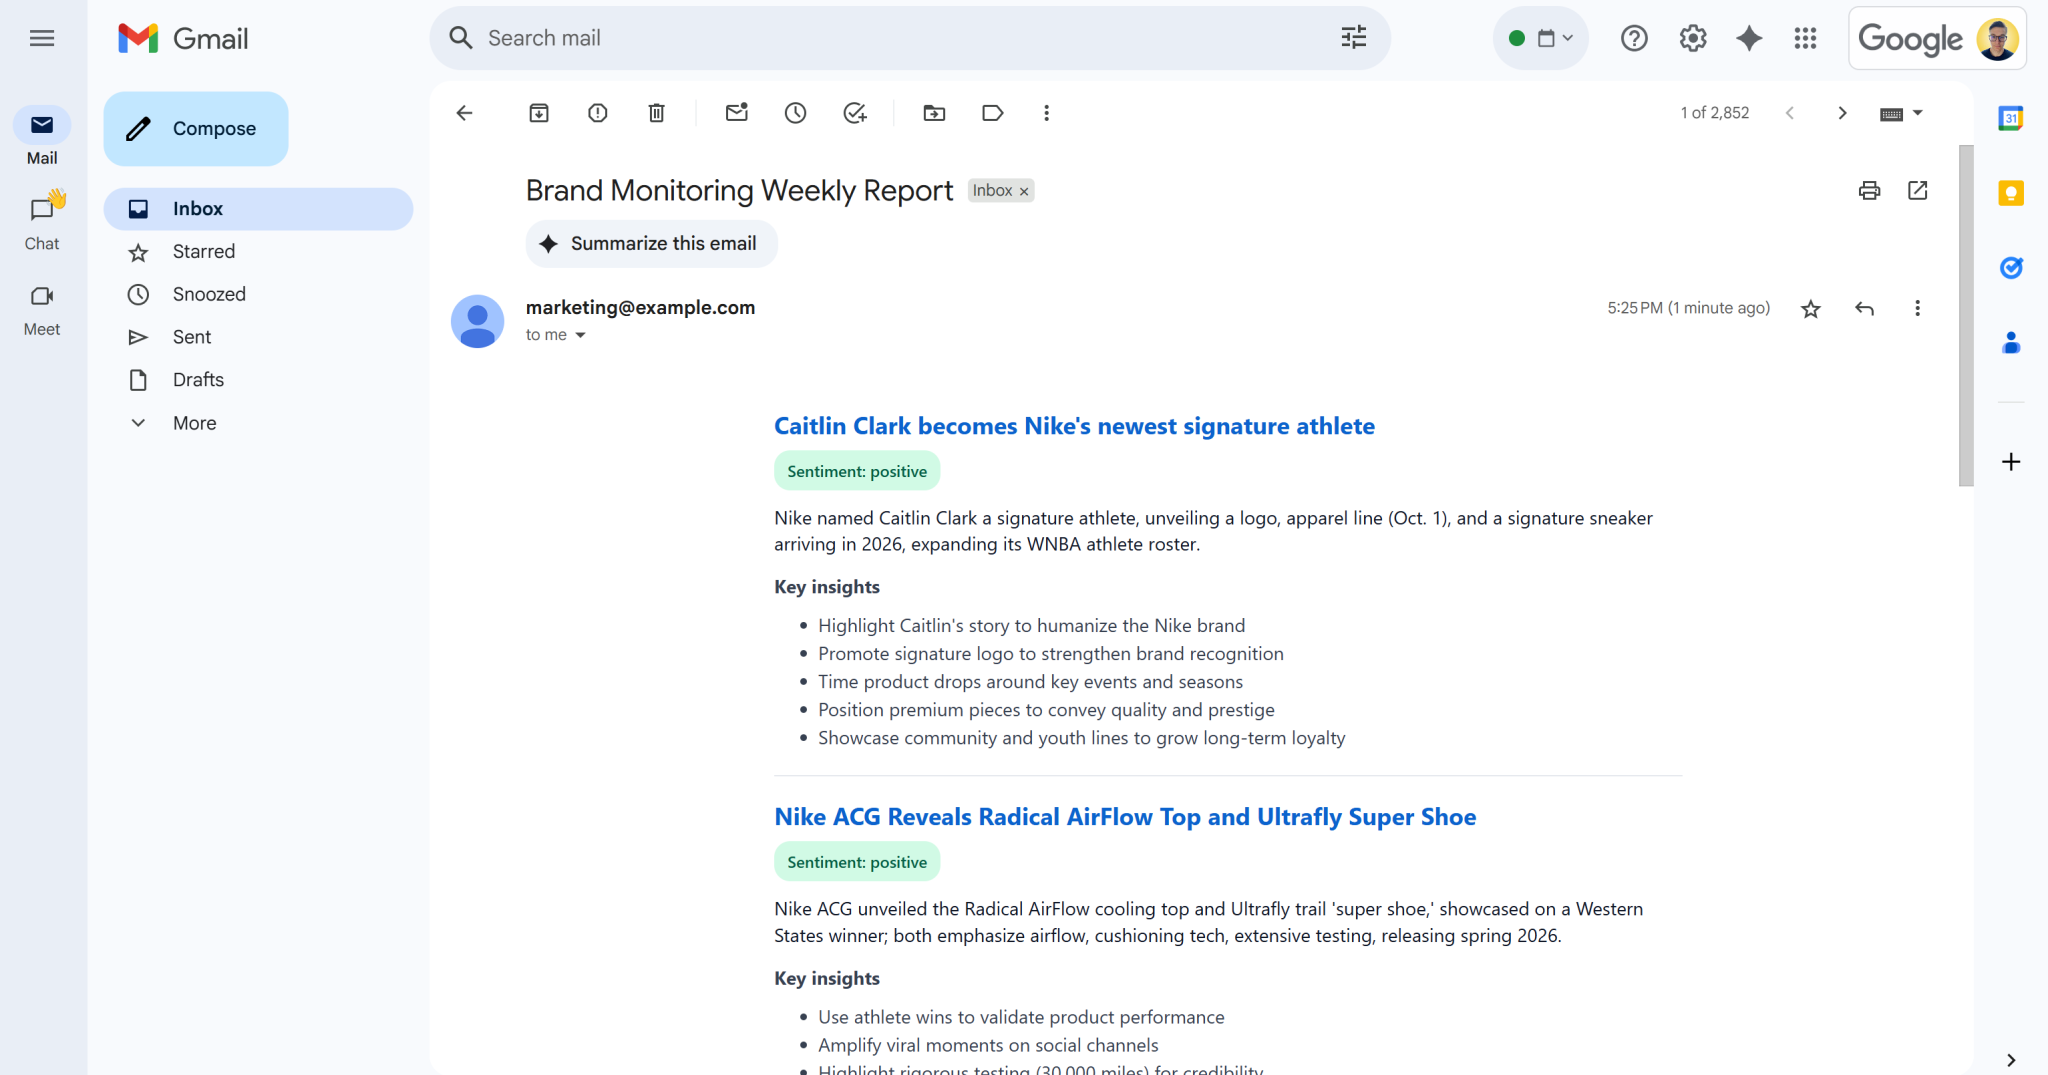
如你所见,AI 能够生成视觉效果良好的品牌监测报告,并包含所有所需数据。
继续向下滚动,你会看到:
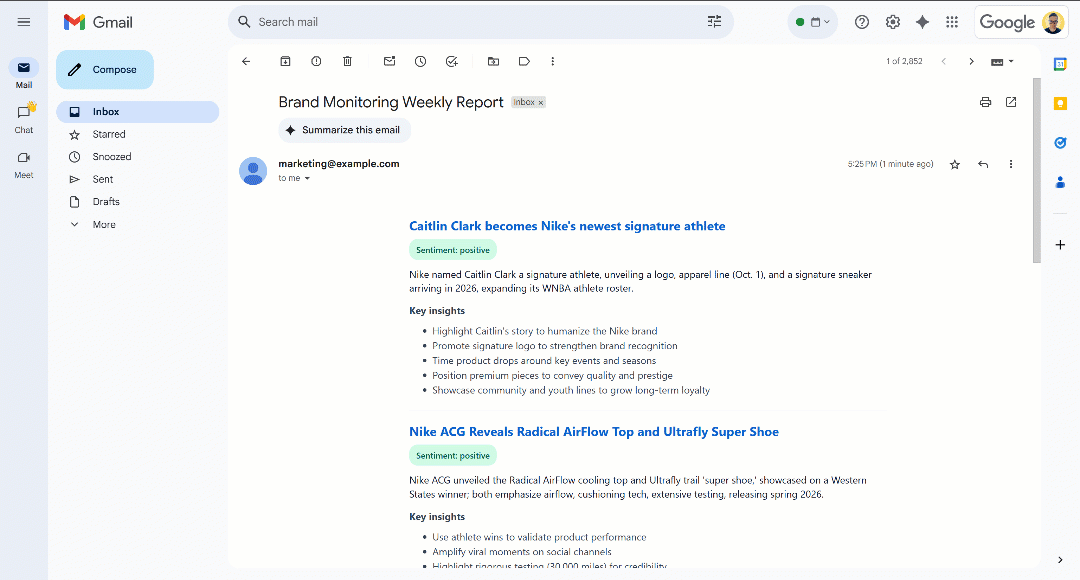
可以注意到,情感标签采用颜色编码,帮助你快速理解情感倾向。同时,新闻标题为蓝色,它们是指向原文的链接。
大功告成!你从几个搜索查询开始,最终收到了包含结构清晰的品牌监测报告的电子邮件。
这一切都归功于 Bright Data SDK 提供的网页数据抓取能力。请记住,抓取页面以 LLM 优化的 Markdown 格式返回,任何 AI 模型都能轻松分析用于你的需求。欢迎探索更多支持的 Agent 与 AI 工作流用例!
下一步
当前的品牌声誉监测 AI 工作流已经相当完善,但你仍可进一步改进:
- 为已覆盖新闻加入记忆层:避免重复分析相同文章,提高报告准确性并减少重复。
- 引入 SendGrid 模板实现标准化:AI 可能每次生成的 HTML 报告结构略有差异。为保持布局一致,可定义 SendGrid 模板,用生成的新闻分析数据填充,并通过 SendGrid SDK 发送。详情请参阅官方文档。
- 将生成的 HTML 报告存储到云端:保存到 S3,确保归档并支持历史品牌监测分析。
结论
本文介绍了如何利用 Bright Data 的网页搜索与抓取能力,构建一个 AI 驱动的品牌声誉工作流。借助全新的 Bright Data SDK,通过简单的方法调用即可访问 Bright Data 的各类产品,让这一过程更为轻松。
本工作流非常适合希望以低成本监测品牌并获取可执行洞察的市场团队。它通过提供上下文相关的指导,帮助节省时间和人力,支撑品牌保护与决策制定。
若要构建更高级的工作流,请探索 Bright Data AI 基础设施中用于获取、验证和转换实时网络数据的全套解决方案。
创建一个免费的 Bright Data 账户,开始体验我们的 AI 就绪型网络数据解决方案吧!


技术写作
 5.5 years experience
Antonello是一名软件工程师,但他更喜欢称自己为技术传教士。通过写作传播知识是他的使命。