简要概述:本教程将展示如何使用 C++ 从网站提取数据,以及为什么它是抓取的高效语言之一。
本指南将涵盖:
- C++ 是抓取网页的好语言吗?
- 最佳 C++ 网页抓取库
- 如何用 C++ 构建网页抓取器
C++ 是抓取网页的好语言吗?
C++ 是一种静态类型的编程语言,广泛用于开发高性能应用程序。这是因为它以速度、效率和内存管理能力闻名。C++ 是一种多功能语言,适用于各种应用程序,包括网页抓取。
C++ 是一种编译型语言,固有地比 Python 等解释型语言更快。这使它成为构建快速抓取器的绝佳选择。然而,C++ 并不是为 Web 开发设计的,可用于网页抓取的库也不多。虽然有一些第三方包,但选择不像 Python、Ruby 或 Java 那么多。
总而言之,使用 C++ 进行网页抓取是可能且高效的,但相比其他语言需要更多的底层编程。让我们看看有哪些工具可以简化这一过程!
最佳 C++ 网页抓取库
以下是一些流行的 C++ 网页抓取库:
- CPR:一个现代的 C++ HTTP 客户端库,灵感来自 Python Requests 项目。它是 libcurl 的包装器,提供易于理解的接口、内置身份验证功能和对异步调用的支持。
- libxml2:一个功能强大且全功能的库,用于解析 XML 和 HTML 文档,最初为 Gnome 开发。它支持通过 XPath 选择器进行 DOM 操作。
- Lexbor:一个快速轻量的 HTML 解析库,完全用 C 语言编写,支持 CSS 选择器。仅适用于 Linux。
多年来,最广泛使用的 C++ HTML 解析器是 Gumbo。自 2016 年以来,该库没有维护过,甚至 官方 README 现在也建议不要使用它。
前提条件
在开始编码之前,你需要:
- 拥有一个 C++ 编译器
- 设置
vcpkgC++ 包管理器 - 安装 CMake
请按照下面的操作系统指南,了解如何满足这些前提条件。
在 macOS 上设置 C++
在 macOS 上,最流行的 C、C++ 和 Objective-C 编译器是 Clang。请注意,许多 Mac 电脑预装了 Clang。要验证这一点,请打开终端并运行以下命令:
clang --version如果收到 command not found: clang 错误,说明 Clang 未安装或配置不正确。在这种情况下,你可以通过 Xcode 命令行工具安装它:
xcode-select --install这可能需要一些时间,请耐心等待。
要设置 vcpkg,你首先需要 macOS 开发者工具。可以通过以下命令将它们添加到你的 Mac:
xcode-select --install然后,你需要全局安装 vcpkg。在终端中创建一个 /dev 文件夹并进入,然后运行:
git clone https://github.com/microsoft/vcpkg现在,该目录将包含源代码。使用以下命令构建包管理器:
./vcpkg/bootstrap-vcpkg.sh运行此命令可能需要提升权限。
最后,按照本指南将 /dev/vcpkg 添加到你的 $PATH 中。
要安装 CMake,请从官网下载安装程序,启动并按照安装向导操作。
在 Windows 上设置 C++
从MinGW-x64 下载并启动安装程序,按照说明进行操作。此包提供了最新的 GCC、Mingw-w64 和其他有用的 C++ 工具和库的本地构建版本。
在安装过程结束时打开的 MSYS2 终端中,运行以下命令以安装 Mingw-w64 工具链:
pacman -S --needed base-devel mingw-w64-x86_64-toolchain等待过程结束,然后按照此处说明将 MinGW 添加到 PATH 环境变量中。
接下来,你需要全局安装 vcpkg。在 PowerShell 中创建一个 C:/dev 文件夹并打开,然后执行:
git clone https://github.com/microsoft/vcpkg使用以下命令构建包管理器的源代码:
./vcpkg/bootstrap-vcpkg.bat现在,将 C:/dev/vcpkg 添加到你的 PATH 中,如之前所述。
只剩下安装 CMake 了。下载安装程序,双击并确保在设置过程中选中以下选项。
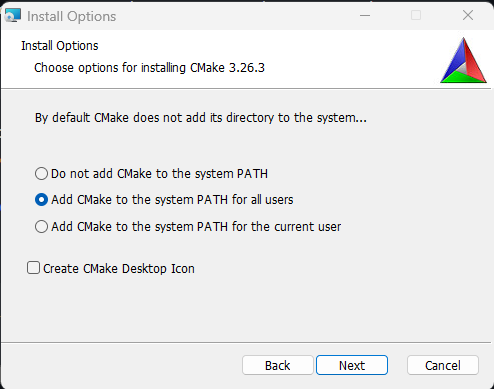
在基于 Debian 的发行版上,安装GCC(GNU 编译器集合)、CMake 和其他开发用的有用包:
sudo apt install build-essential cmake这可能需要一些时间,请耐心等待。
接下来,你需要全局安装 vcpkg。在终端中创建一个 /dev 目录并进入,然后输入:
git clone https://github.com/microsoft/vcpkg现在 vcpkg 子目录将包含包管理器的源代码。使用以下命令构建工具:
./vcpkg/bootstrap-vcpkg.sh请注意,此命令可能需要管理员权限。
然后,按照本指南将 /dev/vcpkg 添加到你的 $PATH 环境变量中。
完美!你现在已经准备好开始使用 C++ 进行网页抓取了!
如何用 C++ 构建网页抓取器
在本章中,你将学习如何编写一个 C++ 网页爬虫。目标站点将是 Bright Data 主页,脚本将负责:
- 连接到网页
- 从 DOM 中选择感兴趣的 HTML 元素
- 从中获取数据
- 将抓取的数据导出到 CSV
目前,访问者在浏览目标页面时看到的是:
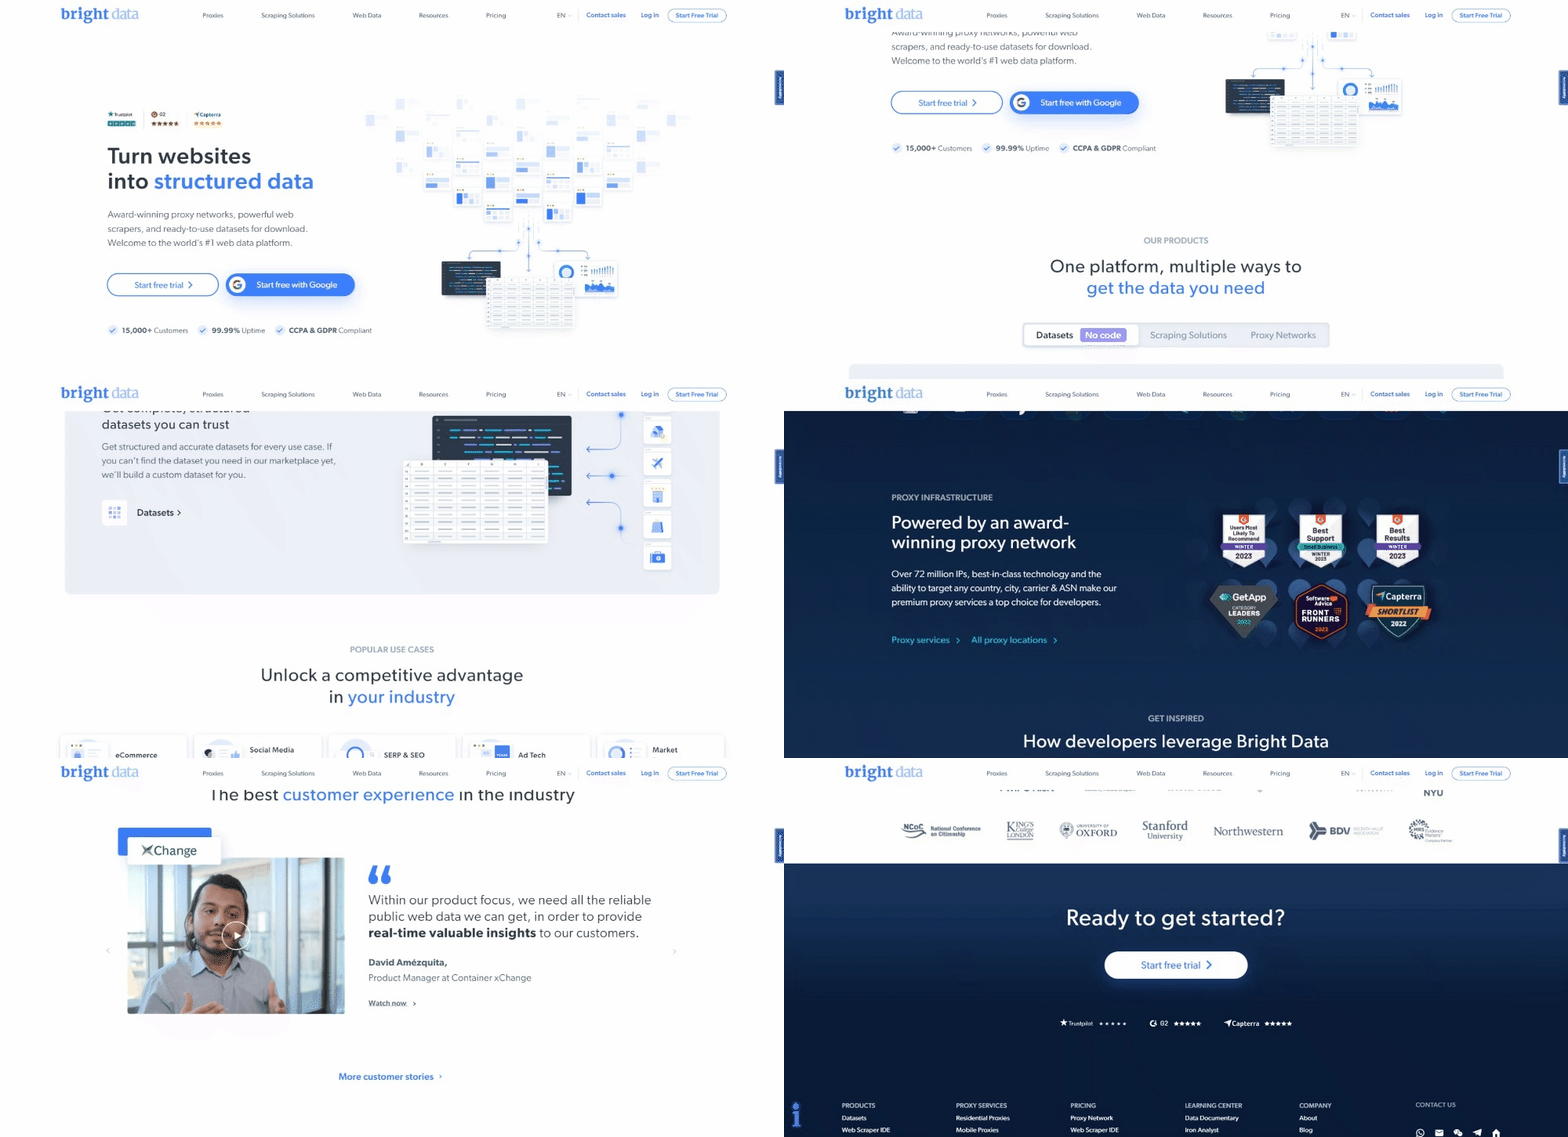
请记住,Bright Data 主页经常变动。因此,当你阅读本文时,可能已经发生了变化。
从页面中提取的一些有趣数据是这些卡片中的行业信息:
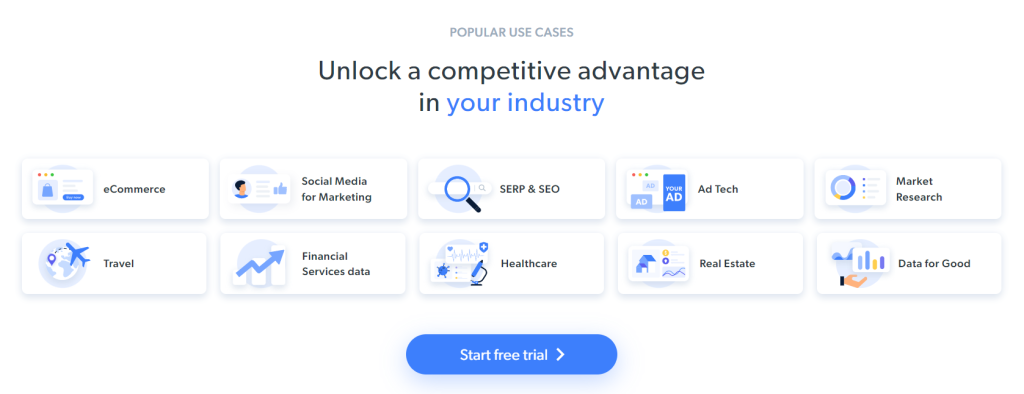
本分步教程的抓取目标已经定义。让我们看看如何用 C++ 进行网页抓取!
步骤 1:初始化一个 C++ 抓取项目
首先,你需要一个文件夹来放置你的 C++ 项目。在终端中创建项目目录:
mkdir c++-web-scraper这将包含你的抓取脚本。
在构建 C++ 软件时,你应该选择一个 Visual Studio IDE。具体来说,你将看到如何设置 Visual Studio Code(VS Code)以进行 C++ 开发,并使用 vcpkg 作为包管理器。请注意,类似的过程也适用于其他 C++ IDE。
VS Code 没有内置的 C++ 支持,因此你需要先添加 C/C++ 插件。启动 Visual Studio Code,点击左侧栏的“扩展”图标,在顶部搜索字段中输入“C++”。
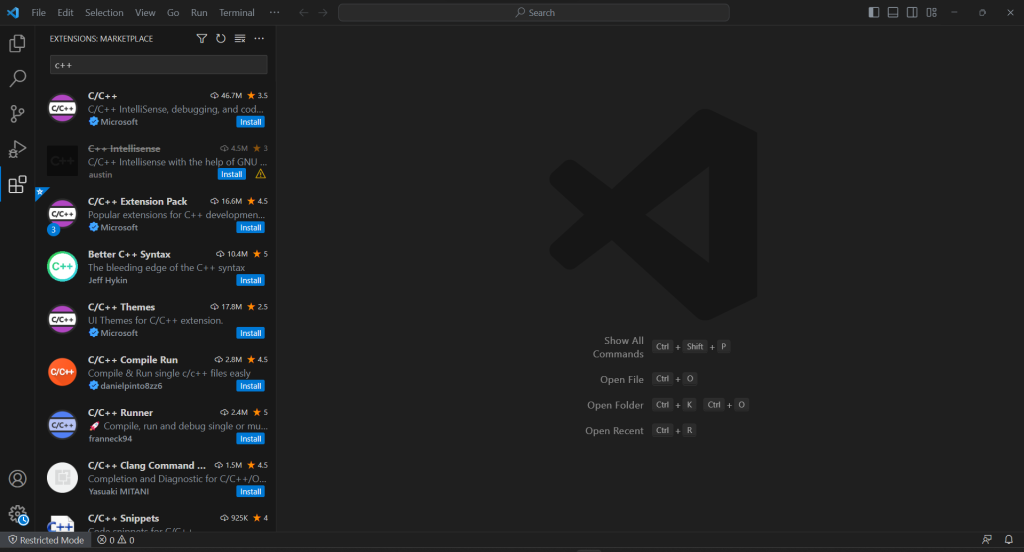
点击第一个元素上的“安装”按钮,向 VS Code 添加 C++ 开发功能。等待扩展设置完成,然后使用 “文件" > "打开文件夹..." 打开 c++-web-scraper 文件夹。
在“资源管理器”部分中右键单击,选择“新建文件…”并初始化一个 scraper.cpp 文件,如下所示:
#include <iostream>

int main()
{
    std::cout << "Hello World" << std::endl;
}
步骤 2:安装抓取库
C++ 繁琐的语法和有限的 Web 功能在构建网页抓取器时可能会成为障碍。为了简化这一过程,你应该采用一些 C++ 的网页抓取库。如前所述,选择范围非常有限。因此,你应该选择最流行的:cpr 和 libxml2。
你可以通过 vcpkg 在 Windows 上安装它们:
vcpkg install cpr libxml2 --triplet=x64-windows在 macOS 上,将 三元组选项替换为 x64-osx。在 Linux 上,使用 x64-linux。
在 Visual Studio Code 终端中,还需要在项目根目录下运行以下命令:
vcpkg integrate install这将使 vcpkg 包与项目链接。
重新启动 VS Code,现在你可以使用 #include 导入任何已安装的库。所以,在 scraper.cpp 文件的顶部添加以下三行代码:
#include "cpr/cpr.h"
#include "libxml/HTMLparser.h"
#include "libxml/xpath.h"
确保 IDE 不报告任何错误。
步骤 3:完成 C++ 项目初始化
要构建 C++ 抓取脚本并完成项目初始化过程,你必须向 VS Code 添加 CMake 工具扩展:
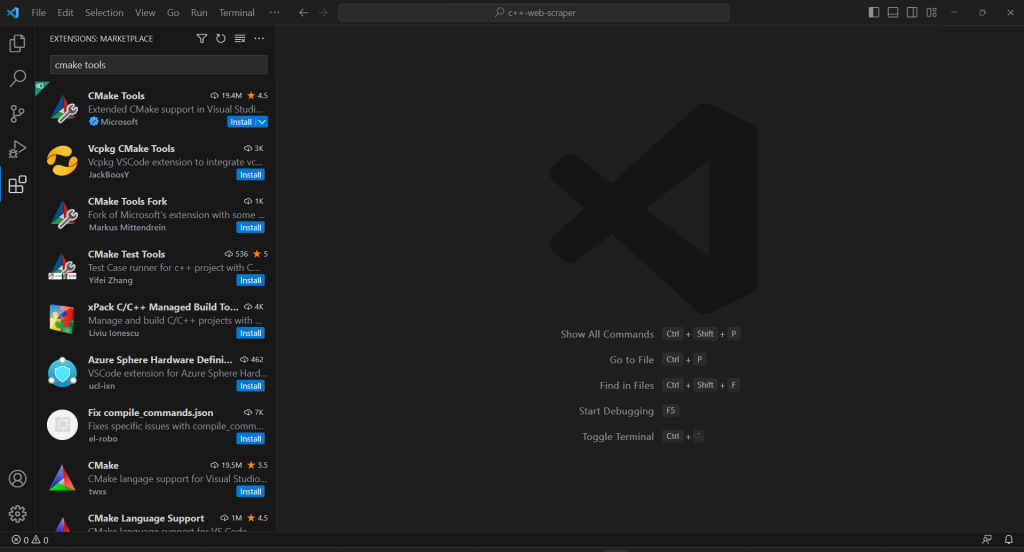
如果你的项目没有 .vscode 文件夹,请创建它。VS Code 将在其中查找与当前项目相关的配置。
通过在 .vscode 文件夹中创建一个 settings.json 文件来配置 CMake Tools 以使用 vcpkg 作为工具链:
{
 "cmake.configureSettings": {
 "CMAKE_TOOLCHAIN_FILE": "c:/dev/vcpkg/scripts/buildsystems/vcpkg.cmake"
 }}
在 macOS 和 Linux 上,根据你安装 vcpkg 的路径,修正 CMAKE_TOOLCHAIN_FILE 字段。如果你按照上述设置指南操作,它应该是 /dev/vcpkg/scripts/buildsystems/vcpkg.cmake。
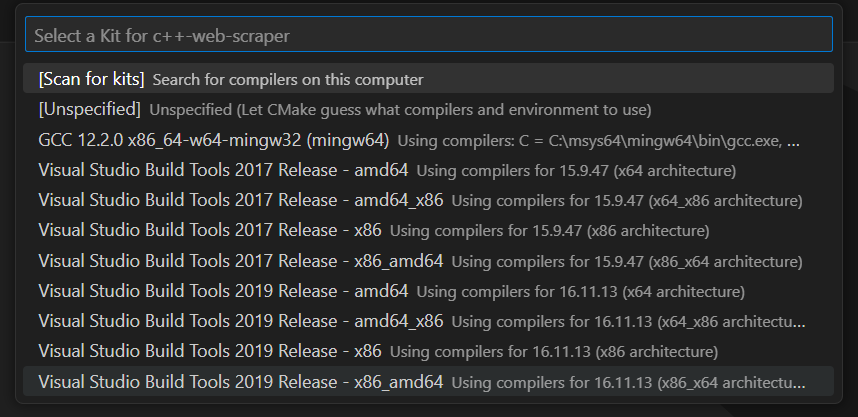
在 VS Code 的主搜索栏中,输入“>cmake”并选择“CMake: Configure”选项:

这将允许你选择目标编译平台。在 Windows 上,选择“Visual Studio Build Tools 2019 Release – x86_amd64”:
在项目的根文件夹中添加 CMakeLists.txt 文件以设置 CMake:
cmake_minimum_required(VERSION 3.0.0)
project(main VERSION 0.1.0)

INCLUDE_DIRECTORIES(
  C:/dev/vcpkg/installed/x86-windows/include
)

LINK_DIRECTORIES(
   C:/dev/vcpkg/installed/x86-windows/lib
)

add_executable(main scraper.cpp)
target_compile_features(main PRIVATE cxx_std_20)

find_package(cpr CONFIG REQUIRED)
target_link_libraries(main PRIVATE cpr::cpr)

find_package(LibXml2 REQUIRED)
target_link_libraries(main PRIVATE LibXml2::LibXml2)
请注意,它涉及前面安装的两个包。确保根据你的 vcpkg 安装文件夹更新 INCLUDE_DIRECTORIES 和 LINK_DIRECTORIES。
为了允许 Visual Studio Code 运行 C++ 程序,你需要一个启动配置文件。在 .vscode 文件夹中,初始化 launch.json 文件如下:
{
  "configurations": [
    {
      "name": "C++ Launch (Windows)",
      "type": "cppvsdbg",
      "request": "launch",
      "program": "${workspaceFolder}/build/Debug/main.exe",
      "args": [],
      "stopAtEntry": false,
      "cwd": "${workspaceFolder}",
      "environment": []
    }
  ]
}
启动运行或调试命令时,VS Code 现在将运行由 CMake 生成的程序路径中的文件。请注意,在 macOS 和 Linux 上,它不会是 .exe 文件。
配置已完成!
每次你想调试或构建应用程序时,在顶部输入字段中键入“>cmake: Build”,选择“CMake: Build”选项。

等待构建过程结束,然后从“运行和调试”部分或按 F5 运行已编译的程序。你将在 VSC 调试控制台中看到应用程序的结果。

太棒了!现在是时候开始用 C++ 抓取一些数据了!
步骤 4:使用 CPR 下载目标页面
如果你想从页面提取数据,首先需要通过 HTTP GET 请求检索其 HTML 文档。
使用 CPR 下载目标页面:
cpr::Response response = cpr::Get(cpr::Url{"https://brightdata.com/"});在幕后,Get() 方法对传入的 URL 执行 GET 请求。response.text 将包含服务器返回的 HTML 代码的字符串表示。
请注意,执行自动化 HTTP 请求可能会触发反机器人技术。这些技术可能会拦截你的请求,阻止你的脚本访问目标站点。具体来说,最基本的反抓取解决方案会阻止没有有效 User-Agent HTTP 头的请求。了解更多关于用户代理的网页抓取指南。
与其他任何 HTTP 客户端一样,CPR 使用占位符值作为 User-Agent。由于这与流行浏览器使用的代理非常不同,反机器人系统可以很容易地发现你。为了避免因此被阻止,你可以在 CPR 中设置一个有效的 User-Agent:
cpr::Header headers = {{"User-Agent", "Mozilla/5.0 (Windows NT 10.0; Win64; x64) AppleWebKit/537.36 (KHTML like Gecko) Chrome/113.0.0.0 Safari/537.36"}};
cpr::Response response = cpr::Get(cpr::Url{"https://brightdata.com/121.21.21.da/31/3das/32/1"}, headers);
通过该 Get() 方法进行的 HTTP 请求现在将显示为来自 Google Chrome 113。
目前 scraper.cpp 包含如下内容:
#include <iostream>
#include "cpr/cpr.h"
#include "libxml/HTMLparser.h"
#include "libxml/xpath.h"

int main()
{
    // define the user agent for the GET request
    cpr::Header headers = {{"User-Agent", "Mozilla/5.0 (Windows NT 10.0; Win64; x64) AppleWebKit/537.36 (KHTML, like Gecko) Chrome/113.0.0.0 Safari/537.36"}};
    // make the HTTP request to retrieve the target page
    cpr::Response response = cpr::Get(cpr::Url{"https://brightdata.com/"}, headers);

    // scraping logic...
}
步骤 5:使用 libxml2 解析 HTML 内容
为了使服务器返回的 HTML 文档易于浏览,你应该先解析它。将其 C 字符串表示传递给 libxml2 的 htmlReadMemory() 函数:
htmlDocPtr doc = htmlReadMemory(response.text.c_str(), response.text.length(), nullptr, nullptr, HTML_PARSE_NOWARNING | HTML_PARSE_NOERROR);变量 doc 现在暴露了 libxml2 提供的 DOM 探索 API。具体来说,你可以通过 XPath 选择器获取页面上的 HTML 元素。目前,libxml2 不支持 CSS 选择器。
步骤 6:定义 XPath 选择器以获取所需的 HTML 元素
要为感兴趣的 HTML 节点定义有效的 XPath 选择策略,你需要分析目标页面的 DOM。打开 Bright Data 主页,在一个行业卡片上右键单击,选择“检查”。这将打开开发者工具部分:
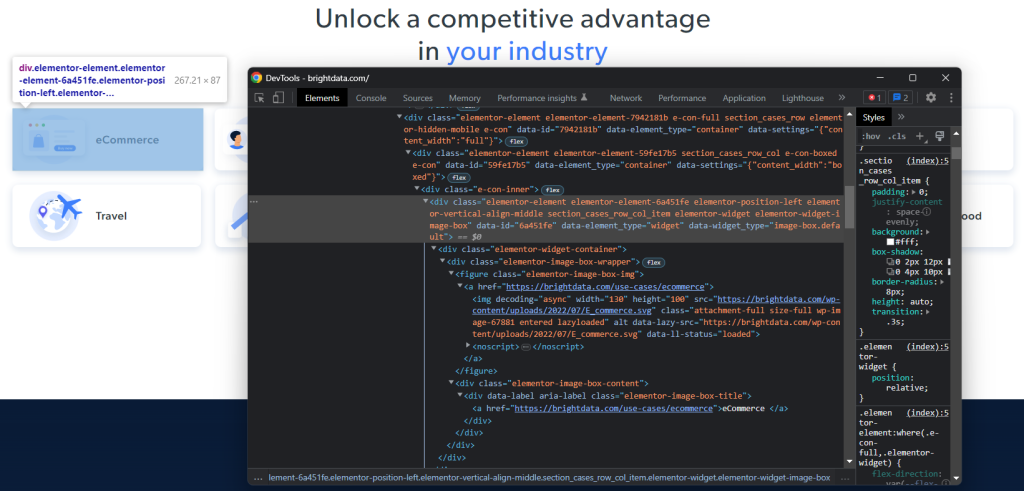
探索 HTML 代码,你会发现每个行业卡片都是一个 <div> 元素,其中包含:
- 一个包含行业图片的
<img>和包含行业页面 URL 的<a>的<figure>元素。 - 一个存储行业名称的
<a>的<div>HTML 元素。
对于每张卡片,C++ 抓取器的目标是提取:
- 行业图片 URL
- 行业页面 URL
- 行业名称
为了定义适当的 XPath 选择器,请将注意力转向感兴趣元素的 DOM 结构。你会注意到你可以使用以下 XPath 选择器获取所有行业卡片:
//div[contains(@class, 'section_cases_row_col_item')]如果有任何疑问,请在浏览器控制台中使用 $x() 测试 XPath 指令:
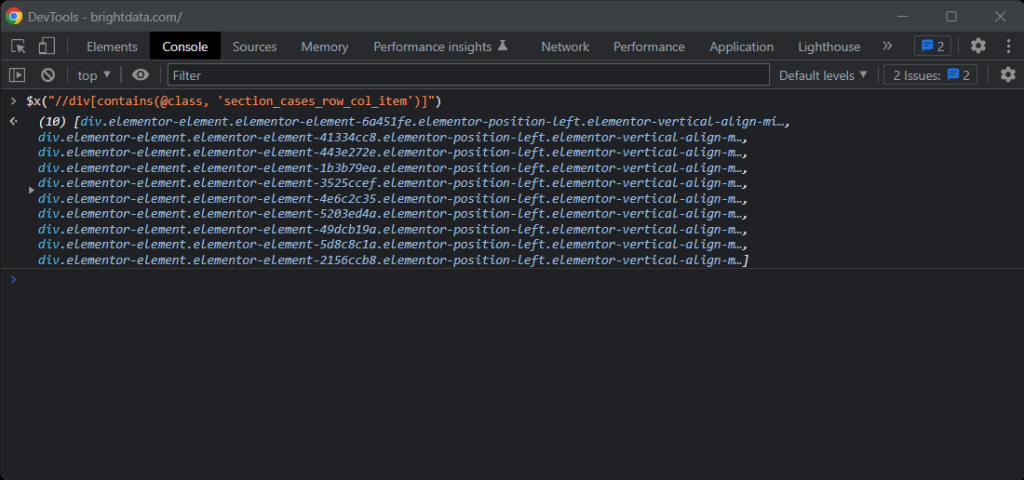
给定一个卡片,你可以使用以下代码获取所需节点:
.//figure/a/img.//figure/a.//div[contains(@class, 'elementor-image-box-title')]/a
步骤 7:使用 libxml2 从网页抓取数据
现在你可以使用 libxml2 应用之前定义的 XPath 选择器,从目标 HTML 网页中获取所需数据。
首先,你需要一个数据结构来存储抓取的数据实例:
struct IndustryCard
{
    std::string image;
    std::string url;
    std::string name;
};
在 C++ 中,struct 允许你在内存块中将多个数据属性捆绑在同一名称下。
然后,在 main() 函数中初始化一个 IndustryCard 数组:
std::vector<IndustryCard> industry_cards;这将存储所有抓取的数据对象。
使用以下 C++ 网页抓取逻辑填充此 vector:
// define an array to store all retrieved data
std::vector<IndustryCard> industry_cards;
// set the libxml2 context to the current document
xmlXPathContextPtr context = xmlXPathNewContext(doc);

// select all industry card HTML elements
// with an XPath selector
xmlXPathObjectPtr industry_card_html_elements = xmlXPathEvalExpression((xmlChar *)"//div[contains(@class, 'section_cases_row_col_item')]", context);

// iterate over the list of industry card elements
for (int i = 0; i < industry_card_html_elements->nodesetval->nodeNr; ++i)
{
    // get the current element of the loop
    xmlNodePtr industry_card_html_element = industry_card_html_elements->nodesetval->nodeTab[i];

    // set the libxml2 context to the current element
    // to limit the XPath selectors to its children
    xmlXPathSetContextNode(industry_card_html_element, context);

    xmlNodePtr image_html_element = xmlXPathEvalExpression((xmlChar *)".//figure/a/img", context)->nodesetval->nodeTab[0];
    std::string image = std::string(reinterpret_cast<char *>(xmlGetProp(image_html_element, (xmlChar *)"data-lazy-src")));

    xmlNodePtr url_html_element = xmlXPathEvalExpression((xmlChar *)".//figure/a", context)->nodesetval->nodeTab[0];
    std::string url = std::string(reinterpret_cast<char *>(xmlGetProp(url_html_element, (xmlChar *)"href")));

    xmlNodePtr name_html_element = xmlXPathEvalExpression((xmlChar *)".//div[contains(@class, 'elementor-image-box-title')]/a", context)->nodesetval->nodeTab[0];
    std::string name = std::string(reinterpret_cast<char *>(xmlNodeGetContent(name_html_element)));

    // instantiate an IndustryCard struct with the collected data
    IndustryCard industry_card = {image, url, name};
    // add the object with the scraped data to the vector
    industry_cards.push_back(industry_card);
}

// free up the resource allocated by libxml2
xmlXPathFreeObject(industry_card_html_elements);
xmlXPathFreeContext(context);
xmlFreeDoc(doc);
上述代码片段通过应用先前定义的 XPath 选择器选择行业卡片元素。然后,遍历它们并实现类似的方法从每个卡片中获取所需的子元素。接着,从中抓取行业图片 URL、页面 URL 和名称。最后,释放 libxml2 分配的资源。
正如你所见,使用 libxml2 进行 C++ 网页抓取并不复杂。通过 xmlGetProp() 和 xmlNodeGetContent(),你可以分别获取 HTML 属性的值和节点的内容。
现在你已经了解了 C++ 数据抓取的工作原理,你有工具可以更进一步,抓取行业页面。你只需跟随发现的链接并设计新的抓取逻辑。这就是网页抓取和网页抓取的全部内容!
太棒了!你已经实现了你的目标。但教程还没结束。
步骤 8:将抓取的数据导出到 CSV
在 for() 循环结束时,industry_cards 将以 struct 实例的形式存储抓取的数据。如你所想,这不是向其他团队提供数据的最佳格式。这就是为什么你应该将获取的数据转换为 CSV。
你可以使用内置的 C++ 函数将 vector 导出到 CSV 文件:
// initialize the CSV output file
std::ofstream csv_file("output.csv");
// write the CSV header
csv_file << "url,image,name" << std::endl;
// poupulate the CSV output file
for (IndustryCard industry_card : industry_cards)
{
    // transfrom each industry card record to a CSV record
    csv_file << industry_card.url << "," << industry_card.image << "," << industry_card.name << std::endl;
}
// free up the file resources
csv_file.close();
上述代码创建了一个 output.csv 文件,并使用标题记录初始化它。然后,它遍历 industry_cards 数组,将每个元素转换为 CSV 格式的字符串,并将其附加到输出文件中。
构建你的 C++ 抓取脚本,运行它,你将在项目根目录中看到以下 output.csv 文件:

干得好!现在你知道如何将抓取的数据导出到 CSV 格式了!
步骤 9:整合所有内容
以下是完整的 C++ 抓取器:
// scraper.cpp

#include <iostream>
#include "cpr/cpr.h"
#include "libxml/HTMLparser.h"
#include "libxml/xpath.h"
#include <vector>

// define a struct where to store the scraped data
struct IndustryCard
{
    std::string image;
    std::string url;
    std::string name;
};

int main()
{
    // define the user agent for the GET request
    cpr::Header headers = {{"User-Agent", "Mozilla/5.0 (Windows NT 10.0; Win64; x64) AppleWebKit/537.36 (KHTML, like Gecko) Chrome/113.0.0.0 Safari/537.36"}};
    // make an HTTP GET request to retrieve the target page
    cpr::Response response = cpr::Get(cpr::Url{"https://brightdata.com/"}, headers);

    // parse the HTML document returned by the server
    htmlDocPtr doc = htmlReadMemory(response.text.c_str(), response.text.length(), nullptr, nullptr, HTML_PARSE_NOWARNING | HTML_PARSE_NOERROR);

    // define an array to store all retrieved data
    std::vector<IndustryCard> industry_cards;
    // set the libxml2 context to the current document
    xmlXPathContextPtr context = xmlXPathNewContext(doc);
    // select all industry card HTML elements
    // with an XPath selector
    xmlXPathObjectPtr industry_card_html_elements = xmlXPathEvalExpression((xmlChar *)"//div[contains(@class, 'section_cases_row_col_item')]", context);

    // iterate over the list of industry card elements
    for (int i = 0; i < industry_card_html_elements->nodesetval->nodeNr; ++i)
    {
        // get the current element of the loop
        xmlNodePtr industry_card_html_element = industry_card_html_elements->nodesetval->nodeTab[i];
        // set the libxml2 context to the current element
        // to limit the XPath selectors to its children
        xmlXPathSetContextNode(industry_card_html_element, context);

        xmlNodePtr image_html_element = xmlXPathEvalExpression((xmlChar *)".//figure/a/img", context)->nodesetval->nodeTab[0];
        std::string image = std::string(reinterpret_cast<char *>(xmlGetProp(image_html_element, (xmlChar *)"data-lazy-src")));

        xmlNodePtr url_html_element = xmlXPathEvalExpression((xmlChar *)".//figure/a", context)->nodesetval->nodeTab[0];
        std::string url = std::string(reinterpret_cast<char *>(xmlGetProp(url_html_element, (xmlChar *)"href")));

        xmlNodePtr name_html_element = xmlXPathEvalExpression((xmlChar *)".//div[contains(@class, 'elementor-image-box-title')]/a", context)->nodesetval->nodeTab[0];
        std::string name = std::string(reinterpret_cast<char *>(xmlNodeGetContent(name_html_element)));

        // instantiate an IndustryCard struct with the collected data
        IndustryCard industry_card = {image, url, name};
        // add the object with the scraped data to the vector
        industry_cards.push_back(industry_card);
    }

    // free up the resource allocated by libxml2
    xmlXPathFreeObject(industry_card_html_elements);
    xmlXPathFreeContext(context);
    xmlFreeDoc(doc);

    // initialize the CSV output file
    std::ofstream csv_file("output.csv");
    // write the CSV header
    csv_file << "url,image,name" << std::endl;

    // poupulate the CSV output file
    for (IndustryCard industry_card : industry_cards)
    {
        // transfrom each industry card record to a CSV record
        csv_file << industry_card.url << "," << industry_card.image << "," << industry_card.name << std::endl;
    }

    // free up the file resources
    csv_file.close();

    return 0;
}
瞧!在大约 80 行代码中,你可以用 C++ 创建一个数据抓取脚本!
结论
在本教程中,我们了解了为什么 C++ 是抓取 Web 的高效语言。虽然没有其他语言那么多的抓取库,但确实有一些。在这里,你有机会看到哪些是最流行的。接下来,你看到了如何使用 CPR 和 libxml2 构建一个 C++ 蜘蛛,可以从真实的目标中收集数据。
然而,网页抓取带来了许多挑战。实际上,越来越多的网站已经实施了反机器人和反抓取技术来保护他们的数据。这些工具能够检测到你的 C++ 抓取脚本执行的自动化请求并禁止它们。幸运的是,有许多自动化解决方案可以满足你的数据收集需求。联系我们,了解哪种解决方案最适合你的用例。
不想处理网页抓取,但对网络数据感兴趣? 探索我们现成的数据集。

