在本教程中,你将学习:
- 为什么网页爬虫通常使用 Python 完成,以及为什么这种编程语言非常适合这项任务。
- 在 Python 中爬虫静态网站和动态网站的区别。
- 如何设置一个 Python 网页爬虫工具项目。
- 在 Python 中爬虫静态网站需要什么。
- 如何使用各种 Python HTTP 客户端下载网页的 HTML。
- 如何使用流行的 Python HTML 解析器解析 HTML。
- 在 Python 中爬虫动态网站需要什么。
- 如何使用不同工具在 Python 中实现用于网页爬虫的数据提取逻辑。
- 如何将爬虫的数据导出为 CSV 和 JSON。
- 使用 Requests + Beautiful Soup、Playwright 和 Selenium 的完整 Python 网页爬虫示例。
- 关于从分页网站爬虫所有数据的分步部分。
- Scrapy 提供的独特网页爬虫方法。
- 如何在 Python 中处理常见的网页爬虫挑战。
让我们开始吧!
什么是 Python 中的网页爬虫?
网页爬虫是从网站提取数据的过程,通常使用自动化工具。在 Python 领域中,执行网页爬虫意味着编写一个 Python 脚本,该脚本会自动从一个或多个网站上的一个或多个网页检索数据。
Python 是最受欢迎的网页爬虫编程语言之一。这是因为它的广泛采用和强大的生态系统。具体来说,它提供了一长串强大的爬虫库。
如果你有兴趣探索 Python 中几乎所有的网页爬虫工具,请查看我们专门的 Python 网页爬虫 GitHub 仓库。
现在,Python 中的网页爬虫过程可以概括为以下四个步骤:
- 连接到目标页面。
- 解析其 HTML 内容。
- 实现数据提取逻辑,以定位感兴趣的 HTML 元素并从中提取所需数据。
- 将爬虫的数据导出为更易访问的格式,例如 CSV 或 JSON。
你在上述步骤中需要使用的具体技术,以及要应用的技巧,取决于网页是静态的还是动态的。所以,接下来让我们探索这一点。
Python 网页爬虫:静态网站 vs 动态网站
在网页爬虫中,决定你应如何构建爬虫机器人的最大因素是目标网站是静态还是动态。
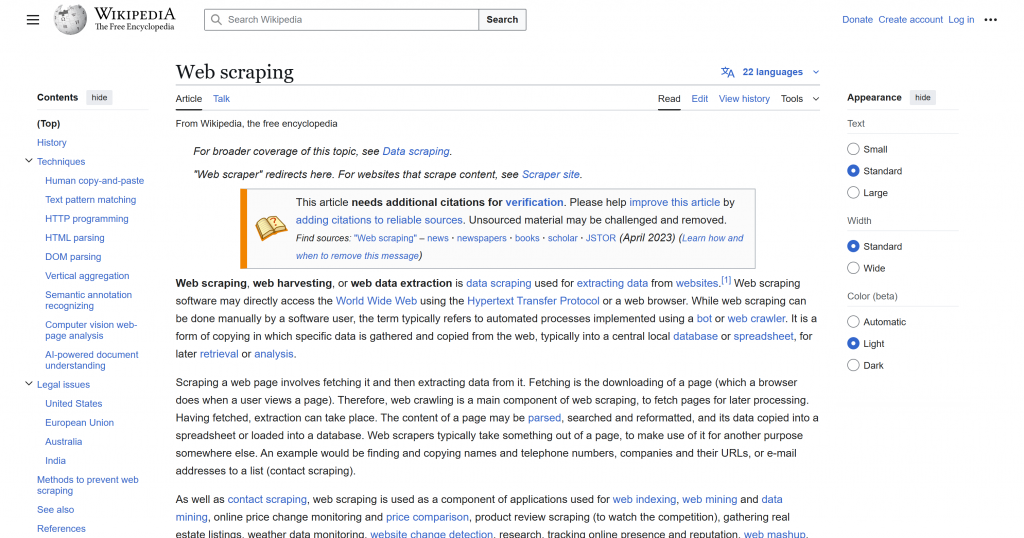
对于静态网站,服务器返回的 HTML 文档已经包含你想要的全部(或大部分)数据。这些页面可能仍会使用 JavaScript 进行一些轻微的客户端交互。尽管如此,你从服务器收到的内容本质上就是你在浏览器中看到的完整页面。
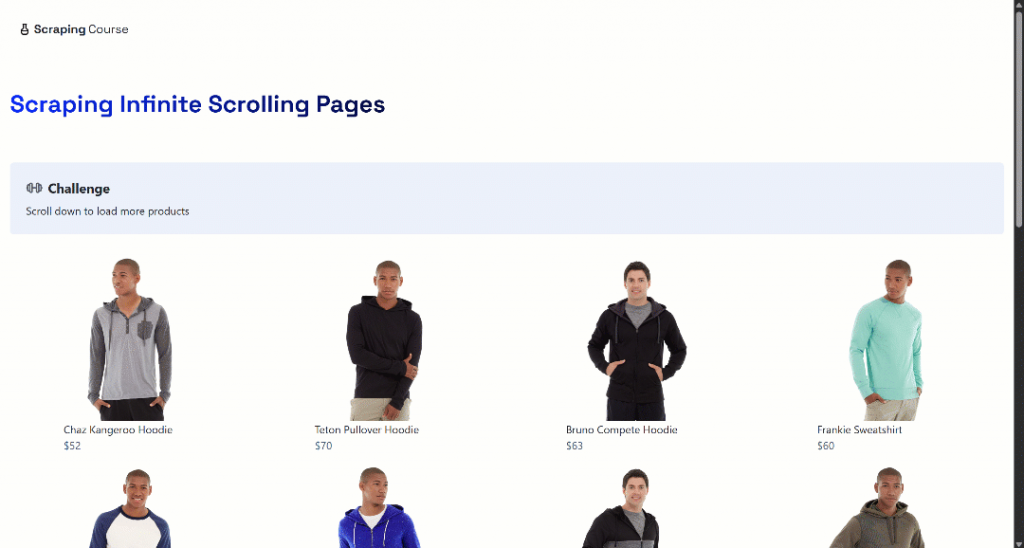
相比之下,动态网站高度依赖 JavaScript 在浏览器中加载和/或渲染数据。服务器返回的初始 HTML 文档通常包含很少的实际数据。相反,数据由 JavaScript 在首次页面加载时或用户交互后(例如无限滚动或动态分页)获取并渲染。
更多详情,请参阅我们关于用于网页爬虫的静态内容 vs 动态内容的指南。
正如你可以想象的,这两种场景非常不同,需要不同的 Python 爬虫技术栈。在本教程接下来的章节中,你将学习如何在 Python 中爬虫静态和动态网站。最后,你还会找到完整的真实世界示例。
网页爬虫 Python 项目设置
无论你的目标网站有静态页面还是动态页面,你都需要设置一个 Python 项目来爬虫它。所以,看看如何为使用 Python 进行网页抓取准备你的环境。
先决条件
要构建一个 Python 网页爬虫工具,你需要以下先决条件:
- 本地安装 Python 3+
- 本地安装
pip
注意:pip 从 Python 3.4 版本(2014 年发布)开始随 Python 捆绑提供,因此你不必单独安装它。
请记住,大多数系统已经预装了 Python。你可以通过运行以下命令来验证你的安装:
python3 --version或者在某些系统上:
python --version你应该会看到类似如下的输出:
Python 3.13.1如果你收到 “command not found” 错误,这意味着 Python 未安装。在这种情况下,从 Python 官方网站下载它,并按照你的操作系统的安装说明进行操作。
虽然不是严格必需,但 Python 代码编辑器或 IDE 会让开发更轻松。我们推荐:
- 带 Python 扩展的 Visual Studio Code
- PyCharm(免费的 Community Edition 应该足够)
这些工具将为你提供语法高亮、linting、调试和其他工具,使编写 Python 爬虫工具更加顺畅。
注意:要跟随本教程操作,你还应该对 Web 的工作原理以及 CSS 选择器如何工作有基本了解。
项目设置
打开终端,首先为你的 Python 爬虫项目创建一个文件夹,然后进入其中:
mkdir python-web-scraper
cd python-web-scraper
接下来,在此文件夹中创建一个 Python 虚拟环境:
python -m venv venv激活虚拟环境。在 Linux 或 macOS 上,运行:
source venv/bin/activate同样,在 Windows 上,执行:
venvScriptsactivate激活虚拟环境后,你现在可以在本地安装网页爬虫所需的所有包。
现在,在你喜欢的 Python IDE 中打开这个项目文件夹。然后,创建一个名为 scraper.py 的新文件。这就是你将编写用于获取和解析 Web 数据的 Python 代码的位置。
你的 Python 网页爬虫项目目录现在应该如下所示:
python-web-scraper/
├── venv/          # Your virtual environment
└── scraper.py     # Your Python scraping script
太棒了!你已准备好开始编写你的 Python 爬虫。
在 Python 中爬虫静态网站
处理静态网页时,服务器返回的 HTML 文档已经包含你想要爬虫的所有数据。因此,在这些场景中,你需要记住的两个具体步骤是:
- 使用 HTTP 客户端检索页面的 HTML 文档,复制浏览器向 Web 服务器发出的请求。
- 使用 HTML 解析器处理该 HTML 文档的内容,并准备从中提取数据。
然后,你需要提取具体数据并将其导出为用户友好的格式。在高层次上,这些操作对于静态和动态网站都是相同的。所以,我们稍后会重点关注它们。
因此,对于静态网站,你通常会组合使用:
- 一个 Python HTTP 客户端来下载网页。
- 一个 Python HTML 解析器来解析 HTML 结构、浏览它并从中提取数据。
作为示例静态网站,从现在开始,我们将引用 Quotes to Scrape 页面:
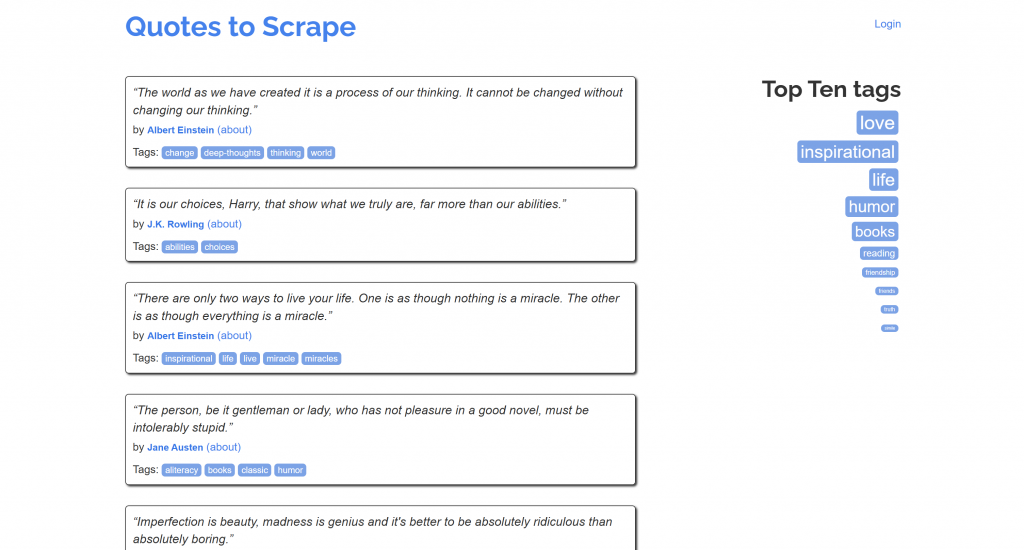
这是一个为练习网页爬虫而设计的简单静态网页。你可以通过在浏览器中右键单击页面并选择“View page source”选项来确认它是静态的。你应该得到以下内容:
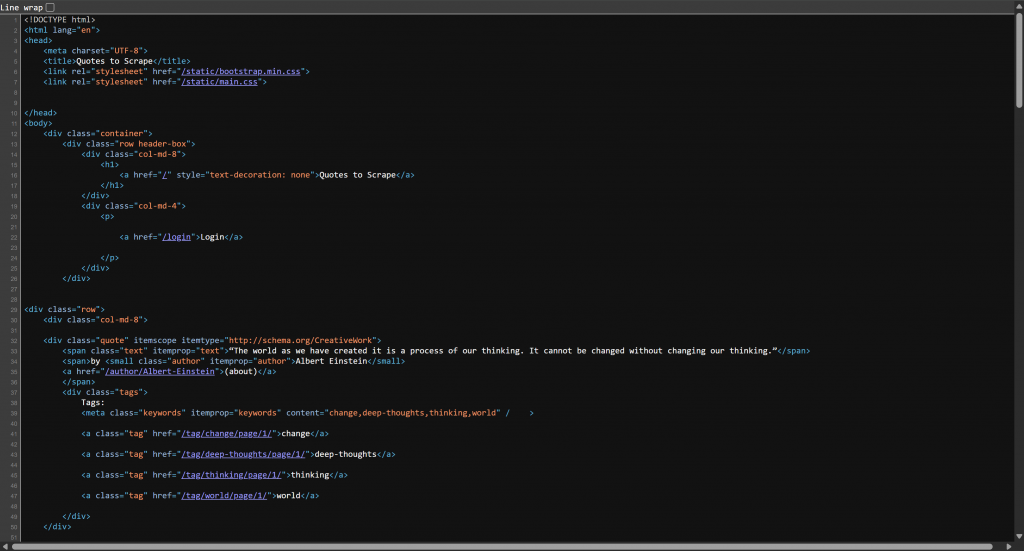
你看到的是服务器返回的原始 HTML 文档,在浏览器中渲染之前。请注意,它已经包含页面上显示的所有 quotes 数据。
在接下来的三章中,你将学习:
- 如何使用 Python HTTP 客户端下载此静态页面的 HTML 文档。
- 如何用 HTML 解析器解析它。
- 如何在专用爬虫框架中一起执行这两个步骤。
这样,你就准备好为静态网站构建一个完整的 Python 爬虫工具。
下载目标页面的 HTML 文档
Python 提供了多个 HTTP 客户端,但最受欢迎的三个是:
requests:一个简单、优雅的 Python HTTP 库,使发送 HTTP 请求变得极其直接。它是同步的、被广泛采用,并且非常适合大多数中小型爬虫任务。httpx:一个下一代 HTTP 客户端,它建立在requests的理念之上,但增加了对同步和异步用法、HTTP/2 以及连接池的支持。aiohttp:一个为asyncio构建的异步 HTTP 客户端(和服务器)框架。它非常适合高并发爬虫场景,在这些场景中你希望并行运行多个请求。
在我们对 Requests 与 HTTPX 与 AIOHTTP 对比 的比较中了解它们的区别。
接下来,你将看到如何安装这些库,并使用它们执行 HTTP GET 请求,以检索目标页面的 HTML 文档。
Requests
使用以下命令安装 Requests:
pip install requests使用它通过以下方式检索目标网页的 HTML:
import requests

url = "http://quotes.toscrape.com/"
response = requests.get(url)
html = response.text

# HTML parsing logic...
get() 方法会向指定 URL 发出 HTTP GET 请求。Web 服务器将以页面的 HTML 文档进行响应。
进一步阅读:
HTTPX
使用以下命令安装 HTTPX:
pip install httpx像这样利用它获取目标页面的 HTML:
import httpx

url = "http://quotes.toscrape.com/"
response = httpx.get(url)
html = response.text

# HTML parsing logic...
如你所见,对于这个简单场景,API 与 Requests 中的相同。HTTPX 相对于 Requests 的主要优势是它还提供 异步支持。
进一步阅读:
AIOHTTP
使用以下命令安装 AIOHTTP:
pip install aiohttp采用它通过以下方式异步连接到目标 URL:
import asyncio
import aiohttp

async def main():
    async with aiohttp.ClientSession() as session:
        url = "http://quotes.toscrape.com/"
        async with session.get(url) as response:
            html = await response.text()

            # HTML parsing logic...

asyncio.run(main())
上述代码片段使用 AIOHTTP 创建一个异步 HTTP 会话。然后它使用该会话向给定 URL 发送 GET 请求,等待服务器的响应。注意使用 async with 块来保证异步资源的正确打开和关闭。
AIOHTTP 默认以异步方式运行,需要从 Python 标准库导入并使用 asyncio。
进一步阅读:
使用 Python 解析 HTML
现在,html 变量只包含服务器返回的 HTML 文档的原始文本。你可以通过打印它来验证:
print(html)你将在终端中获得类似这样的输出:
<!DOCTYPE html>
<html lang="en">
<head>
    <meta charset="UTF-8">
    <title>Quotes to Scrape</title>
    <link rel="stylesheet" href="/static/bootstrap.min.css">
    <link rel="stylesheet" href="/static/main.css">
</head>
<body>
    <!-- omitted for brevity... -->
如果你想以编程方式选择 HTML 节点并从中提取数据,你必须将这个 HTML 字符串解析为可导航的 DOM 结构。
Python 中最受欢迎的 HTML 解析库是 Beautiful Soup。这个包位于 HTML 或 XML 解析器之上,使从网页爬虫信息变得简单。它公开了 Pythonic 方法,用于遍历、搜索和修改解析树。
另一个不太常见但仍然强大的选择是 PyQuery。它提供类似 jQuery 的语法,用于解析和查询 HTML。
在接下来的两章中,你将探索如何将 HTML 字符串转换为解析后的树结构。从该树中提取具体数据的实际逻辑将在稍后介绍。
Beautiful Soup
首先,安装 Beautiful Soup:
pip install beautifulsoup4然后,像这样使用它解析 HTML:
from bs4 import BeautifulSoup

# HTML retrieval logic...

soup = BeautifulSoup(html, "html.parser")

# Data extraction logic...在上述代码片段中,"html.parser" 是 Beautiful Soup 用来解析 html 字符串的底层解析器的名称。具体来说,html.parser 是 Python 标准库中包含的默认 HTML 解析器。
为了获得更好的性能,最好改用 lxml。你可以使用以下命令同时安装 Beautiful Soup 和 lxml:
pip install beautifulsoup4 lxml然后,像这样更新解析逻辑:
soup = BeautifulSoup(html, "lmxl")此时,soup 是一个解析后的类似 DOM 的树结构,你可以使用 Beautiful Soup 的 API 来导航它,以查找标签、提取文本、读取属性等等。
进一步阅读:
PyQuery
使用 pip 安装 PyQuery:
pip install pyquery使用它按如下方式解析 HTML:
from pyquery import PyQuery as pq

# HTML retrieval logic...

d = pq(html)

# Data extraction logic...
d 是一个包含解析后的类似 DOM 树的 PyQuery 对象。你可以应用 CSS 选择器来导航它,并使用类似 jQuery 的语法链式调用方法。
在 Python 中爬虫动态网站
处理动态网页时,服务器返回的 HTML 文档通常只是一个最小骨架。这包括大量 JavaScript,浏览器会执行它来获取数据并动态构建或更新页面内容。
由于只有浏览器才能完全渲染动态页面,你需要依赖它们来在 Python 中爬虫动态网站。特别是,你必须使用浏览器自动化工具。这些工具公开一个 API,使你能够以编程方式控制 Web 浏览器。
在这种情况下,网页爬虫通常归结为:
- 指示浏览器访问感兴趣的页面。
- 等待动态内容加载和/或可选地模拟用户交互。
- 从完全渲染的页面中提取数据。
现在,浏览器自动化工具通常会以无头模式控制浏览器,这意味着浏览器在没有 GUI 的情况下运行。这节省了大量资源,考虑到大多数浏览器都非常消耗资源,这一点很重要。
这一次,你的目标将是 Quotes to Scrape 的动态版本页面:
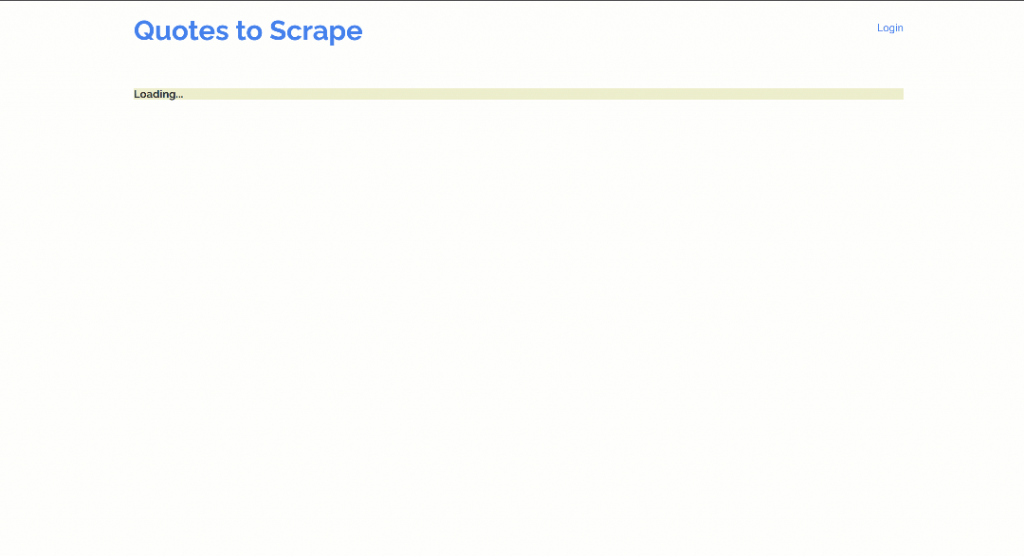
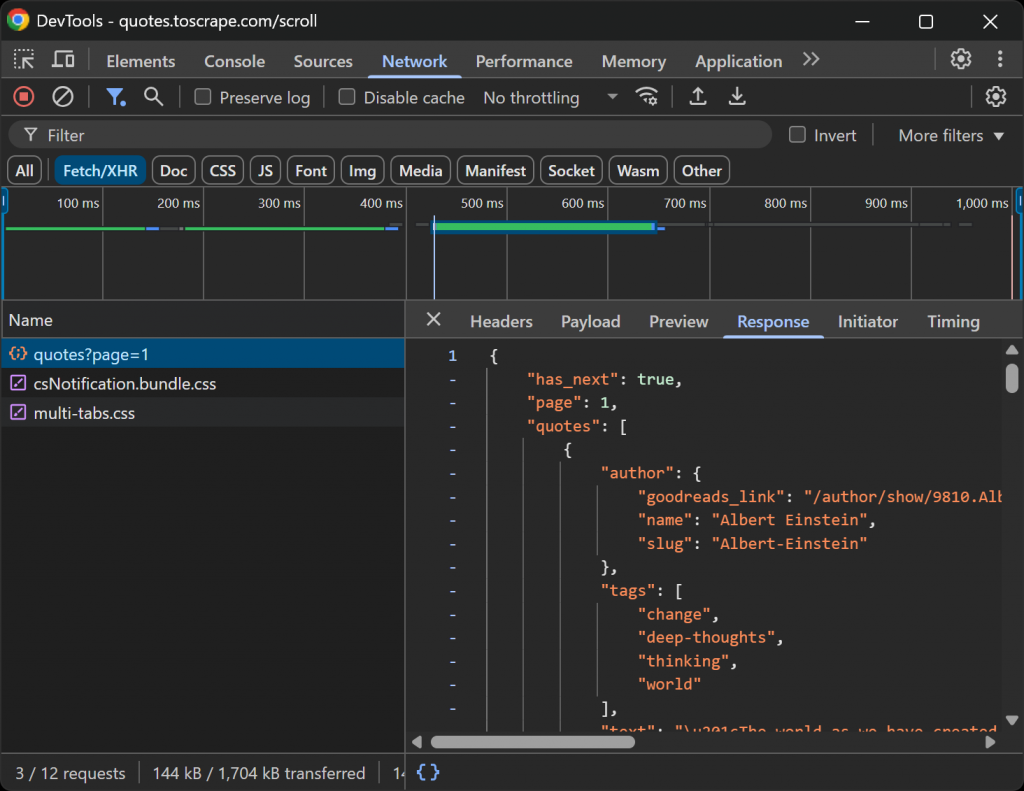
此版本通过 AJAX 检索 quotes 数据,并使用 JavaScript 在页面上动态渲染它。你可以通过检查 DevTools 中的网络请求来验证这一点:
现在,Python 中使用最广泛的两个浏览器自动化工具是:
- Playwright:一个由 Microsoft 开发的现代浏览器自动化库。它支持 Chromium、Firefox 和 WebKit。它速度快,具有强大的选择器,并为等待动态内容提供出色的内置支持。
- Selenium:一个成熟且被广泛采用的框架,用于在 Python 中自动化浏览器,以支持爬虫和测试用例。
在我们对 Playwright 与 Selenium 对比 的比较中深入了解这两种解决方案。
在下一节中,你将看到如何安装和配置这些工具。你将利用它们指示一个受控的 Chrome 实例导航到目标页面。
注意:这一次,不需要单独的 HTML 解析步骤。这是因为浏览器自动化工具提供了用于选择节点并从 DOM 中提取数据的直接 API。
Playwright
要安装 Playwright,运行:
pip install playwright然后,你需要使用以下命令安装所有 Playwright 依赖项(例如,浏览器二进制文件、浏览器驱动程序等):
python -m playwright install使用 Playwright 指示一个无头 Chromium 实例连接到目标动态页面,如下所示:
from playwright.sync_api import sync_playwright

with sync_playwright() as p:
    # Open a controllable Chromium instance in headless mode
    browser = p.chromium.launch(headless=True)
    page = browser.new_page()

    # Visit the target page
    url = "http://quotes.toscrape.com/scroll"
    page.goto(url)

    # Data extraction logic...
    # Data export logic...

    # Close the browser and release its resources
    browser.close()
这会打开一个无头 Chromium 浏览器,并使用 goto() 方法导航到该页面。
进一步阅读:
Selenium
使用以下命令安装 Selenium:
pip install selenium注意:过去,你还需要手动安装浏览器驱动程序(例如,用于控制 Chromium 浏览器的 ChromeDriver)。但是,使用最新版本的 Selenium(4.6 及以上)后,这不再是必需的。Selenium 现在会自动为你安装的浏览器管理合适的驱动程序。你只需要在本地安装 Google Chrome。
利用 Selenium 像这样连接到动态网页:
from selenium import webdriver
from selenium.webdriver.chrome.options import Options

# Launch a Chrome instance in headless mode
options = Options()
options.add_argument("--headless")
driver = webdriver.Chrome(options=options)

# Visit the target page
url = "http://quotes.toscrape.com/scroll"
driver.get(url)

# Data extraction logic...
# Data export logic...

# Close the browser and clean up resources
driver.quit()
与 Playwright 相比,使用 Selenium 时,你必须使用 Chrome CLI 标志显式设置无头模式。此外,告诉浏览器导航到 URL 的方法是 get()。
进一步阅读:
实现 Python Web 数据解析逻辑
在前面的步骤中,你分别学习了如何解析/渲染静态/动态页面的 HTML。现在是时候看看如何真正从该 HTML 中爬虫数据了。
第一步是熟悉目标页面的 HTML。特别是,关注包含你想要的数据的元素。在这种情况下,假设你想从目标页面爬虫所有 quotes(文本和作者)。
所以,在浏览器中打开页面,右键单击一个 quote 元素,并选择“Inspect”选项:
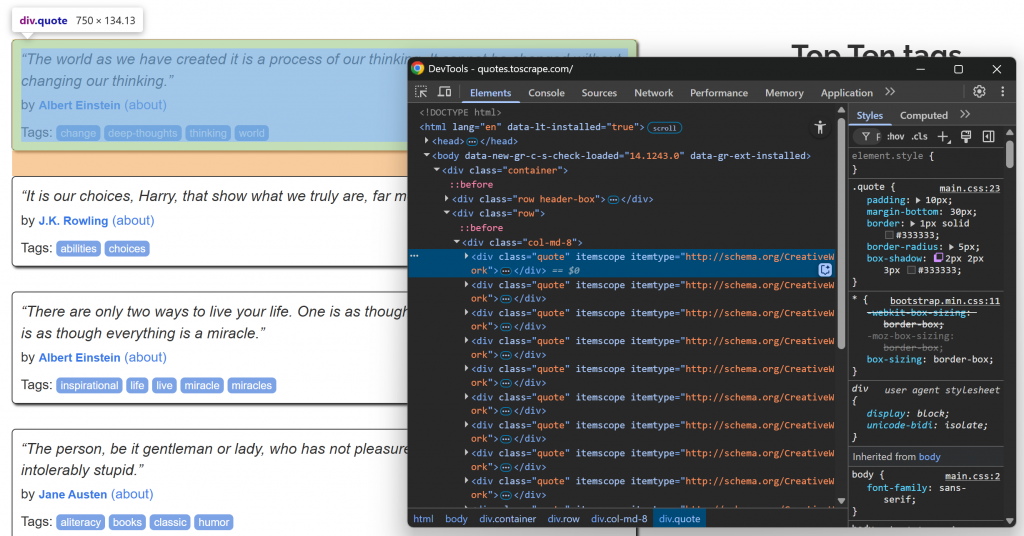
注意每个 quote 都被包裹在一个带有 .quote CSS 类的 HTML 元素中。
接下来,展开单个 quote 的 HTML:
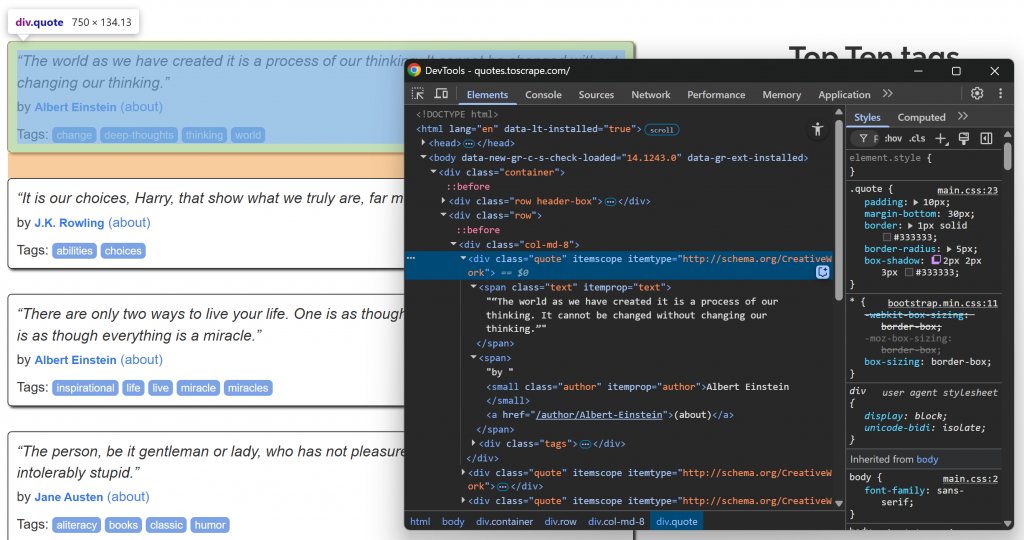
你会看到:
- quote 文本位于
.textHTML 元素内。 - 作者姓名位于
.authorHTML 节点内。
由于页面包含多个 quotes,你还需要一个数据结构来存储它们。一个简单的列表就很好:
quotes = []简而言之,你的整体数据提取计划是:
- 选择页面上的所有
.quote元素。 - 遍历它们,并对每个 quote:
- 从
.text节点提取 quote 文本 - 从
.author节点提取作者姓名 - 使用抓取到的 quote 和作者创建一个新字典
- 将其追加到
quotes列表
现在,让我们看看如何使用 Beautiful Soup、PyQuery、Playwright 和 Selenium 实现上述 Python Web 数据提取逻辑。
Beautiful Soup
使用 Beautiful Soup 实现数据提取逻辑:
# HTML retrieval logic...

# Where to store the scraped data
quotes = []

# Select all quote HTML elements on the page
quote_elements = soup.select(".quote")
for quote_element in quote_elements:
    # Extract the quote text
    text_element = quote_element.select_one(".text")
    text = text_element.get_text(strip=True)

    # Extract the author name
    author_element = quote_element.select_one(".author")
    author = author_element.get_text(strip=True)

    # Populate a new quote dictionary with the scraped data
    quote = {
        "text": text,
        "author": author
    }
    # Append to the list
    quotes.append(quote)

# Data export logic...
上述代码片段调用 select() 方法查找所有匹配给定 CSS 选择器的 HTML 元素。然后,对于这些元素中的每一个,它使用 select_one() 选择具体的数据节点。它的工作方式与 select() 类似,但将结果限制为单个节点。
接下来,它使用 get_text() 提取当前节点的内容。通过抓取到的数据,它构建一个字典并将其追加到 quotes 列表。
请注意,也可以使用 find_all() 和 find() 实现相同结果(正如你稍后将在分步部分中看到的)。
PyQuery
使用 PyQuery 按如下方式编写数据提取代码:
# HTML retrieval logic...

# Where to store the scraped data
quotes = []

# Select all quote HTML elements on the page
quote_elements = d(".quote")
for quote_element in quote_elements:
    # Wrap the element in PyQuery again to use its methods
    q = d(quote_element)

    # Extract the quote text
    text = q(".text").text().strip()

    # Extract the author name
    author = q(".author").text().strip()

    # Populate a new quote dictionary with the scraped data
    quote = {
        "text": text,
        "author": author
    }

    # Append to the list
    quotes.append(quote)

# Data export logic...
注意其语法与 jQuery 多么相似。
Playwright
使用 Playwright 构建 Python 数据提取逻辑:
# Page visiting logic...

# Where to store the scraped data
quotes = []

# Select all quote HTML elements on the page
quote_elements = page.locator(".quote")
# Wait for the quote elements to appear on the page
quote_elements.first.wait_for()

# Iterate over each quote element
for quote_element in quote_elements.all():
    # Extract the quote text
    text_element = quote_element.locator(".text")
    text = text_element.text_content().strip()

    # Extract quote author
    author_element = quote_element.locator(".author")
    author = author_element.text_content().strip()

    # Populate a new quote dictionary with the scraped data
    quote = {
        "text": text,
        "author": author
    }

    # Append to the list
    quotes.append(quote)

# Data export logic...
在这种情况下,请记住你正在处理动态页面。这意味着当你应用 CSS 选择器时,quote 元素可能不会立即渲染(因为它们是通过 JavaScript 动态加载的)。
Playwright 为大多数定位器操作实现了自动等待机制,但这不适用于 all() 方法。因此,你需要在调用 all() 之前,使用 wait_for() 手动等待 quote 元素出现在页面上。wait_for() 会自动最多等待 30 秒。
注意:wait_for() 必须在单个定位器上调用,以避免违反 Playwright 严格模式。这就是为什么你必须首先使用 .first 访问单个定位器。
Selenium
这是使用 Selenium 提取数据的方法:
# Page visiting logic...

# Where to store the scraped data
quotes = []

# Wait for the quote elements to appear on the page (up to 30 seconds by default)
wait = WebDriverWait(driver, 30)
quote_elements = wait.until(
    EC.presence_of_all_elements_located((By.CSS_SELECTOR, ".quote"))
)

# Iterate over each quote element
for quote_element in quote_elements:
    # Extract the quote text
    text_element = quote_element.find_element(By.CSS_SELECTOR, ".text")
    text = text_element.text.strip()

    # Extract the author name
    author_element = quote_element.find_element(By.CSS_SELECTOR, ".author")
    author = author_element.text.strip()

    # Populate a new quote dictionary with the scraped data
    quote = {
        "text": text,
        "author": author
    }

    # Append to the list
    quotes.append(quote)

# Data export logic...
这一次,你可以使用 Selenium 的预期条件机制等待 quote 元素出现在页面上。这会结合使用 WebDriverWait 和 presence_of_all_elements_located(),等待所有匹配 .quote 选择器的元素都出现在 DOM 中。
注意,上述代码需要额外的三个导入:
from selenium.webdriver.common.by import By
from selenium.webdriver.support.ui import WebDriverWait
from selenium.webdriver.support import expected_conditions as EC
导出爬虫的数据
目前,你已将爬虫的数据存储在 quotes 列表中。要完成典型的 Python 网页爬虫工作流,最后一步是将这些数据导出为更易访问的格式,例如 CSV 或 JSON。
看看如何在 Python 中完成这两者!
导出为 CSV
使用以下方式将爬虫的数据导出为 CSV:
import csv

# Python scraping logic...

with open("quotes.csv", mode="w", newline="", encoding="utf-8") as file:
    writer = csv.DictWriter(file, fieldnames=["text", "author"])
    writer.writeheader()
    writer.writerows(quotes)
这使用 Python 内置的 csv 库将你的 quotes 列表写入名为 quotes.csv 的输出文件。该文件将包含名为 text 和 author 的列标题。
导出为 JSON
使用以下方式将抓取到的 quotes 数据导出为 JSON 文件:
import json

# Python scraping logic...

with open("quotes.json", mode="w", encoding="utf-8") as file:
    json.dump(quotes, file, indent=4, ensure_ascii=False)
这会生成一个包含 JSON 格式化的 quotes 列表的 quotes.json。
完整的 Python 网页爬虫示例
你现在已经拥有在 Python 中进行网页爬虫所需的所有构建块。最后一步只是将它们全部放到你的 Python 项目中的 scraper.py 文件里。
注意:如果你更喜欢更有指导性的方式,请跳到下一章。
下面,你将找到使用 Python 中最常见爬虫技术栈的完整示例。要运行其中任意一个,请安装所需库,将代码复制到 scraper.py 中,并使用以下命令启动:
python3 scraper.py或者,在 Windows 和其他系统上等效地:
python scraper.py运行脚本后,你会看到 quotes.csv 文件或 quotes.json 文件出现在你的项目文件夹中。
quotes.csv 将如下所示:
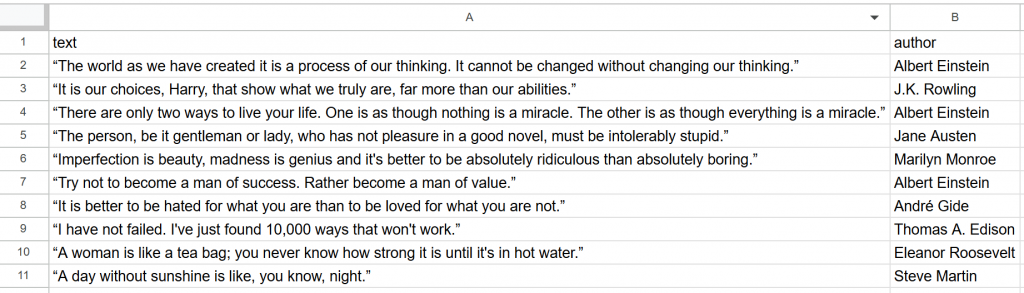
而 quotes.json 将包含:
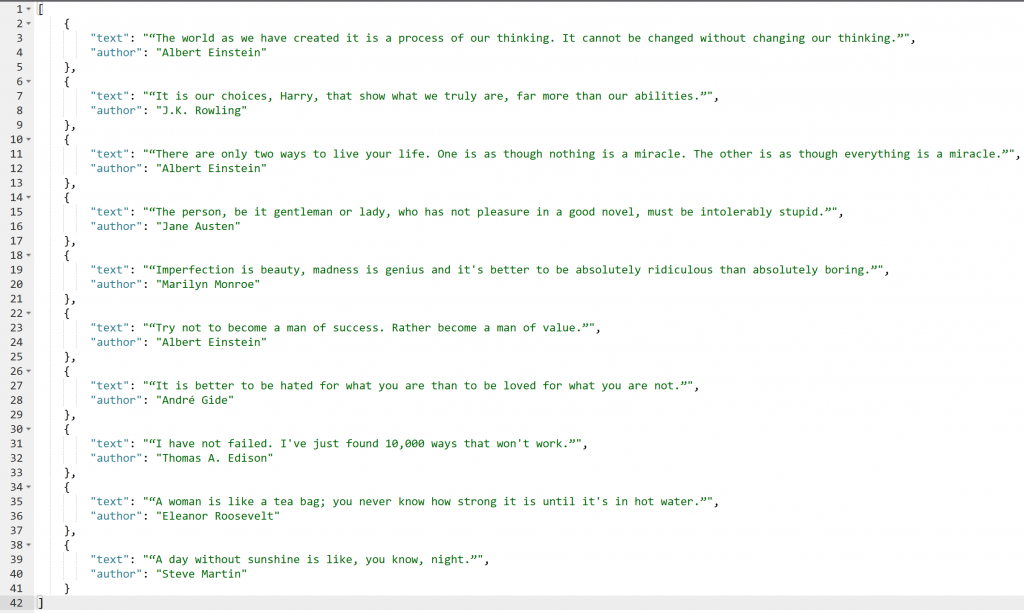
是时候查看完整的网页抓取 Python 示例了!
Requests + Beautiful Soup
# pip install requests beautifulsoup4 lxml

import requests
from bs4 import BeautifulSoup
import csv

# Retrieve the HTML of the target page
url = "http://quotes.toscrape.com/"
response = requests.get(url)
html = response.text

# Parse the HTML
soup = BeautifulSoup(html, "lxml")

# Where to store the scraped data
quotes = []

# Select all quote HTML elements on the page
quote_elements = soup.select(".quote")
for quote_element in quote_elements:
    # Extract the quote text
    text_element = quote_element.select_one(".text")
    text = text_element.get_text(strip=True)

    # Extract the author name
    author_element = quote_element.select_one(".author")
    author = author_element.get_text(strip=True)

    # Populate a new quote dictionary with the scraped data
    quote = {
        "text": text,
        "author": author
    }
    # Append to the list
    quotes.append(quote)

# Export the scraped data to CSV
with open("quotes.csv", mode="w", newline="", encoding="utf-8") as file:
    writer = csv.DictWriter(file, fieldnames=["text", "author"])
    writer.writeheader()
    writer.writerows(quotes)
Playwight
# pip install playwright
# python -m install playwright install

from playwright.sync_api import sync_playwright
import json

with sync_playwright() as p:
    # Open a controllable Chromium instance in headless mode
    browser = p.chromium.launch(headless=True)
    page = browser.new_page()

    # Visit the target page
    url = "http://quotes.toscrape.com/scroll"
    page.goto(url)

    # Where to store the scraped data
    quotes = []

    # Select all quote HTML elements on the page
    quote_elements = page.locator(".quote")
    # Wait for the quote elements to appear on the page
    quote_elements.first.wait_for()

    # Iterate over each quote element
    for quote_element in quote_elements.all():
        # Extract the quote text
        text_element = quote_element.locator(".text")
        text = text_element.text_content().strip()

        # Extract quote author
        author_element = quote_element.locator(".author")
        author = author_element.text_content().strip()

        # Populate a new quote dictionary with the scraped data
        quote = {
            "text": text,
            "author": author
        }

        # Append to the list
        quotes.append(quote)

    # Export the scraped data to JSON
    with open("quotes.json", mode="w", encoding="utf-8") as file:
        json.dump(quotes, file, indent=4, ensure_ascii=False)

    # Close the browser and release its resources
    browser.close()
Selenium
# pip install selenium

from selenium import webdriver
from selenium.webdriver.chrome.options import Options
from selenium.webdriver.common.by import By
from selenium.webdriver.support.ui import WebDriverWait
from selenium.webdriver.support import expected_conditions as EC
import csv

# Launch a Chrome instance in headless mode
options = Options()
options.add_argument("--headless")
driver = webdriver.Chrome(options=options)

# Visit the target page
url = "http://quotes.toscrape.com/scroll"
driver.get(url)

# Where to store the scraped data
quotes = []

# Wait for the quote elements to appear on the page (up to 30 seconds by default)
wait = WebDriverWait(driver, 30)
quote_elements = wait.until(
    EC.presence_of_all_elements_located((By.CSS_SELECTOR, ".quote"))
)

# Iterate over each quote element
for quote_element in quote_elements:
    # Extract the quote text
    text_element = quote_element.find_element(By.CSS_SELECTOR, ".text")
    text = text_element.text.strip()

    # Extract the author name
    author_element = quote_element.find_element(By.CSS_SELECTOR, ".author")
    author = author_element.text.strip()

    # Populate a new quote dictionary with the scraped data
    quote = {
        "text": text,
        "author": author
    }

    # Append to the list
    quotes.append(quote)

# Export the scraped data to CSV
with open("quotes.csv", mode="w", newline="", encoding="utf-8") as file:
    writer = csv.DictWriter(file, fieldnames=["text", "author"])
    writer.writeheader()
    writer.writerows(quotes)

# Close the browser and clean up resources
driver.quit()
在 Python 中构建网页爬虫工具:分步指南
要采用更完整、更有指导性的方式,请按照本节使用 Requests 和 Beautiful Soup 在 Python 中构建网页爬虫工具。
目标是向你展示如何从目标网站提取所有 quote 数据,并浏览每个分页页面。对于每个 quote,你将抓取文本、作者和标签列表。最后,你将看到如何将抓取的数据导出到 CSV 文件。
步骤 #1:连接到目标 URL
我们将假设你已经设置好了 Python 项目。在已激活的虚拟环境中,使用以下命令安装所需库:
pip install requests beautifulsoup4 lxml此外,你的 scraper.py 文件应该已经包含必要的导入:
import requests
from bs4 import BeautifulSoup
网页爬虫工具要做的第一件事是连接到你的目标网站。使用 requests 通过以下代码行下载网页:
page = requests.get("https://quotes.toscrape.com")page.text 包含服务器返回的字符串格式 HTML 文档。是时候将 text 属性提供给 Beautiful Soup,以解析网页的 HTML 内容了!
步骤 #2:解析 HTML 内容
将 page.text 传递给 BeautifulSoup() 构造函数以解析 HTML 文档:
soup = BeautifulSoup(page.text, "lxml")你现在可以使用它从页面中选择所需的 HTML 元素。看看如何做!
步骤 #3:定义节点选择逻辑
要从网页提取数据,你必须首先识别感兴趣的 HTML 元素。特别是,你必须为包含你想要抓取的数据的元素定义选择策略。
你可以通过使用浏览器提供的开发工具来实现。在 Chrome 中,右键单击感兴趣的 HTML 元素并选择“Inspect”选项。在这种情况下,对一个 quote 元素执行此操作:
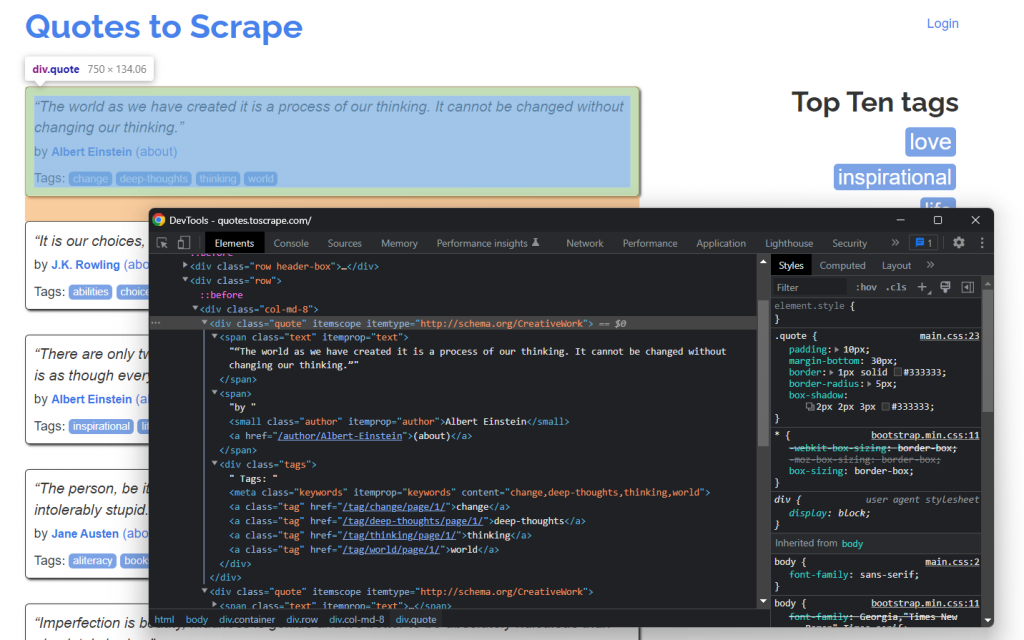
如你在这里所见,quote <div> HTML 节点由 .quote 选择器标识。每个 quote 节点包含:
- quote 文本位于一个
<span>中,你可以用.text选择它。 - quote 的作者位于一个
<small>中,你可以用.author选择它 - 一个标签列表位于一个
<div>元素中,每个标签包含在<a>中。你可以用.tags .tag选择它们全部。
太好了!准备实现 Python 爬虫逻辑。
步骤 #4:从 Quote 元素提取数据
首先,你需要一个数据结构来跟踪爬虫的数据。因此,初始化一个数组变量:
quotes = []然后,使用 soup 通过应用前面定义的 .quote CSS 选择器从 DOM 中提取 quote 元素。
在这里,我们将使用 Beautiful Soup 的 find() 和 find_all() 方法,以介绍一种与目前已探索内容不同的方法:
find():返回匹配输入选择器策略的第一个 HTML 元素(如果有)。find_all():返回与作为参数传入的选择器条件匹配的 HTML 元素列表。
使用以下方式选择所有 quote 元素:
quote_elements = soup.find_all("div", class_="quote")find_all() 方法将返回由 quote 类标识的所有 <div> HTML 元素列表。遍历 quotes 列表并如下收集 quote 数据:
for quote_element in quote_elements:
    # Extract the text of the quote
    text = quote_element.find("span", class_="text").get_text(strip=True)
    # Extract the author of the quote
    author = quote_element.find("small", class_="author").get_text(strip=True)

    # Extract the tag <a> HTML elements related to the quote
    tag_elements = quote_element.select(".tags .tag")

    # Store the list of tag strings in a list
    tags = []
    for tag_element in tag_elements:
        tags.append(tag_element.get_text(strip=True))
Beautiful Soup 的 find() 方法将检索单个感兴趣的 HTML 元素。由于与 quote 关联的标签字符串不止一个,你应该将它们存储在列表中。
然后,你可以将爬虫的数据转换为字典,并按如下方式将其追加到 quotes 列表:
quotes.append(
    {
        "text": text,
        "author": author,
        "tags": ", ".join(tags) # Merge the tags into a "A, B, ..., Z" string
    }
)
很好!你刚刚看到了如何从单个页面提取所有 quote 数据。
但是,请记住目标网站由多个网页组成。学习如何爬取整个网站!
步骤 #5:实现爬虫逻辑
在首页底部,你可以找到一个“Next →” <a> HTML 元素,它会重定向到下一页:
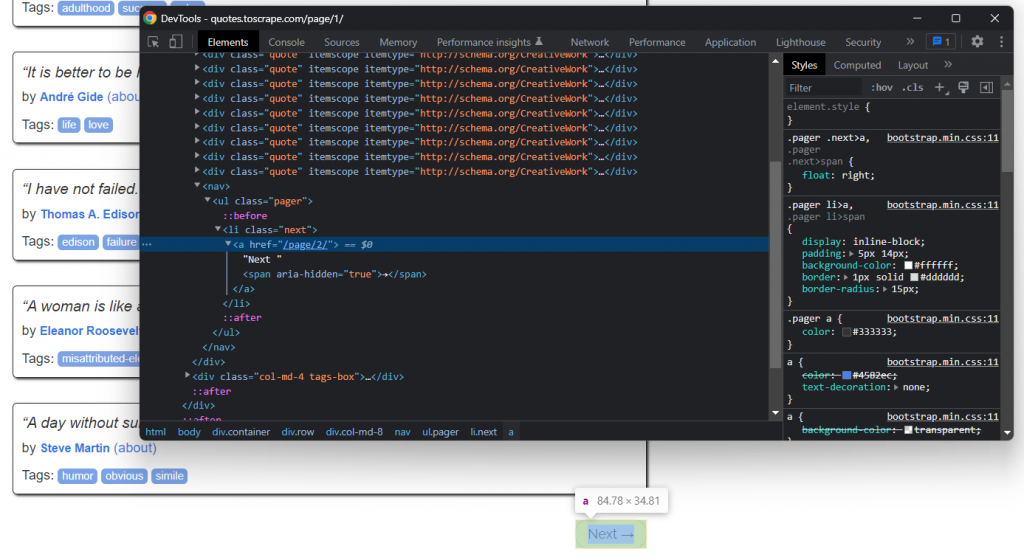
除最后一页外,所有页面都包含此 HTML 元素。这样的场景在任何分页网站中都很常见。通过跟随“Next →”元素中包含的链接,你可以轻松浏览整个网站。
所以,从首页开始,看看如何遍历目标网站所包含的每个页面。你所要做的就是查找 .next <li> HTML 元素,并提取指向下一页的相对链接。
按如下方式实现爬虫逻辑:
# The URL of the home page of the target website
base_url = "https://quotes.toscrape.com"

# Retrieve the page and initializing soup...

# Get the "Next →" HTML element
next_li_element = soup.find("li", class_="next")

# If there is a next page to scrape
while next_li_element is not None:
    next_page_relative_url = next_li_element.find("a", href=True)["href"]

    # Get the new page
    page = requests.get(base_url + next_page_relative_url, headers=headers)

    # Parse the new page
    soup = BeautifulSoup(page.text, "lxml")

    # Scraping logic...

    # Look for the "Next →" HTML element in the new page
    next_li_element = soup.find("li", class_="next")
while 循环会遍历每个页面,直到没有下一页为止。它提取下一页的相对 URL,并使用它创建要爬虫的下一页 URL。然后,它下载下一页。最后,它爬虫该页面并重复该逻辑。
太棒了!你现在知道如何爬虫整个网站了。剩下的只是学习如何将提取的数据转换为更有用的格式,例如 CSV。
步骤 #6:将爬虫的数据提取到 CSV 文件
将包含爬虫到的 quote 数据的字典列表导出到 CSV 文件:
import csv

# Scraping logic...

# Open (or create) the CSV file and ensure it is properly closed afterward
with open("quotes.csv", "w", encoding="utf-8", newline="") as csv_file:
    writer = csv.writer(csv_file)

    # Write the header row
    writer.writerow(["Text", "Author", "Tags"])

    # Write each quote as a row
    for quote in quotes:
        writer.writerow(quote.values())
这段代码片段所做的是使用 open() 创建一个 CSV 文件。然后,它使用 csv 库的 Writer 对象中的 writerow() 函数填充输出文件。该函数将每个 quote 字典写成 CSV 格式的行。
太惊人了!你从网站中包含的原始数据,变成了存储在 CSV 文件中的半结构化数据。数据提取过程结束了,你现在可以查看完整的 Python 数据爬虫工具了。
步骤 #7:整合在一起
完整的数据爬虫 Python 脚本如下所示:
# pip install requests beautifulsoup4 lxml

import requests
from bs4 import BeautifulSoup
import csv

def scrape_page(soup, quotes):
    # Retrieve all the quote <div> HTML element on the page
    quote_elements = soup.find_all("div", class_="quote")

    # Iterate over the list of quote elements and apply the scraping logic
    for quote_element in quote_elements:
        # Extract the text of the quote
        text = quote_element.find("span", class_="text").get_text(strip=True)
        # Extract the author of the quote
        author = quote_element.find("small", class_="author").get_text(strip=True)

        # Extract the tag <a> HTML elements related to the quote
        tag_elements = quote_element.select(".tags .tag")

        # Store the list of tag strings in a list
        tags = []
        for tag_element in tag_elements:
            tags.append(tag_element.get_text(strip=True))

        # Append a dictionary containing the scraped quote data
        quotes.append(
            {
                "text": text,
                "author": author,
                "tags": ", ".join(tags)  # Merge the tags into a "A, B, ..., Z" string
            }
        )

# The URL of the home page of the target website
base_url = "https://quotes.toscrape.com"
# Retrieve the target web page
page = requests.get(base_url)

# Parse the target web page with Beautiful Soup
soup = BeautifulSoup(page.text, "lxml")

# Where to store the scraped data
quotes = []

# Scrape the home page
scrape_page(soup, quotes)

# Get the "Next →" HTML element
next_li_element = soup.find("li", class_="next")

# If there is a next page to scrape
while next_li_element is not None:
    next_page_relative_url = next_li_element.find("a", href=True)["href"]

    # Get the new page
    page = requests.get(base_url + next_page_relative_url)

    # Parse the new page
    soup = BeautifulSoup(page.text, "lxml")

    # Scrape the new page
    scrape_page(soup, quotes)

    # Look for the "Next →" HTML element in the new page
    next_li_element = soup.find("li", class_="next")

# Open (or create) the CSV file and ensure it is properly closed afterward
with open("quotes.csv", "w", encoding="utf-8", newline="") as csv_file:
    writer = csv.writer(csv_file)

    # Write the header row
    writer.writerow(["Text", "Author", "Tags"])

    # Write each quote as a row
    for quote in quotes:
        writer.writerow(quote.values())
如这里所示,用不到 80 行代码,你就可以构建一个 Python 网页爬虫工具。该脚本能够爬取整个网站,自动提取其所有数据,并将其导出为 CSV。
恭喜!你刚刚学会了如何使用 Requests 和 Beautiful Soup 执行 Python 网页抓取。
在项目目录内的终端中,使用以下命令启动 Python 脚本:
python3 scraper.py或者,在某些系统上:
python scraper.py等待进程结束,你现在将可以访问一个 quotes.csv 文件。打开它,它应包含以下数据:
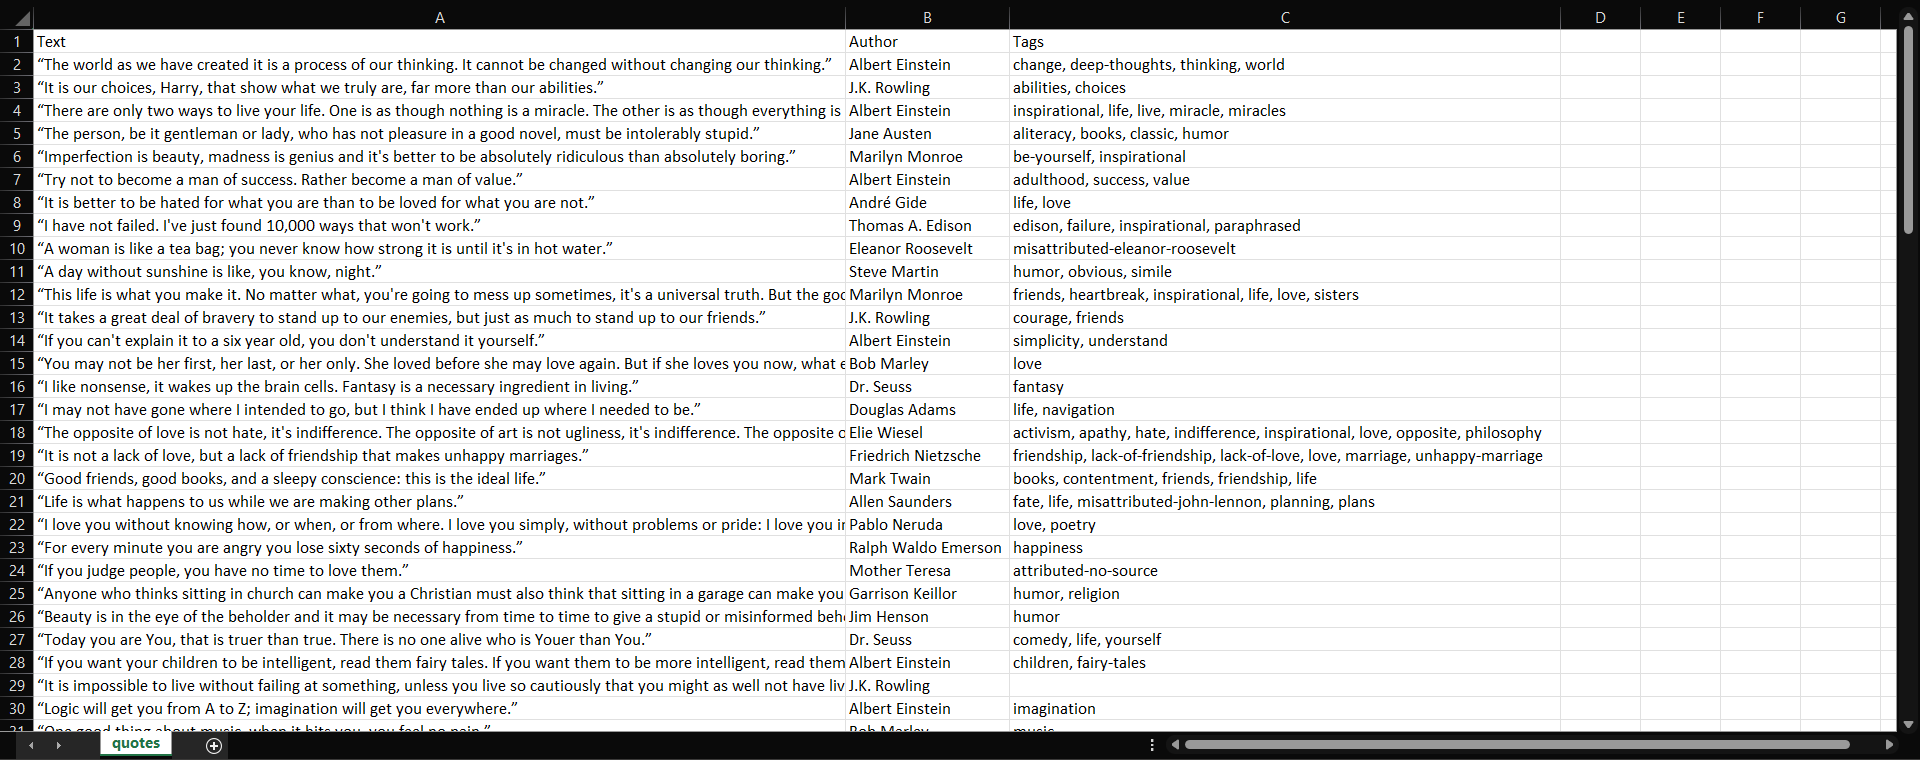
Et voilà!你现在把目标网站中包含的全部 100 条 quotes 都放在一个易于阅读格式的单个文件中了。
Scrapy:一体化 Python 网页爬虫框架
到目前为止的叙述是,要在 Python 中爬虫网站,你要么需要 HTTP 客户端 + HTML 解析器设置,要么需要浏览器自动化工具。然而,这并不完全正确。还有专用的一体化爬虫框架,在单个库中提供你所需的一切。
Python 中最受欢迎的爬虫框架是 Scrapy。虽然它主要开箱即用于静态网站,但它可以通过 Scrapy Splash 或 Scrapy Playwright 等工具扩展以处理动态网站。
在其标准形式中,Scrapy 将 HTTP 客户端功能和 HTML 解析结合到一个强大的包中。在本节中,你将学习如何设置 Scrapy 项目,以爬虫 Quotes to Scrape 的静态版本。
使用以下命令安装 Scrapy:
pip install scrapy然后,创建一个新的 Scrapy 项目,并为 Quotes to Scrape 生成一个 spider:
scrapy startproject quotes_scraper
cd quotes_scraper
scrapy genspider quotes quotes.toscrape.com
此命令会创建一个名为 quotes_scraper 的新 Scrapy 项目文件夹,进入其中,并生成一个名为 quotes 的 spider,目标站点为 quotes.toscrape.com。
如果你不熟悉此过程,请参考我们的使用 Scrapy 爬虫指南。
编辑 spider 文件(quotes_scraper/spiders/quotes.py)并添加以下爬虫 Python 逻辑:
# quotes_scraper/spiders/quotes.py

import scrapy

class QuotesSpider(scrapy.Spider):
    name = "quotes"

    # Sites to visit
    start_urls = [
        "http://quotes.toscrape.com/"
    ]

    def parse(self, response):
        # Scraping logic
        for quote in response.css(".quote"):
            yield {
                "text": quote.css(".text::text").get(),
                "author": quote.css(".author::text").get(),
                "tags": quote.css(".tags .tag::text").getall(),
            }

        # Pagination handling logic
        next_page = response.css("li.next a::attr(href)").get()
        if next_page:
            yield response.follow(next_page, self.parse)
在幕后,Scrapy 向目标页面发送 HTTP 请求,并使用 Parsel(其内置 HTML 解析器)按你的 spider 中指定的方式提取数据。
你现在可以使用此命令以编程方式将爬虫的数据导出为 CSV:
scrapy crawl quotes -o quotes.csv或者导出为 JSON:
scrapy crawl quotes -o quotes.json这些命令会运行 spider,并自动将提取的数据保存为指定的文件格式。
进一步阅读:
- Scrapy vs Requests 用于网页爬虫:该选择哪一个?
- Scrapy vs Beautiful Soup:详细比较
- Scrapy vs Playwright:网页爬虫比较指南
- Scrapy vs Selenium 用于网页爬虫
爬虫挑战以及如何在 Python 中克服它们
在本教程中,你学习了如何爬虫那些为了使网页爬虫变得简单而构建的网站。当将这些技术应用到真实世界的目标时,你将遇到更多爬虫挑战。
一些最常见的爬虫问题和反爬虫技术(以及处理它们的指南)包括:
- 网站频繁更改其 HTML 结构,破坏你的元素选择逻辑:
- 如何将 AI 用于网页爬虫:通过专用 Python AI 爬虫库将 AI 集成到数据提取逻辑中,以通过简单提示检索数据。
- 最佳 AI 网页爬虫工具:完整比较
- 在 Python 中使用 Gemini AI 进行网页爬虫 – 分步指南
- IP 封禁和速率限制在请求过多后停止你的脚本:
- 如何使用代理在 Python 中轮换 IP 地址:通过使用动态代理隐藏你的 IP 并避免速率限制器。
- 10 个最佳动态代理:终极比较
- 指纹问题在目标服务器上引发怀疑并触发阻止,以及常见的防御技术:
- 用于网页爬虫的 HTTP 标头:在你的 HTTP 客户端中设置正确的标头以减少阻止。
- 网页爬虫的 User-Agents 101
- 在 2026 年使用 curl_cffi 和 Python 进行网页爬虫:
curl_cffi是 cURL 的一个特殊版本,旨在避免 Python 中的 TLS 指纹问题。 - 如何使用 Undetected ChromeDriver 进行网页爬虫:Undetected ChromeDriver 是 Selenium 的一个特殊版本,经过优化以避免阻止。
- 2026 年使用 SeleniumBase 进行网页爬虫指南:SeleniumBase 是 Selenium 的一个定制版本,经过调整以限制检测。
- CAPTCHA 和 JavaScript 挑战阻止访问动态网页:
- 使用 Python 绕过 CAPTCHA:技术
- 如何使用 Playwright 绕过 CAPTCHA
- 如何在 Python 中使用 Selenium 绕过 CAPTCHA
- 法律和伦理考量需要谨慎合规:
- 伦理数据收集:用于构建合乎伦理的爬虫工具的实用工具和准则。
- 用于网页爬虫的 Robots.txt 指南:尊重
robots.txt文件,以在 Python 中执行合乎伦理的网页爬虫。
现在,大多数解决方案都基于变通方法,而这些方法通常只能暂时有效。这意味着你需要持续维护你的爬虫脚本。此外,你有时可能需要访问高级资源,例如高质量 Web 代理。
因此,在生产环境中或当爬虫变得过于复杂时,依赖像 Bright Data 这样的完整 Web 数据提供商是有意义的。
Bright Data 提供广泛的网页爬虫服务,包括:
- Unlocker API:自动解决阻止、CAPTCHA 和反机器人挑战,以保证大规模成功检索页面。
- Crawl API:将整个网站解析为结构化的 AI-ready 数据。
- 搜索引擎 API:检索实时搜索引擎结果(Google、Bing 等),内置地理定位、设备模拟和反 CAPTCHA。
- Browser API:启动带有隐身指纹的远程无头浏览器,自动化 JavaScript 密集型页面渲染和复杂交互。它可与 Playwright 和 Selenium 配合使用。
- 验证码破解:一种快速且自动化的 CAPTCHA 破解工具,可绕过来自 reCAPTCHA、hCaptcha、px_captcha、SimpleCaptcha、GeeTest CAPTCHA 等的挑战。
- Web 爬虫 API:预构建的爬虫工具,可从 LinkedIn、Amazon、TikTok 等 100+ 顶级网站提取实时数据。
所有这些解决方案都能与 Python 或任何其他技术栈无缝集成。它们极大地简化了你的 Python 网页爬虫项目的实现。
结论
在这篇博客文章中,你学习了什么是使用 Python 进行网页爬虫、入门需要什么,以及如何使用多种工具来完成它。你现在已经具备用 Python 爬虫网站的所有基础知识,并有进一步阅读链接帮助你提升爬虫技能。
请记住,网页爬虫伴随着许多挑战。反机器人和反爬虫技术正变得越来越常见。这就是为什么你可能需要高级网页爬虫解决方案,比如 Bright Data 提供的那些。
如果你对自己爬虫不感兴趣,而只是想访问数据,请考虑探索我们的数据集服务。
免费创建一个 Bright Data 账户,并使用我们的解决方案将你的 Python 网页爬虫工具提升到新水平!



技术写作
 5.5 years experience
Antonello是一名软件工程师,但他更喜欢称自己为技术传教士。通过写作传播知识是他的使命。