掌握使用 Python 进行网页抓取,探索从各种网站快速收集数据的艺术。通过这些基本技能节省时间和精力!
简单的可用脚本语言之一,并附带各种各样的网页抓取库。这使其成为网页抓取的完美编程语言。仅需几行代码即可进行 Python 网页抓取!
在本分步教程中,将学习如何构建简单的 Python 抓取工具。该应用程序将浏览整个网站,从每个页面提取数据,然后将其导出到 CSV 文件中。本教程将帮助你了解哪些是最佳 Python 数据抓取库,应采用哪些库,以及如何使用。按照本分步教程学习如何构建 Python 脚本进行网页抓取。
目录:
先决条件
要构建 Python 网页抓取工具,需要满足以下先决条件:
- Python 3.4+
- pip
请注意,Python 3.4 或更高版本默认包含 pip。因此,无需手动安装。如果计算机上没有 Python,请按照以下适用您操作系统的指南进行操作。
macOS
Mac 过去曾预装 Python 2.7,但目前情况已不再如此。实际上,该版本现已过时。
如果想要最新版本的 Python,必须手动安装。为此,请下载安装程序,双击启动,然后按照安装向导进行操作。
Windows
下载 Python 安装程序并运行。在安装向导期间,确保“将 python.exe 添加到 PATH”复选框标记如下:
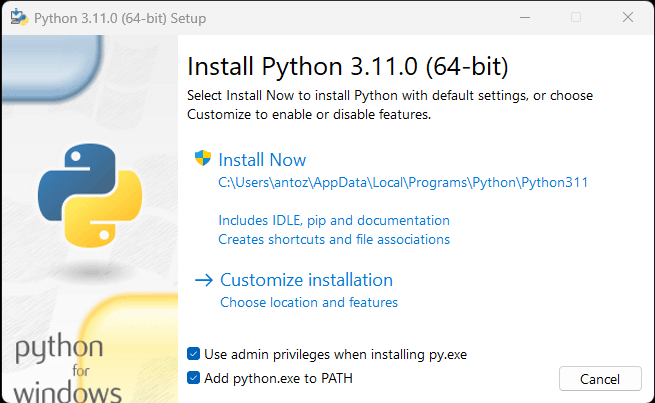
这样,Windows 将自动识别终端中的 python 和 pip 命令。具体而言,pip 是 Python 软件包的软件包管理器。
Linux
大多数 Linux 发行版都预装了 Python,但可能不是最新版本。在 Linux 上安装或更新 Python 的命令会根据软件包管理器的不同而变化。在基于 Debian 的 Linux 发行版中,则运行:
sudo apt-get install python3无论操作系统如何,可以打开终端并使用以下命令验证 Python 是否已成功安装:
python --version该操作应进行类似如下打印:
Python 3.11.0构建你的第一个 Python 网页抓取工具,现已准备就绪。但首先,需要一个 Python 网页抓取库!
最佳 Python 网页抓取库
可以使用 Python vanilla 从头开始构建网页抓取脚本,但这并非理想的解决方案。毕竟,Python 以其广泛的软件包选择而闻名,有很多网页抓取库可供选择。不妨了解其中最重要的一些网页抓取库!
请求
请求库允许在 Python 中执行 HTTP 请求。这样可以轻松发送 HTTP 请求,尤其是与标准的 Python HTTP 库相比。请求在 Python 网页抓取项目中起着关键作用。原因在于,要抓取网页中包含的数据,首先必须通过 HTTP GET 请求检索这些数据。此外,可能需要向目标网站的服务器执行其他 HTTP 请求。
可以使用以下 pip 命令安装请求:
pip install requestsBeautiful Soup
Beautiful Soup Python 库使从网页中抓取信息变得更加容易。具体而言,Beautiful Soup 可与任何 HTML 或 XML 解析器一起使用,并提供迭代、搜索和修改解析树所需的一切。请注意,可以将 Beautiful Soup 与 html.parser 一起使用,后者是 Python 标准库自带的解析器,允许解析 HTML 文本文件。特别是,Beautiful Soup 可以帮你遍历 DOM 并从中提取所需数据。
可以使用 pip 安装 Beautiful Soup,如下所示:
pip install beautifulsoup4Selenium
Selenium 是一个开源的自动化高级测试框架,使你能够在浏览器中对网页执行操作。换言之,你可以利用它来指示浏览器执行某些任务。请注意,你还可以使用 Selenium 作为网页抓取库,因为它具有无头浏览器功能。如果你不熟悉这一概念,不妨了解,无头浏览器是指在没有 GUI(图形用户界面)的情况下运行的 Web 浏览器。如果配置为无头模式,Selenium 将在后台运行受控浏览器。
在 Selenium 中访问的网页通过真实的浏览器进行渲染。因此,它所支持的网页抓取依赖于 JavaScript 进行渲染或数据检索的网页。Selenium 为你提供了构建网页抓取工具的一切所需,而无需其他库。可以使用以下 pip 命令安装:
pip install selenium在 Python 构建网页抓取工具
现在让我们学习如何在 Python 构建网页抓取工具。目标网站如下所示:
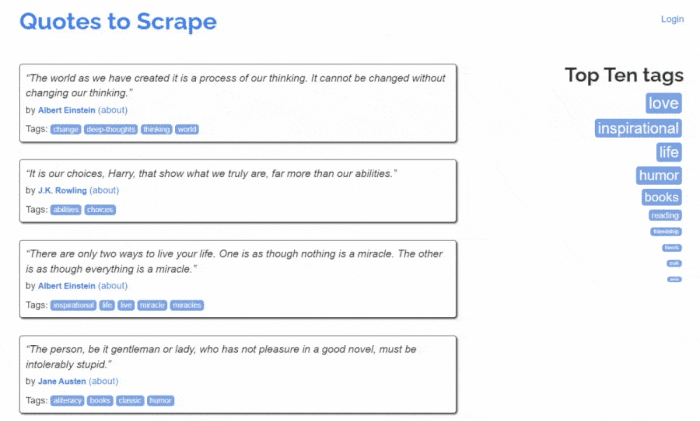
这是 Quotes to Scrape 网站,是一个用于网页抓取的沙盒,其中包含引文(quote)的分页列表。
本教程的目标是学习如何从中提取所有引文数据。对于每句引文,你将学习如何抓取文本、作者和标签列表。然后,所抓取的数据将转换为 CSV。
如你所见,Quotes to Scrape 仅仅是一个用于网页抓取的沙盒。具体而言,其中包含引文的分页列表。所要构建的 Python 网页抓取工具将检索每个页面上包含的所有引文,并将其作为 CSV 数据返回。
第 1 步:选择正确的 Python 抓取库
首先,需要了解哪些是 Python 的最佳网页抓取库,才能实现目标。为此,请在网站浏览器中访问目标站点。右键单击背景并选择“检查”(Inspect)。将会打开 DevTools 浏览器窗口。来到“网络”(Network)选项卡并重新加载页面。
正如你所注意到的,目标网站不执行任何 Fetch/XHR 请求。
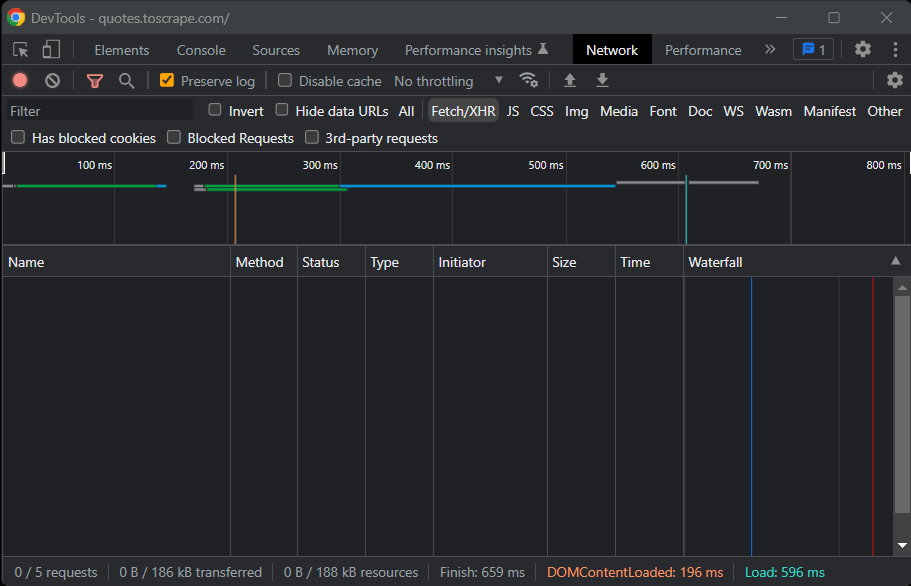
这意味着 Quotes to Scrape 不依赖于 JavaScript 来动态检索数据。换言之,服务器返回的页面已经包含了感兴趣的数据。这就是静态内容网站中发生的情况。
由于目标网站不依赖于 JavaScript 来渲染页面或检索数据,因此不需要 Selenium 进行抓取。虽然仍然可以使用,但不应使用。原因是 Selenium 会在浏览器中打开网页。由于这需要时间和资源,Selenium 会带来性能开销。可以通过将 Beautiful Soup 与 Requests 协同使用来避免这种情况。
既然已经了解了需要使用哪些 Python 抓取库,接下来让我们学习如何使用 Beautiful Soup 构建简单的抓取工具吧!
第 2 步:初始化 Python 项目
在编写第一行代码之前,需要设置 Python 网页抓取项目。在技术层面而言,只需一个 .py 文件即可。但是,使用高级 IDE(集成开发环境)将使你的编码体验更加轻松。接下来,将学习如何在 PyCharm 中设置 Python 项目,不过,任何其他 Python IDE 也可以做到。
打开 PyCharm 并选择“文件 > 新建项目…”。在“新建项目”(New Project)弹出窗口中,选择“Pure Python”,并创建一个新项目。
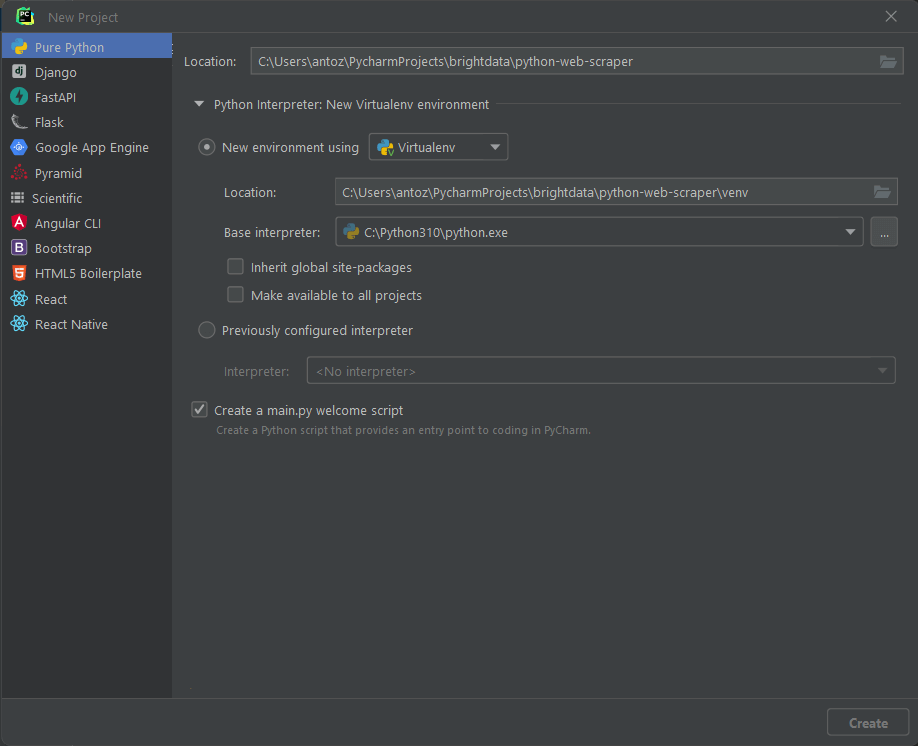
例如,可以将项目命名为 python-web-scraper。单击“创建”(Create),即可访问空白的 Python 项目。默认情况下,PyCharm 将初始化 main.py 文件。为了清楚简明,将其重命名为 scraper.py。项目外观如下:
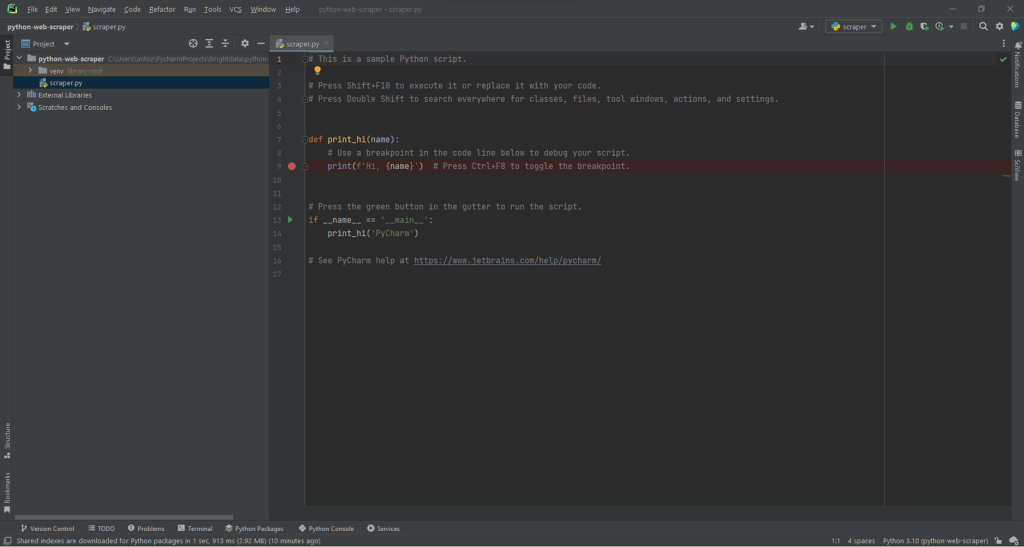
如你所见,PyCharm 会使用一些代码行自动初始化 Python 文件。删除它们并从头开始。
接下来,必须安装项目的附属项。可以通过在终端中启动以下命令来安装 Requests 和 Beautiful Soup:
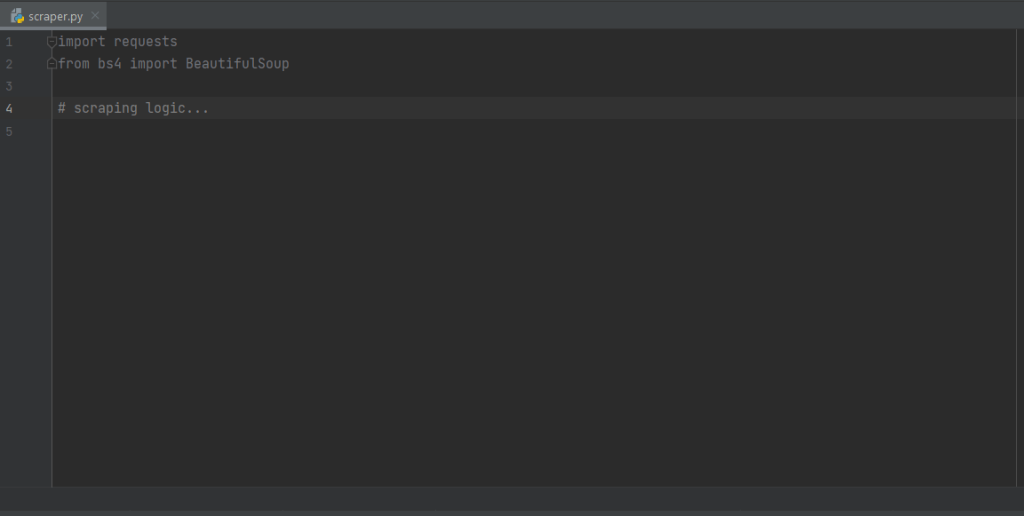
pip install requests beautifulsoup4将同时安装这两个库。等待安装过程完成。现在,可以使用 Beautiful Soup 和 Requests 在 Python 中构建网页爬虫和抓取工具。将以下行添加到 scraper.py 脚本文件的顶部,确保导入这两个库:
import requests
from bs4 import BeautifulSoup
PyCharm 将以灰色显示这两行,因为代码中未使用库。如果出现了红色下划线,则表示在安装过程中出现了问题。在这种情况下,请尝试再次安装。
功告成!现在可以开始编写一些 Python 网页抓取逻辑。
第 3 步:连接到目标 URL
在网页抓取工具中要做的第一件事是连接到目标网站。首先,从网络浏览器检索目标页面的完整 URL。请务必同时复制 http:// 或 https:// HTTP 协议部分。这种情况下,这是目标网站的完整网址:
https://quotes.toscrape.com现在,可以使用请求下载带有以下代码行的网页:
page = requests.get('https://quotes.toscrape.com')此行只是将 request.get () 方法的结果分配给变量页面。在后台,request.get () 使用作为参数传递的 URL,并以此执行 GET 请求。然后,它返回一个响应对象,其中包含服务器对 HTTP 请求的响应。
如果 HTTP 请求成功执行,page.status_code 将包含 200。HTTP 200 OK 状态响应代码表明,HTTP 请求已成功执行。4xx 或 5xx HTTP 状态代码代表错误。发生这种情况可能有多种原因,但请记住,大多数网站会阻止不包含有效用户代理(User-Agent)的请求。该特殊标头是一个字符串,用于描述请求来源的应用程序和操作系统版本。了解有关用于网页抓取的用户代理的更多信息。
可以在请求中设置有效的用户代理标头,如下所示:
headers = {
    'User-Agent': 'Mozilla/5.0 (Windows NT 10.0; Win64; x64) AppleWebKit/537.36 (KHTML, like Gecko) Chrome/107.0.0.0 Safari/537.36'
}

page = requests.get('https://quotes.toscrape.com', headers=headers
Requests 现在将执行 HTTP 请求,该请求将作为参数传递的标头。
应注意到 page.text 的属性。这将包含服务器以字符串格式返回的 HTML 文档。将文本属性输入到 Beautiful Soup 以从网页中提取数据。让我们来学习如何操作。
应注意到 page.text 的属性。这将包含服务器以字符串格式返回的 HTML 文档。将文本属性输入到 Beautiful Soup 以解析网页。让我们在下一步中学习如何操作!
第 4 步:解析 HTML 内容
要解析服务器在 GET 请求后返回的 HTML 文档,请将 page.text 传递给 BeautifulSoup () 构造函数:
soup = BeautifulSoup(page.text, 'html.parser')第二个参数指定 Beautiful Soup 将使用的解析器。
soup 变量现在包含一个 BeautifulSoup 对象。这是使用 Python 内置 html.parser 解析 page.text 中包含的 HTML 文档后生成的树结构。
现在可以使用它从页面中选择所需的 HTML 元素。下面将了解如何操作!
第 5 步:使用 Beautiful Soup 选择 HTML 元素
Beautiful Soup 提供了几种从 DOM 中选择元素的方法。起点是:
- find():返回第一个与输入选择器策略匹配的 HTML 元素(如果有)。
- find_all():返回与作为参数传递的选择器条件相匹配的 HTML 元素列表。
根据输入到这两种方法的参数,将以不同方式在页面上寻找元素。具体来说,可以选择 HTML 元素:
- 按标签:
# get all <h1> elements
# on the page
h1_elements = soup.find_all('h1')
- 按 ID:
# get the element with id="main-title"
main_title_element = soup.find(id='main-title')- 按文本:
# find the footer element
# based on the text it contains
footer_element = soup.find(text={'Powered by WordPress'})- 按属性:
# find the email input element
# through its "name" attribute
email_element = soup.find(attrs={'name': 'email'})- 按类别:
# find all the centered elements
# on the page
centered_element = soup.find_all(class_='text-center')
通过连接这些方法,可以从页面中提取任何 HTML 元素。查看如下示例:
# get all "li" elements
# in the ".navbar" element
soup.find(class_='navbar').find_all('li')
为了简化操作,Beautiful Soup 还提供了 select() 方法。通过这种方法,可以直接应用 CSS 选择器:
# get all "li" elements
# in the ".navbar" element
soup.select('.navbar > li')
请注意,在撰写本文时,注意支持 XPath 选择器。
需要学习的重点内容是,要从网页中提取数据,必须首先确定感兴趣的 HTML 元素。特别是,必须为包含要抓取数据的元素定义选择策略。
可以使用浏览器提供的开发工具来实现这一目标。在 Chrome 中,右键单击感兴趣的 HTML 元素,然后选择“检查”(Inspect)选项。在这种情况下,对引文元素执行此操作。
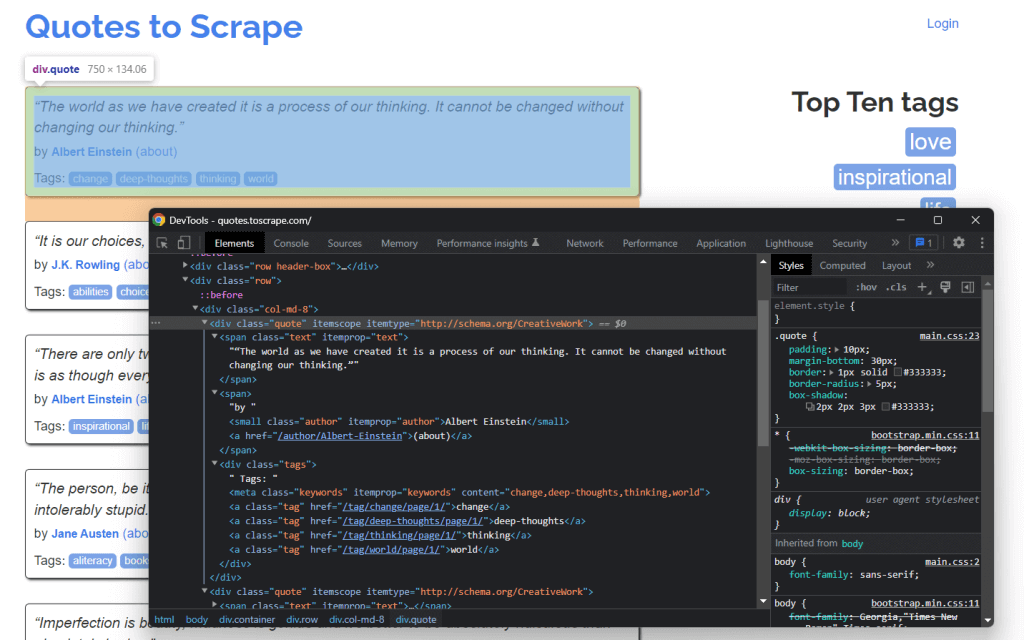
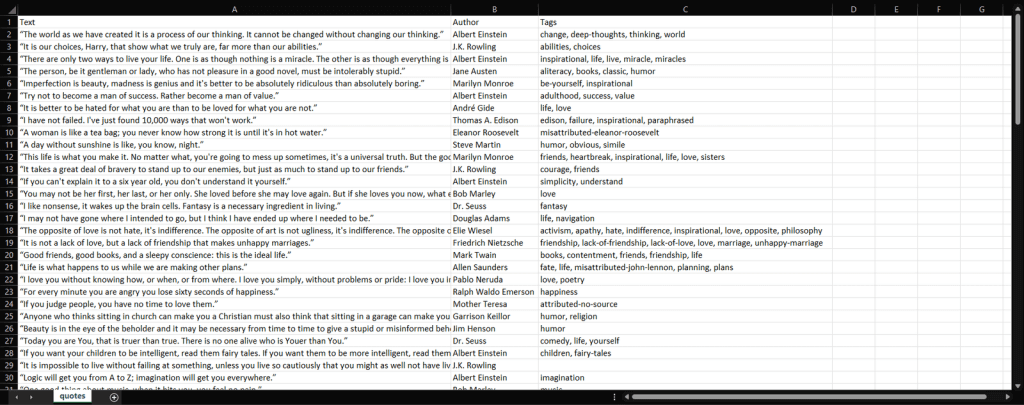
您可以从图上看到, quote <div> HTML HTML 元素由quote/引用类标识。这包含:
<span>HTML元素中的引用文本<small>HTML元素中的引用作者<div>元素中的标签列表,每个标签都包含<a>HTML元素中
具体而言,可以在 .quote 使用以下 CSS 选择器提取该数据:
.text.author.tags .tag
第 6 步:从元素中提取数据
首先,需要一个数据结构来存储所抓取的数据。因此,初始化一个数组变量。
quotes = []然后,通过应用之前定义的 .quote CSS 选择器,使用 soup 从 DOM 中提取引文元素:
quote_elements = soup.find_all('div', class_='quote')使用 find_all() 方法将返回所有列表
将 HTML 元素标识为引文类别。遍历引文列表以检索引文数据,如下所示:
for quote_element in quote_elements:
    # extract the text of the quote
    text = quote_element.find('span', class_='text').text
    # extract the author of the quote
    author = quote_element.find('small', class_='author').text

    # extract the tag <a> HTML elements related to the quote
    tag_elements = quote_element.select('.tags .tag')

    # store the list of tag strings in a list
    tags = []
    for tag_element in tag_elements:
        tags.append(tag_element.text)
Beautiful Soup find() 方法将检索感兴趣的单一 HTML 元素。由于与引文相关的标签字符串不止一个,因此应将其存储在列表中。
然后,可以将抓取的数据转换为字典,并将其附加到引文列表中,如下所示:
quotes.append(
    {
        'text': text,
        'author': author,
        'tags': ', '.join(tags) # merge the tags into a "A, B, ..., Z" string
    }
)
将数据存储在结构化字典中有助于访问和理解数据。
大功告成!刚刚学到的是如何从单一页面提取所有引文数据!不过,请记住,目标网站通常由多个网页组成。接下来,我们将学习如何爬取整个网站!
第 7 步:实现爬取逻辑
在主页底部,可以找到重定向到下一页的“下一步 →” HTML 元素。该 HTML 元素包含在除最后一页之外的所有页面上。这种情况在任何分页网站中都很常见。
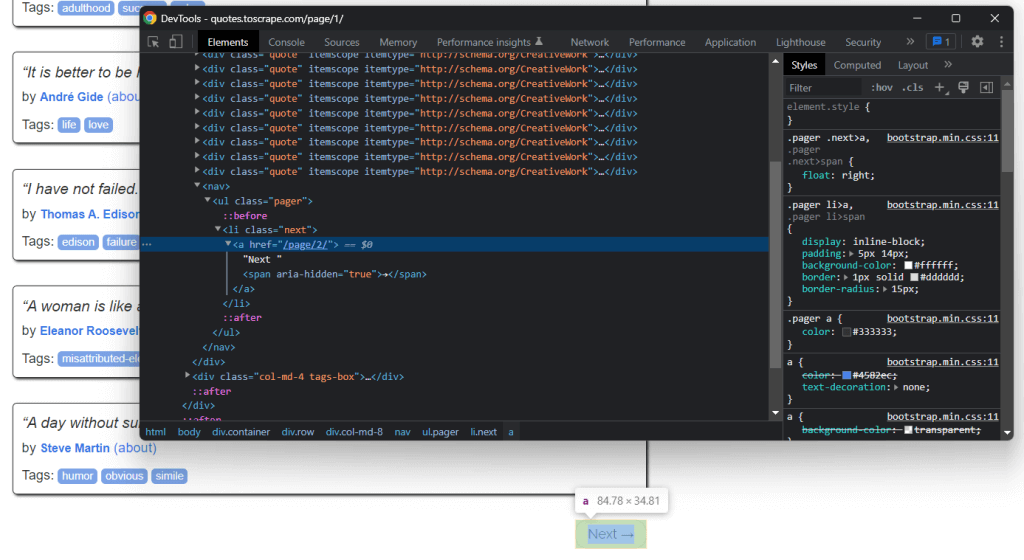
通过点击该 HTML 元素中包含的链接,即可轻松浏览整个网站。因此,从主页开始,了解如何浏览目标网站所包含的每个页面。所要做的就是查找 .next
可以按如下方式实现爬取逻辑:
# the URL of the home page of the target website
base_url = 'https://quotes.toscrape.com'

# retrieve the page and initializing soup...

# get the "Next →" HTML element
next_li_element = soup.find('li', class_='next')

# if there is a next page to scrape
while next_li_element is not None:
    next_page_relative_url = next_li_element.find('a', href=True)['href']

    # get the new page
    page = requests.get(base_url + next_page_relative_url, headers=headers)

    # parse the new page
    soup = BeautifulSoup(page.text, 'html.parser')

    # scraping logic...

    # look for the "Next →" HTML element in the new page
    next_li_element = soup.find('li', class_='next')
where 循环遍历每个页面,直到没有下一页。特别是,它会提取下一页的相关 URL,并用其创建要抓取的下一页 URL。然后,它会下载下一页。接下来,它将进行抓取并重复逻辑。
太棒了!现在你已经了解了如何抓取整个网站。下面要学习如何将提取的数据转换为更适用的格式,例如 CSV。
第 8 步:将所抓取的数据提取到 CSV 文件中
让我们看看如何将包含所抓取引文数据的字典列表导出到 CSV 文件中。可使用以下代码行实现这一目的:
import csv

# scraping logic...

# reading  the "quotes.csv" file and creating it
# if not present
csv_file = open('quotes.csv', 'w', encoding='utf-8', newline='')

# initializing the writer object to insert data
# in the CSV file
writer = csv.writer(csv_file)

# writing the header of the CSV file
writer.writerow(['Text', 'Author', 'Tags'])

# writing each row of the CSV
for quote in quotes:
    writer.writerow(quote.values())

# terminating the operation and releasing the resources
csv_file.close()
此代码段的作用是将字典列表中包含的引文数据写入 quotes.csv 文件中。请注意,csv 是 Python 标准库的一部分。因此,无需安装其他附属项,即可导入和使用。
具体而言,仅需使用 open() 创建一个 CSV 文件即可。随后,可以使用 csv 库中 Writer 对象的 writerow() 函数来进行填充。此操作会将每个引文字典写入 CSV 格式的代码行。
网站中所包含的原始数据已经变成了存储在 CSV 文件中的半结构化数据。数据提取过程已经结束,现在可以查看整个 Python 数据抓取工具。
第 9 步:整体组合
完整的数据抓取 Python 脚本如下所示:
import requests
from bs4 import BeautifulSoup
import csv

def scrape_page(soup, quotes):
    # retrieving all the quote <div> HTML element on the page
    quote_elements = soup.find_all('div', class_='quote')

    # iterating over the list of quote elements
    # to extract the data of interest and store it
    # in quotes
    for quote_element in quote_elements:
        # extracting the text of the quote
        text = quote_element.find('span', class_='text').text
        # extracting the author of the quote
        author = quote_element.find('small', class_='author').text

        # extracting the tag <a> HTML elements related to the quote
        tag_elements = quote_element.find('div', class_='tags').find_all('a', class_='tag')

        # storing the list of tag strings in a list
        tags = []
        for tag_element in tag_elements:
            tags.append(tag_element.text)

        # appending a dictionary containing the quote data
        # in a new format in the quote list
        quotes.append(
            {
                'text': text,
                'author': author,
                'tags': ', '.join(tags)  # merging the tags into a "A, B, ..., Z" string
            }
        )

# the url of the home page of the target website
base_url = 'https://quotes.toscrape.com'

# defining the User-Agent header to use in the GET request below
headers = {
    'User-Agent': 'Mozilla/5.0 (Windows NT 10.0; Win64; x64) AppleWebKit/537.36 (KHTML, like Gecko) Chrome/107.0.0.0 Safari/537.36'
}

# retrieving the target web page
page = requests.get(base_url, headers=headers)

# parsing the target web page with Beautiful Soup
soup = BeautifulSoup(page.text, 'html.parser')

# initializing the variable that will contain
# the list of all quote data
quotes = []

# scraping the home page
scrape_page(soup, quotes)

# getting the "Next →" HTML element
next_li_element = soup.find('li', class_='next')

# if there is a next page to scrape
while next_li_element is not None:
    next_page_relative_url = next_li_element.find('a', href=True)['href']

    # getting the new page
    page = requests.get(base_url + next_page_relative_url, headers=headers)

    # parsing the new page
    soup = BeautifulSoup(page.text, 'html.parser')

    # scraping the new page
    scrape_page(soup, quotes)

    # looking for the "Next →" HTML element in the new page
    next_li_element = soup.find('li', class_='next')

# reading  the "quotes.csv" file and creating it
# if not present
csv_file = open('quotes.csv', 'w', encoding='utf-8', newline='')

# initializing the writer object to insert data
# in the CSV file
writer = csv.writer(csv_file)

# writing the header of the CSV file
writer.writerow(['Text', 'Author', 'Tags'])

# writing each row of the CSV
for quote in quotes:
    writer.writerow(quote.values())

# terminating the operation and releasing the resources
csv_file.close()
如此处所示,通过不到 100 行代码即可构建一个网页抓取工具。此 Python 脚本能够爬取整个网站,自动提取网站所有数据,并将其导出为 CSV。
恭喜!你刚刚学会了如何使用 Requests 和 Beautiful Soup 构建 Python 网页抓取工具!
第 10 步:运行 Python 网页抓取脚本
如果你是 PyCharm 用户,请点击下方按钮运行脚本:

或者,在项目目录内的终端中启动以下 Python 命令:
python scraper.py等待该过程结束,现在您可以访问 quotes.csv文件。打开该文件,应该包含以下数据:
确实如此!现在,目标网站中包含的所有 100 条引文均以便于阅读的格式存放在同一文件中!
结语
在本教程中,你学到了什么是 Python 网页抓取、 需要哪些先决条件才能开始使用 Python 网页抓取,以及 Python 的最佳网页抓取库有哪些。然后,通过真实示例了解到了如何使用 Beautiful Soup 和 Requests 来构建网页抓取应用程序。正如你所了解的那样,只需几行代码即可进行 Python 网页抓取。
但是,网页抓取也带来了若干挑战。具体而言,反机器人技术和防抓取技术变得日益热门。而这将为代理服务器提供用武之地。
代理服务器可以充当在 X 的抓取脚本和目标页面之间的中间媒介。在接收到请求后,将其转发到目标服务器,接收响应,然后将其发送回来。这样,目标网站将看到代理服务器的 IP,而不是你的 IP。这意味着,你可以隐藏 IP 以维护声誉并保护隐私,避免禁令和地理限制。由于轮换代理的重要作用,你可以在每次请求时获得新的 IP,从而绕过速率限制系统。
剩下的就是选择一个可靠的提供商,可以助你访问拥有良好信誉 IP 的一流代理服务器。Bright Data 掌控着全球最热门的代理服务器,为财富 500 强企业和 2 万多家客户提供服务。其全球代理网络包括:
- 数据中心代理 — 来自数据中心的 77 万余 IP。
- 住宅代理 — 超过 7200 万个住宅 IP,覆盖 195 个以上的国家/地区。
- ISP 代理 — 来自 ISP 注册设备的超过 70 万个 IP。
常见问题
Python 不仅是网页抓取的良好选择,而且实际上通常认为是实现此目的的最佳语言之一。这要归功于它的可读性和较简易的学习曲线。尤为重要的是,它还拥有 IT 界最庞大的社区以及专为网页抓取而设计的各种库和工具。
是的,网页抓取和爬取是数据科学领域更为广泛的一部分。抓取/爬取是所有其他副产品的基础,这些副产品可以从结构化和非结构化数据中获得。其中包括分析、算法模型/输出、见解和“适用知识”。
使用 Python 从网站抓取数据需要检查目标 URL 的页面、识别要提取的数据、编写和运行数据提取代码,最后以所需格式存储数据。
构建 Python 数据抓取器的第一步是使用字符串方法解析网站数据,然后使用 HTML 解析器解析网站数据,最后与必要的表单和网站组件进行交互。


技术写作
 5.5 years experience
Antonello是一名软件工程师,但他更喜欢称自己为技术传教士。通过写作传播知识是他的使命。